Acer PE320QK driver and firmware

Related Acer PE320QK Manual Pages
Download the free PDF manual for Acer PE320QK and other Acer manuals at ManualOwl.com
User Manual - Page 4
... never be placed near or over a radiator or heat register, or in a built-in installation unless proper ventilation is provided.
• Never push objects of any kind into this product through...devices that may interfere with the performance of this product. • Use the product only with the supplied power supply cord set. If you need to replace the
power cord set, make sure that the new power...
User Manual - Page 7

... your display in such a way that the side faces the window or ...computer use more relaxing and productive: • Take short breaks regularly and often. • Perform some stretching exercises. • Breathe fresh air as often as possible. • Exercise regularly and maintain a healthy body.
Acer monitor is purposed for video and visual display of information obtained from electronic devices...
User Manual - Page 10
... Using electrical power iii Product servicing iii Potentially explosive environments iv Additional safety information iv IT Equipment Recycling Information iv Disposal instructions iv LCD ...Pivot...3 Monitor shading hood installation 4 Monitor introduction...7 Front view...7 Connecting the cables 8 Connecting the adapter and AC Power cord 9 Power saving...9 Display Data Channel (DDC 10 ...
User Manual - Page 15
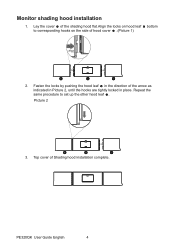
Monitor shading hood installation
1. Lay the cover a of the shading hood flat.Align the locks on hood leaf b bottom to corresponding hooks on the side ... of the arrow as indicated in Picture 2, until the hooks are tightly locked in place. Repeat the same procedure to set up the other hood leaf c .
Picture 2
b
a
c
3. Top cover of Shading hood installation complete.
PE320QK User Guide English
4
User Manual - Page 17
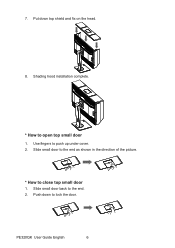
7. Put down top shield and fix on the head. 8. Shading hood installation complete.
* How to open top small door
1. Use fingers to push up under cover. 2. Slide small door to the end as shown in the direction of the picture.
* How to close top small door
1. Slide small door back to the end. 2. Push down to lock the door.
PE320QK User Guide English
6
User Manual - Page 19
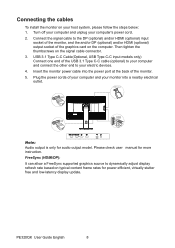
... end to your electric devices. 4. Insert the monitor power cable into the power port at the back of the monitor. 5. Plug the power cords of your computer and your monitor into a nearby electrical outlet.
USB Type C
USB
DP
Note: Audio output is only for audio output model. Please check user manual for more instruction. FreeSync (HDMI/DP): It can allow a FreeSync supported graphics source to...
User Manual - Page 20
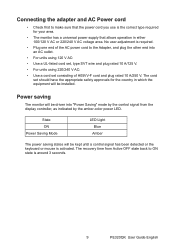
... control signal from the display controller, as indicated by the amber-color power LED.
State ON Power Saving Mode
LED Light Blue Amber
The power saving states will be kept until a control signal has been detected or the keyboard or mouse is activated. The recovery time from Active OFF state back to ON state is around 3 seconds.
9
PE320QK User Guide...
User Manual - Page 21
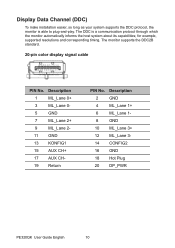
... make installation easier, so long as your system supports the DDC protocol, the monitor is able to plug-and-play. The DDC is a communication protocol through which the monitor automatically informs the host system about its capabilities; for example, supported resolutions and corresponding timing. The monitor supports the DDC2B standard.
20-pin color display signal cable
PIN...
User Manual - Page 27
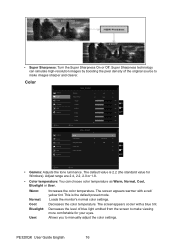
... is the default preset mode.
Normal: Loads the monitor's normal color settings.
Cool:
Decreases the color temperature. The screenappears cooler with a blue tint.
Bluelight: Decreases the level of blue light emitted from the screen to make viewing more comfortable for your eyes.
User:
Allows you to manually adjust the color settings.
PE320QK User Guide English
16
User Manual - Page 30
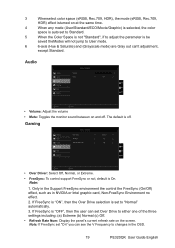
...; Over Driver: Select Off, Normal, or Extreme.
• FreeSync: To control support FreeSync or not, default is On. Note:
1. Only in the Support FreeSync environment the control the FreeSync (On/Off) effect, such as in NVIDIA or Intel graphic card, Non-FreeSync Environment no effect.
2. If FreeSync is "ON", then the Over Drive selection is set to "Normal...
User Manual - Page 32
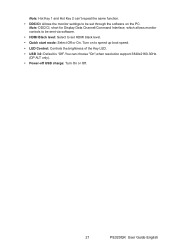
... to set HDMI black level.
• Quick start mode: Select Off or On. Turn on to speed up boot speed.
• LED Control: Controls the brightness of the Key LED.
• USB 3.0: Default is "Off".You can choose "On",when resolution support 3840x2160-30Hz. (DP ALT only).
• Power-off USB charge: Turn On or Off.
21
PE320QK User Guide English