Acer X173 driver and firmware


Related Acer X173 Manual Pages
Download the free PDF manual for Acer X173 and other Acer manuals at ManualOwl.com
X173 LCD Service Guide - Page 3
... in a retrieval system, or translated into any language or computer language, in any form or by any means, electronic, mechanical, magnetic, optical, chemical, manual or otherwise, without the prior written permission of Acer Incorporated.
Disclaimer The information in this guide is subject to change without notice. Acer Incorporated makes no representations or warranties, either expressed or...
X173 LCD Service Guide - Page 4
... FRU list of this printed Service Guide. You MUST use the list provided by your regional Acer office to order FRU parts for repair and service of customer machines.
Warning: (For FCC Certified Models)
Note: This equipment has been tested and found to comply with the limits for a Class B digital device, pursuant to Part 15 of...
X173 LCD Service Guide - Page 5
...power outlet as a safety feature. If your outlet does not accommodate the three-wire plug, have an electrician install the correct outlet, or use an adapter...servicing to qualified service personnel z To ensure satisfactory operation, use the monitor only with UL listed computers which have appropriate configured receptacles marked between 100 - 240V AC, Min. 5A. z The wall socket shall be installed...
X173 LCD Service Guide - Page 6
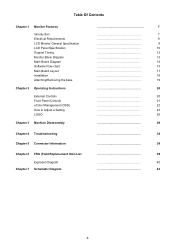
... Requirements LCD Monitor General Specification LCD Panel Specification Support Timing Monitor Block Diagram Main Board Diagram Software Flow chart Main Board Layout Installation Attaching/Removing the base
Chapter 2 Operating Instructions
External Controls Front Panel Controls eColor Management (OSD) How to Adjust a Setting LOGO
Chapter 3 Machine Disassembly
Chapter 4 Troubleshooting
Chapter...
X173 LCD Service Guide - Page 16
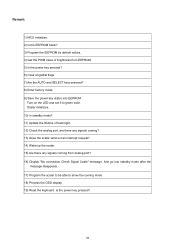
... AUTO and SELECT keys pressed? 8) Enter factory mode. 9) Save the power key status into EEPROM.
Turn on the LED and set it to green color. Scalar initializes. 10) In standby mode? 11) Update the lifetime of back light. 12) Check the analog port, are there any signals coming? 13) Does the scalar send out...
X173 LCD User's Guide EN - Page 2
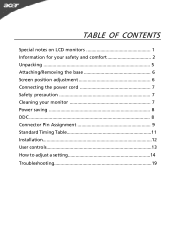
... OF CONTENTS
Special notes on LCD monitors 1 Information for your safety and comfort 2 Unpacking 5 Attaching/Removing the base 6 Screen position adjustment 6 Connecting the power cord 7 Safety precaution 7 Cleaning your monitor 7 Power saving 8 DDC 8 Connector Pin Assignment 9 Standard Timing Table 11 Installation 12 User controls 13 How to adjust a setting 14 Troubleshooting 19
X173 LCD User's Guide EN - Page 4
X173
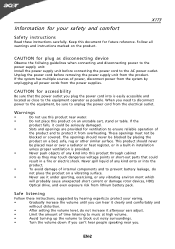
Information for your safety and comfort
Safety instructions
Read these instructions carefully. Keep this document for future reference. Follow all warnings and instructions marked on the product.
CAUTION for plug as disconnecting device
Observe the follwing guidelines when connecting and disconnecting power to the power supply unit: Install the power supply unit before connecting the power ...
X173 LCD User's Guide EN - Page 6
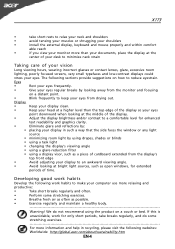
... a piece of cardboard extended from the display's
top front edge
•
Avoid adjusting your display to an awkward viewing angle.
•
Avoid looking at bright light sources, such as open windows, for extended
periods of time.
Developing good work habits
Develop the following work habits to make your computer use more relaxing and
productive...
X173 LCD User's Guide EN - Page 8
X173
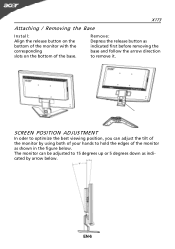
Attaching / Removing the Base
Install: Align the release button on the bottom of the monitor with the corresponding slots on the bottom of the base.
Remove: Depress the release button ...
X173 LCD User's Guide EN - Page 9
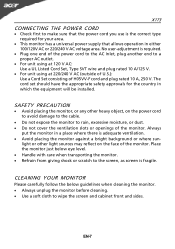
... and plug rated 10 A, 250 V. The cord set should have the appropriate safety approvals for the country in which the equipment will be installed.
SAFETY PRECAUTION
· Avoid placing the monitor, or any other heavy object, on the power cord to avoid damage to the cable.
· Do not expose the monitor to rain...
X173 LCD User's Guide EN - Page 10

X173
Power saving
The monitor will be driven into Power Saving" mode by the control signal from the display controller, as indicated by the amber-color power LED.
State
ON Power Saving
Mode
LED Light Blue
Amber
The power saving states will be kept until a control signal has been detected or the keyboard or mouse is activated. The recovery time from Active...
X173 LCD User's Guide EN - Page 13
X173
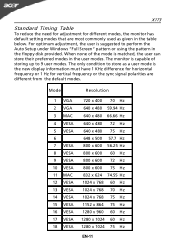
Standard Timing Table
To reduce the need for adjustment for different modes, the monitor has default setting modes that are most commonly used as given in the table below. For optimum adjustment, the user is suggested to perform the Auto Setup under Windows "Full Screen" pattern or using the pattern in the floppy disk provided...
X173 LCD User's Guide EN - Page 14
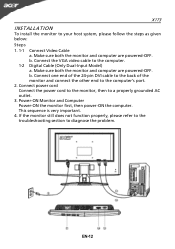
... both the monitor and computer are powered-OFF. b. Connect the VGA video cable to the computer. 1-2 Digital Cable (Only Dual-Input Model) a. Make sure both the monitor and computer are powered-OFF. b. Connect one end of the 24-pin DVI cable to the back of the monitor and connect the other end to the computer's port. 2. Connect power cord Connect the power cord to the...
X173 LCD User's Guide EN - Page 16
X173
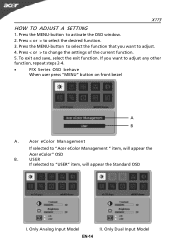
HOW TO ADJUST A SETTING
1. Press the MENU-button to activate the OSD window. 2. Press < or > to select the desired function. 3. Press the MENU-button to select the function that you want to adjust. 4. Press < or > to change the settings... on front bezel
A B
A.
Acer eColor Management
If selected to "Acer eColor Management " item, will appear the
Acer eColor" OSD
B.
USER
If selected...
X173 LCD User's Guide EN - Page 23
... is connected.
•
Consult the dealer or an experienced radio/television technician for help.
Notice: Shielded cables
All connections to other computing devices must be made using shielded cables to maintain compliance with FCC regulations.
Notice: Peripheral devices
Only peripherals (input/output devices, terminals, printers, etc.) certified to comply with the Class B limits may be...