Asus H110S2/CSM driver and firmware

Related Asus H110S2/CSM Manual Pages
Download the free PDF manual for Asus H110S2/CSM and other Asus manuals at ManualOwl.com
User Guide - Page 2
... the express written permission of ASUSTeK COMPUTER INC. ("ASUS"). Product warranty or service will not be extended if: (1) the product is repaired, modified or altered, unless such repair, modification of alteration is authorized in writing by ASUS; or (2) the serial number of the product is defaced or missing. ASUS PROVIDES THIS MANUAL "AS IS" WITHOUT WARRANTY OF...
User Guide - Page 4
... try to fix it by yourself. Contact a qualified service technician or your retailer.
Operation safety
• Before installing the motherboard and adding components, carefully read all the manuals that came with the package.
• Before using the product, ensure all cables are correctly connected and the power cables are not damaged. If you detect any damage, contact...
User Guide - Page 5
... updates.
1. ASUS websites
The ASUS website provides updated information on ASUS hardware and software products. Refer to the ASUS contact information.
2. Optional documentation
Your product package may include optional documentation, such as warranty flyers, that may have been added by your dealer. These documents are not part of the standard package.
Conventions used in this guide
To ensure...
User Guide - Page 7
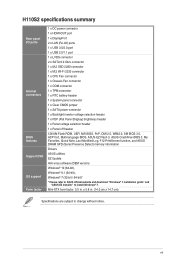
...F12 PrintScreen function, and ASUS DRAM SPD (Serial Presence Detect) memory information Drivers ASUS utilities EZ Update Anti-virus software (OEM version) Windows® 10 (64-bit), Windows® 8.1 (64-bit), Windows® 7 (32-bit / 64-bit)* * Please refer to ASUS official website and download "Windows® 7 installation guide" and
"ASUS EZ installer" to install Windows® 7. Mini-STX form...
User Guide - Page 8
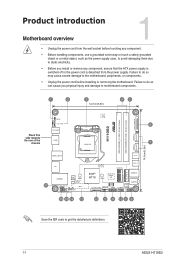
...
MIC IN
17
DP
LAN12
Intel® I219V 2280
Realtek® 8111H
BLKT_PWR_SEL
LVDS
BATT_CON VCC_PWR_SEL PANEL_SW
16 15 14 13
ASM1480
M.2(WIFI)
USB3_C1
M2_TYPE_M
Intel® H110
2230
Super I/O
CHA_FAN LCD_BLKT_PANEL
128Mb BIOS
TPM
F_PANEL
USB3_3
AUDIO ALC 3236
COM
12 2 11 10 9 8
Scan the QR code to get the detailed pin definitions.
1-1
ASUS H110S2
User Guide - Page 9
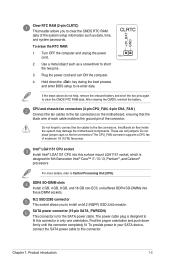
... to connect the fan cables to the fan connectors. Insufficient air flow inside the system may damage the motherboard components. These are not jumpers! Do not place jumper caps on the fan connectors! The CPU_FAN connector supports a CPU fan of maximum 1A (12 W) fan power.
Intel® LGA1151 CPU socket
Install Intel® LGA1151 CPU into this surface...
User Guide - Page 10
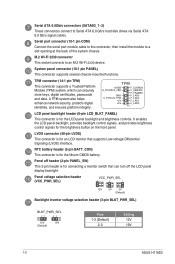
... to Serial ATA 6.0 Gb/s hard disk drives via Serial ATA 6.0 Gb/s signal cables.
Serial port connector (10-1 pin COM)
Connect the serial port module cable to this connector, then install the module to a slot opening at the back of the system chassis.
M.2 Wi-Fi 2230 connector This socket connects to an M.2 Wi-Fi 2230 device.
System panel connector (10-1 pin PANEL) This connector supports several...
User Guide - Page 11
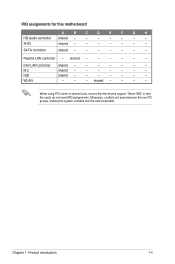
... Audio controller shared -
-
-
-
-
-
-
XHCI
shared -
-
-
-
-
-
-
SATA controller
shared -
-
-
-
-
-
-
Realtek LAN controller - shared -
-
-
-
-
-
Intel LAN controller shared -
-
-
-
-
-
-
M.2
shared -
-
-
-
-
-
-
IGD
shared -
-
-
-
-
-
-
WLAN
-
-
- shared -
-
-
-
When using PCI cards on shared slots, ensure that the drivers support "Share...
User Guide - Page 12
...-rated adapter (above 90W) when a high-rated CPU (45W or higher CPU) is installed on the system.
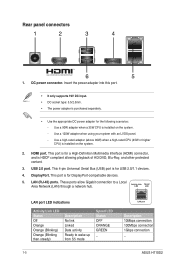
2. HDMI port. This port is for a High-Definition Multimedia Interface (HDMI) connector, and is HDCP compliant allowing playback of HD DVD, Blu-Ray, and other protected content.
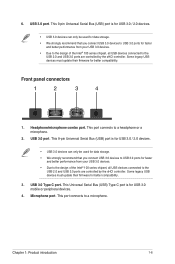
3. USB 2.0 port. This 4-pin Universal Serial Bus (USB) port is for USB 2.0/1.1 devices.
4. DisplayPort. This port is...
User Guide - Page 13
... the Intel® 100 series chipset, all USB devices connected to the
USB 2.0 and USB 3.0 ports are controlled by the xHCI controller. Some legacy USB devices must update their firmware for better compatibility.
3. USB 3.0 Type C port. This Universal Serial Bus (USB) Type C port is for USB 3.0 mobile or peripheral devices.
4. Microphone port. This port connects to a microphone.
Chapter 1: Product...
User Guide - Page 14
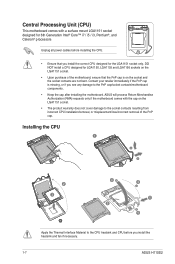
...; i7 / i5 / i3, Pentium®, and Celeron® processors
Unplug all power cables before installing the CPU.
• Ensure that you install the correct CPU designed for the LGA1151 socket only. DO NOT install a CPU designed for LGA1150, LGA1155 and LGA1156 sockets on the LGA1151 socket.
• Upon purchase of the motherboard, ensure that the PnP cap is on the...
User Guide - Page 15
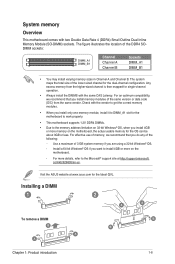
... you install memory modules of the same version or data code (D/C) from the same vendor. Check with the vendor to get the correct memory modules.
• When you install only one memory module, install it to DIMM_A1 slot for the motherboard to work properly.
• This motherboard supports 1.2V DDR4 DIMMs.
• Due to the memory address limitation on 32-bit Windows®...
User Guide - Page 16
... using the ASUS CrashFree BIOS 3 utility, rename the
BIOS file in the removable device into H110S2.CAP.
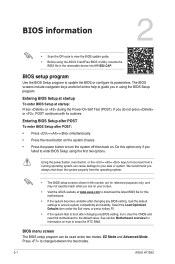
BIOS setup program
Use the BIOS Setup program to update the BIOS or configure its parameters. The BIOS screens include navigation keys and brief online help to guide you in using the BIOS Setup program.
Entering BIOS Setup at startup To enter BIOS Setup at startup: Press or during the Power-On...
User Guide - Page 17
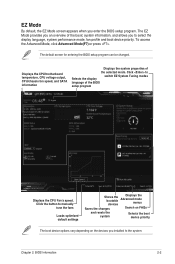
... the CPU/motherboard temperature, CPU voltage output, CPU/chassis fan speed, and SATA information
Displays the system properties of
the selected mode. Click to
Selects the display
switch EZ System Tuning modes
language of the BIOS
setup program
Displays the CPU Fan's speed. Click the button to manually tune the fans
Loads optimized default settings
Shows the bootable devices
Displays the...
User Guide - Page 18
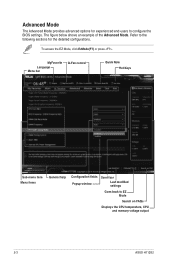
... for the detailed configurations.
To access the EZ Mode, click EzMode(F7) or press .
MyFavorite
Language Menu bar
Q-Fan control
Quick Note Hot Keys
Sub-menu item Menu items
General help
Configuration fields Popup window
Scroll bar
Last modified settings
Goes back to EZ Mode
Search on FAQs
Displays the CPU temperature, CPU and memory voltage output
2-3
ASUS H110S2
User Guide - Page 19
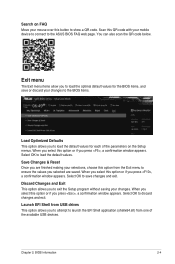
... exit the Setup program without saving your changes. When you select this option or if you press , a confirmation window appears. Select OK to discard changes and exit.
Launch EFI Shell from USB drives This option allows you to attempt to launch the EFI Shell application (shellx64.efi) from one of the available USB devices.
Chapter 2: BIOS Information
2-4
User Guide - Page 20
... an experienced radio/TV technician for help.
The use of shielded cables for connection of the monitor to the graphics card is required to assure compliance with FCC regulations. Changes or modifications to this unit not expressly approved by the party responsible for compliance could void the user's authority to operate this equipment.
A-1
ASUS H110S2
User Guide - Page 22
....apache.org/licenses/LICENSE-2.0 Unless required by applicable law or agreed to in writing, software distributed under the License is distributed on an "AS IS" BASIS, WITHOUT WARRANTIES OR CONDITIONS OF ANY KIND, either express or implied. See the License for the specific language governing permissions and limitations under the License.
A-3
ASUS H110S2