Asus Q500A driver and firmware
Related Asus Q500A Manual Pages
Download the free PDF manual for Asus Q500A and other Asus manuals at ManualOwl.com
User Guide for English Edition - Page 1
E7495
Notebook PC
User Guide for Windows® 8
e7495_Win8_User_Guide.indd 1
8/13/12 2:47:52 PM
User Guide for English Edition - Page 2
... CHANGE AT ANY TIME WITHOUT NOTICE, AND SHOULD NOT BE CONSTRUED AS A COMMITMENT BY ASUS. ASUS ASSUMES NO RESPONSIBILITY OR LIABILITY FOR ANY ERRORS OR INACCURACIES THAT MAY APPEAR IN THIS MANUAL, INCLUDING THE PRODUCTS AND SOFTWARE DESCRIBED IN IT.
Copyright © 2012 ASUSTeK COMPUTER INC. All Rights Reserved.
e7495_Win8_User_Guide.indd 2
8/13/12 2:47:52 PM
User Guide for English Edition - Page 4
Contents
About this user guide 5 Icons ...5 Messages...5 Typography...5
Before upgrading to Windows® 8 6 Using Windows® 8 for the first time 7 Starting up Windows® 8 8 Windows® UI...9
Start screen...9 Windows® apps 9 Hotspots...10 Working with Windows® apps 12 Launching apps 12 Closing apps...12 Customizing apps on the Start Screen 12 Accessing All Apps 13 ...
User Guide for English Edition - Page 5
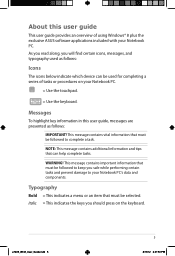
About this user guide
This user guide provides an overview of using Windows® 8 plus the exclusive ASUS software applications included with your Notebook PC. As you read along, you will find certain icons, messages, and typography used as follows:
Icons
The icons below indicate which device can be used for completing a series of tasks or procedures...
User Guide for English Edition - Page 6
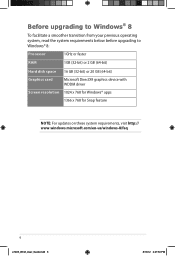
... system requirements below before upgrading to Windows® 8:
Processor
1GHz or faster
RAM
1GB (32-bit) or 2 GB (64-bit)
Hard disk space 16 GB (32-bit) or 20 GB (64-bit)
Graphics card
Microsoft DirectX9 graphics device with WDDM driver
Screen resolution 1024 x 768 for Windows® apps
1366 x 768 for Snap feature
NOTE: For updates on these system requirements...
User Guide for English Edition - Page 7
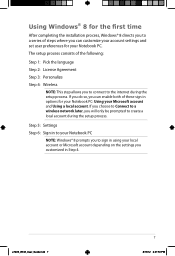
... the installation process, Windows® 8 directs you to a series of steps where you can customize your account settings and set user preferences for your Notebook PC.
The setup process consists of the following:
Step 1: Pick the language
Step 2: License Agreement
Step 3: Personalize
Step 4: Wireless
NOTE: This step allows you to connect to the internet during the setup process...
User Guide for English Edition - Page 8

... Down, Sleep, or Hibernate mode, refer to the following steps:
1. Press the power button on your Notebook PC .
2. The Windows® 8 lock screen appears after the Notebook PC boots up. Click on the ...
4. The Start screen appears next, indicating that you have successfully signed in to Windows® 8.
NOTE: Steps 2-4 are also applicable when restarting your Notebook PC.
e7495_Win8_User_Guide.indd 8
8/13/12 ...
User Guide for English Edition - Page 9
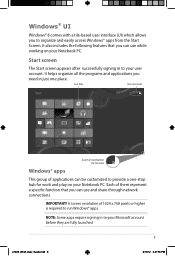
... all the programs and applications you
need in just one place.
live tiles
User account
Windows® apps
Zoom in/out button for live tiles
This group of applications can be ... a specific function that you can use and share through network connections.
IMPORTANT! A screen resolution of 1024 x 768 pixels or higher is required to run Windows® apps.
NOTE: Some apps require signing in to...
User Guide for English Edition - Page 12
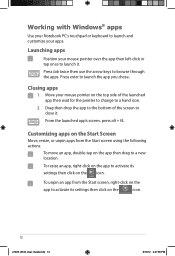
Working with Windows® apps
Use your Notebook PC's touchpad or keyboard to launch and customize your apps.
Launching apps
Position your mouse pointer over the app ...move an app, double-tap on the app then drag to a new location.
To resize an app, right-click on the app to activate its
settings then click on the icon.
To unpin an app from the Start screen, right-click on the
app to activate its...
User Guide for English Edition - Page 13
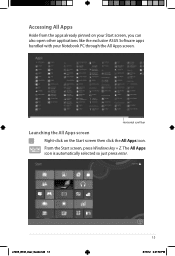
... already pinned on your Start screen, you can also open other applications like the exclusive ASUS Software apps bundled with your Notebook PC through the All Apps screen.
Horizontal scroll bar
Launching ... the Start screen then click the All Apps icon. From the Start screen, press Windows key + Z. The All Apps icon is automatically selected so just press enter.
e7495_Win8_User_Guide.indd 13
13
8/...
User Guide for English Edition - Page 15
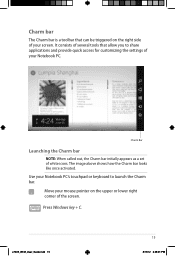
... It consists of several tools that allow you to share applications and provide quick access for customizing the settings of your Notebook PC.
Charm Bar
Launching the Charm bar
NOTE: When called out, the Charm bar initially appears as... the Charm bar.
Move your mouse pointer on the upper or lower right corner of the screen.
Press Windows key + C.
e7495_Win8_User_Guide.indd 15
15
8/13/12 2:48:01 PM
User Guide for English Edition - Page 17

... simultaneously on your Notebook PC. Once activated, the Snap bar appears to divide your display into two.
IMPORTANT! A screen resolution of at least 1366 x 768 pixels is required to use the Snap feature.
Snap...drag then drop
the app to the right or left side of the display panel.
Launch an app then press the Windows key + . to activate the Snap bar. The first app would automatically be placed...
User Manual - Page 5
USB Charger 71 Instant On...73
Chapter 5: Upgrading your Notebook PC Installing a Random Access Memory (RAM) module 76 Replacing the Hard Disk Drive (HDD 78 Replacing the battery pack 80
Chapter 6: Troubleshooting your Notebook PC
Appendices
Notebook PC E-Manual
User Manual - Page 6
... the different parts of your Notebook PC, including the BIOS.
Chapter 3: Working with Windows® 8 This chapter provides an overview of using Windows® 8 in your Notebook PC.
Chapter 4: ASUS Apps This chapter features the ASUS apps included with your Notebook PC.
Chapter 5: Upgrading your Notebook PC This chapter guides you through the process of replacing and...
User Manual - Page 27

... BIOS Setup.
• You have installed a new system component that requires further BIOS settings or updates.
WARNING: Using inappropriate BIOS settings may result to system instability or boot failure. We strongly recommend that you change the BIOS settings only with the help of a trained service personnel.
Accessing BIOS
Restart your Notebook PC then press
during POST.
Notebook PC E-Manual...
User Manual - Page 33
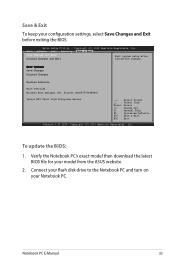
....
F1 : General Help
F9 : Optimized Defaults
F10 : Save & Exit
ESC : Exit
Version 2.15.1226. Copyright (C) 2012 American Megatrends, Inc.
To update the BIOS:
1. Verify the Notebook PC's exact model then download the latest BIOS file for your model from the ASUS website.
2. Connect your flash disk drive to the Notebook PC and turn on your Notebook PC.
Notebook PC...
User Manual - Page 76
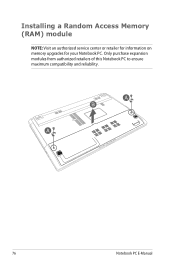
Installing a Random Access Memory (RAM) module
NOTE: Visit an authorized service center or retailer for information on memory upgrades for your Notebook PC. Only purchase expansion modules from authorized retailers of this Notebook PC to ensure maximum compatibility and reliability.
76
Notebook PC E-Manual
User Manual - Page 82
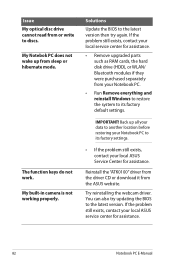
... camera is not working properly.
Solutions
Update the BIOS to the latest version then try again. If the problem still exists, contact your local service center for assistance.
• Remove upgraded parts such as RAM cards, the hard disk drive (HDD), or WLAN/ Bluetooth modules if they were purchased separately from your Notebook PC.
• Run Remove everything and reinstall Windows...
User Manual - Page 92
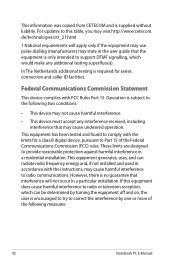
This information was copied from CETECOM and is supplied without liability. For updates to this table, you may visit http://www.cetecom. de/technologies/ctr_21.html
1 National requirements will apply only if the equipment may use pulse dialling (manufacturers may state in the user guide that the equipment is only intended to support DTMF signalling...
User Manual - Page 95
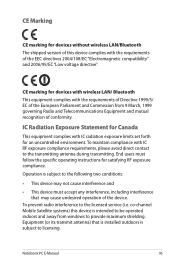
... interference, including interference that may cause undesired operation of the device.
To prevent radio interference to the licensed service (i.e. co-channel Mobile Satellite systems) this device is intended to be operated indoors and away from windows to provide maximum shielding. Equipment (or its transmit antenna) that is installed outdoors is subject to licensing.
Notebook PC E-Manual
95