Asus X71Vn - Core 2 Duo 2.4 GHz driver and firmware
Drivers and firmware downloads for this Asus item

Related Asus X71Vn Manual Pages
Download the free PDF manual for Asus X71Vn and other Asus manuals at ManualOwl.com
User Manual - Page 3
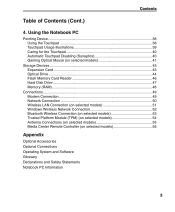
... Touchpad Disabling (Synaptics 40 Gaming Optical Mouse (on selected models 41
Storage Devices 43 Expansion Card 43 Optical Drive 44 Flash Memory Card Reader 46 Hard Disk Drive 47 Memory (RAM 48
Connections 49 Modem Connection 49 Network Connection 50 Wireless LAN Connection (on selected models 51 Windows Wireless Network Connection 52 Bluetooth Wireless Connection (on selected models...
User Manual - Page 9
1 Introducing the Notebook PC
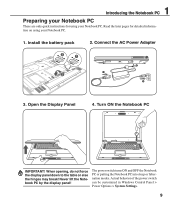
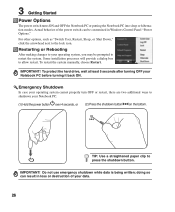
Preparing your Notebook PC
These are only quick instructions for using your Notebook PC. Read the later pages for detailed informa-
tion on using your Notebook PC.
1. Install the battery pack
2. Connect the AC Power Adapter
3
1
2
2
3. Open the Display Panel
4. Turn ON the Notebook PC
Power Options > System Settings.
User Manual - Page 13
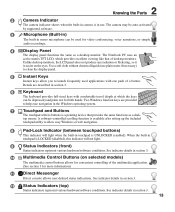
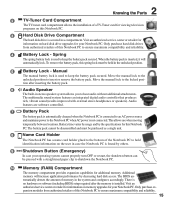
2 Knowing the Parts
2
Camera Indicator
The camera indicator shows when the built-in camera is in use. The camera may be auto-activated
by supported software.
3
Microphone (Built-in)
The built-in mono microphone can be used for video conferencing, voice narrations, or simple
audio recordings.
4
Display Panel
The display panel functions the same as a desktop monitor. The Notebook PC uses ...
User Manual - Page 15
... will increase application performance by decreasing hard disk access. The BIOS automatically detects the amount of memory in the system and configures accordingly. There is no hardware or software (including BIOS) setup required after the memory is installed. Visit an authorized service center or retailer for information on memory upgrades for your Notebook PC. Only purchase expansion modules...
User Manual - Page 17
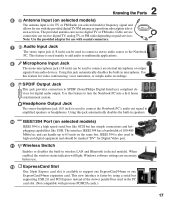
... the built-in wireless LAN and Bluetooth (selected models). When enabled, the wireless status indicator will light. Windows software settings are necessary before use.
12 ExpressCard Slot
One 26pin Express card slot is available to support one ExpressCard/34mm or one ExpressCard/54mm expansion card. This new interface is faster by using a serial bus supporting USB 2.0 and PCI Express instead of...
User Manual - Page 18
... any software player or by right clicking the optical drive in
Windows "Computer" and selecting Eject.
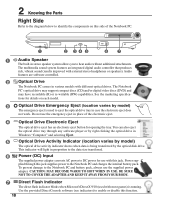
5
Optical Drive Activity Indicator (location varies by model)
The optical drive activity indicator shows when data is being transferred by the optical disk drive.
This indicator will light in proportion to the data size transferred.
6
Power (DC) Input
The supplied power adapter converts...
User Manual - Page 24
... BIOS version can be seen. Press [ESC] and you will be presented with a boot menu with selections to boot from your available drives.
NOTE: Before bootup, the display panel flashes when the power is turned ON. This is part of the Notebook PC's test routine and is not a problem with the display.
IMPORTANT! To protect the hard disk drive...
User Manual - Page 26
... can be customized in Windows Control Panel "Power Options." For other options, such as "Switch User, Restart, Sleep, or Shut Down," click the arrowhead next to the lock icon.
Restarting or Rebooting
After making changes to your operating system, you may be prompted to restart the system. Some installation processes will provide a dialog box...
User Manual - Page 45
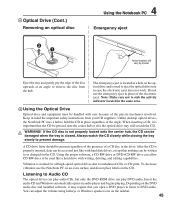
...important safety instructions from your CD suppliers. Unlike desktop optical drives, the Notebook...Audio CD
The optical drives can play audio CDs, but only the DVD-ROM drive can play DVD audio. Insert the audio CD and Windows automatically opens an audio player and begins playing. Depending on the DVD audio disc and installed software, it may require that you open a DVD player to listen to DVD audio...
User Manual - Page 48
4 Using the Notebook PC
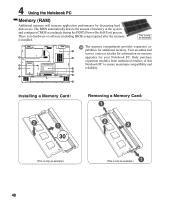
Memory (RAM)
Additional memory will increase application performance by decreasing hard disk access. The BIOS automatically detects the amount of memory in the system and configures CMOS accordingly during the POST (Power-On-Self-Test) process. There is no hardware or software (including BIOS) setup required after the memory is installed.
This is only an example.
10
9 8
...
User Manual - Page 49
4 Using the Notebook PC
Connections
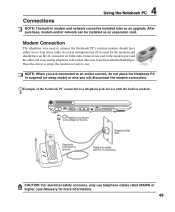
NOTE: The built-in modem and network cannot be installed later as an upgrade. After purchase, modem and/or network can be installed as an expansion card.
Modem Connection
The telephone wire used to connect the Notebook PC's internal modem should have either two or four wires (only two wires (telephone line #1) is used by the...
User Manual - Page 56

... software must be installed).
The Media Center on-screen menus are designed for remote control interaction, providing users with a convenient and engaging way to access digital media from across the room. A Media Center remote control functions like a remote control for any other consumer electronics device, such as an audio/video receiver or DVD player. A Media Center remote control includes...
User Manual - Page 64
... provided by the native operating system. If updates or replacement of the support disc is necessary, contact your dealer for web sites to download individual software drivers and utilities.
The support disc contains all drivers, utilities and software for all popular operating systems including those that have been pre-installed. The support disc does not include the operating system itself...
User Manual - Page 67
... the "ATK0100" driver from the driver CD or download it from the ASUS website.
Hardware Problem - Built-in Camera
The built-in camera does not work correctly. 1. Check "Device Manager" to see if there are any problems. 2. Try reinstalling the webcam driver to solve the problem. 3. If the problem is not solved, update the BIOS to the latest version and try...
User Manual - Page 69
...-install them in Windows Safe Mode. 3. Check your system for viruses. 4. Update the BIOS to the latest version with WINFLASH in Windows or AFLASH in DOS mode. These utilities and BIOS files can be downloaded from the ASUS website. (WARNING: Make sure your Notebook PC does not loose power during the BIOS flashing process.) 5. If problem still cannot be solved, use the recovery...
User Manual - Page 70
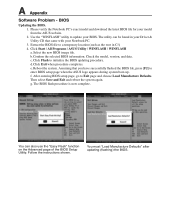
... found in your Driver & Utility CD that came with your Notebook PC. 3. Extract the BIOS file to a temporary location (such as the root in C:\) 4. Click Start | All Programs | ASUS Utility | WINFLASH | WINFLASH a. Select the new BIOS image file. b. Confirm the selected BIOS information. Check the model, version, and data. c. Click Flash to initialize the BIOS updating procedure. d. Click Exit...
User Manual - Page 71
..., install NIS again, use "Live Update" and update the virus definition file.
3. Norton accidently blocks desired web pages or reduces download speeds. Change the security configuration to a lower level. NIS scans virus while downloading data so network speed will be decreased.
4. Cannot login to MSN or Yahoo messenger services. Make sure NIS has been updated and also update the Windows system...
User Manual - Page 72
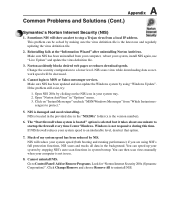
... Problems and Solutions (Cont.)
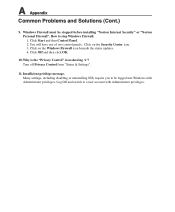
9. Windows Firewall must be stopped before installing "Norton Internet Security" or "Norton Personal Firewall". How to stop Windows Firewall: 1. Click Start and then Control Panel. 2. You will have one of two control panels. Click on the Security Center icon. 3. Click on the Windows Firewall icon beneath the status updates. 4. Click Off and then click...
User Manual - Page 73
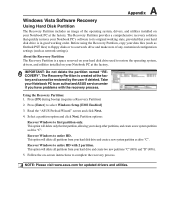
... delete all partitions from your hard disk drive and create a new system partition as drive "C".
Recover Windows to entire HD with 2 partition. This option will delete all partitions from your hard drive and create two new partitions "C" (60%) and "D" (40%).
5. Follow the on-screen instructions to complete the recovery process.
NOTE: Please visit www.asus.com for updated drivers and utilities.
User Manual - Page 74
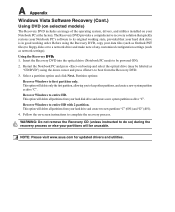
... good working order. Before using the Recovery DVD, copy your data files (such as Outlook PST files) to floppy disks or to a network drive and make note of any customized configuration settings (such as network settings).
Using the Recovery D�V��D��: 1. Insert the Recovery DVD into the optical drive (Notebook PC needs to be powered ON).
2. Restart the Notebook PC...