Canon LV-7250 driver and firmware


Related Canon LV-7250 Manual Pages
Download the free PDF manual for Canon LV-7250 and other Canon manuals at ManualOwl.com
LV-7250_LV-X6_manual.pdf - Page 2

... Cautions
Precautions Please read this manual carefully before using your Canon LV-7250/LV-X6 projector and keep the manual handy for future reference. Your serial number is located on the bottom of your projector. Record it here:
CAUTION To turn off main power, be sure to remove the plug from power outlet. The power outlet socket should be installed as near to the...
LV-7250_LV-X6_manual.pdf - Page 3

... Commission Notice Multimedia Projector, Model : LV-7250 and LV-X6 This device complies with Part 15 of the FCC Rules...instructions. If such changes or modifications should be made, you could be required to stop operation of the equipment.
Canon U.S.A., Inc. One Canon Plaza, Lake Success, NY 11042, U.S.A. Tel No. (516)328-5600
Canadian Radio Interference Regulations This Class B digital...
LV-7250_LV-X6_manual.pdf - Page 4

... vent. The gas contains toxic mercury. Open windows and doors for ventilation. If you inhale the gas or the shards of the broken lamp enter your eyes or mouth, consult the doctor immediately. If a lamp explodes, its shards may scatter inside the projector. Ask the Canon service representative to clean and check the inside...
LV-7250_LV-X6_manual.pdf - Page 5

... UK only: In UK, a BS approved power cord with moulded plug has a Black (five Amps) fuse installed for use with this equipment. If a power cord is not supplied with this equipment please contact your supplier.
Important Safeguards These safety instructions are to ensure the long life of your projector and to prevent fire and shock...
LV-7250_LV-X6_manual.pdf - Page 7

... not give a shock to it, drop it, or place anything on it. Do not transport the projector through a courier or transport service with the carrying bag. The projector can damage.
Remote Control Precautions • Handle the remote control carefully. • If the remote control gets wet, wipe it dry immediately. • Avoid excessive heat and humidity. • Do not...
LV-7250_LV-X6_manual.pdf - Page 8

...for Wireless Remote Control 10
2. Installation and Connections 11
ᕡ Setting Up the Screen and the Projector 12 Selecting a Location 12 Throw Distance and Screen Size 12
ᕢ Making Connections 14 Enabling the computer's external display 14 Connecting Your PC or Macintosh Computer 14 To connect Scart output (RGB 15 Connecting an External Monitor 16 Connecting Your DVD Player with...
LV-7250_LV-X6_manual.pdf - Page 11

... the PC Control port (SERVICE PORT). • Easy set up and operation • The contemporary cabinet design is light, compact and complements any office, boardroom Auditorium. • You can use the supplied wireless remote control and remote mouse receiver to operate your PC mouse from across the room. The remote mouse receiver supports almost any PC using a USB connection (LV-7250 only).
2
LV-7250_LV-X6_manual.pdf - Page 12

... of International Business Machines Corporation. • Mac and PowerBook are trademarks of Apple Computer, Inc., registered in the U.S. and other countries. • Windows, Windows 98, Windows Me, Windows XP or Windows 2000 are trademarks or registered trademarks
of Microsoft Corporation. • Other product and company names mentioned in this user's manual may be the trademarks or registered...
LV-7250_LV-X6_manual.pdf - Page 18

...
RD-428E
1. Introduction
16. PAGE ̆/̄ Button (Not available on LV-X6) Use these buttons to operate your computer with the supplied remote mouse receiver. See page 32. You can use these buttons to scroll the viewing area of the window or to move to the previous or next slide in PowerPoint on...
LV-7250_LV-X6_manual.pdf - Page 19

.... • Dispose of used batteries according to your local regulations.
Operating Range for Wireless Remote Control
Remote sensor on projector cabinet 7m/22 feet
30°
30°
30°
30°
7m/22 feet
Remote control
NOTE: The LV-X6 does not have the remote sensor on the rear panel.
• The infrared signal operates by line-of...
LV-7250_LV-X6_manual.pdf - Page 20

... must first: ቢ Set up a screen and the projector. See page 12. ባ Connect your computer or video equipment to the projector. See pages 14 to 18. ቤ Connect the supplied power cord. See page 19.
NOTE: Ensure that the power cord and any other cables are disconnected before moving the projector. When moving the projector or when it...
LV-7250_LV-X6_manual.pdf - Page 21
...Installation and Connections
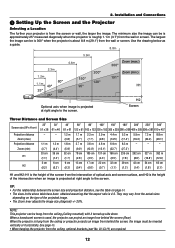
ᕡ Setting Up the Screen and the Projector
Selecting a Location
The further your projector is from the screen or wall, the larger the image. The minimum size the image can be is approximately 25" measured diagonally when the projector...projector is about 8.8 m (29.1') from the wall or screen. Use the drawing below as a guide... intersection of optical axis and screen...
LV-7250_LV-X6_manual.pdf - Page 22

...
Using a mirror to reflect your projector's image enables
you to enjoy a much larger image. Contact your dealer if
you need a mirror system. If you're using a mirror sys-
tem and your image is inverted, use the MENU and
SELECT
buttons on your projector cabinet or
your remote control to correct the orientation. See page...
LV-7250_LV-X6_manual.pdf - Page 23

...-7250: The ANALOG IN- 1 connector supports Plug & Play (DDC2). • LV-X6: The ANALOG IN connector supports Plug & Play (DDC2).
LV-7250
S-VIDEO IN
VIDEO IN
AUDIO IN
L SERVICE PORT
R AUDIO IN
AUDIO IN
ANALOG IN-1
AUDIO OUT
ANALOG IN-2
ANALOG IN-1
ANALOG IN-2
LV-X6
ANALOG IN
ANALOG IN
Audio cable (not supplied)
PHONE
VGA cable (supplied)
To mini D-Sub 15-pin connector on the projector...
LV-7250_LV-X6_manual.pdf - Page 24
...)
Video equipment such as DVD player
Female
2. Installation and Connections
S-VIDEO IN
VIDEO IN
L
SERVICE PORT R
AUDIO IN
AUDIO IN
ANALOG IN-1
AUDIO OUT
ANALOG IN-2
Projector ANALOG IN-1
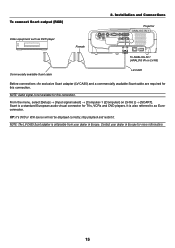
To ANALOG IN-1 (ANALOG IN on LV-X6)
Commercially available Scart cable
LV-CA35
Before connections: An exclusive Scart adapter (LV-CA35) and a commercially available Scart cable are required for this...
LV-7250_LV-X6_manual.pdf - Page 25

...IN
L
SERVICE PORT R
AUDIO IN
AUDIO IN
ANALOG IN-1
AUDIO OUT
ANALOG IN-2
2. Installation and Connections
VGA cable (supplied)
VGA cable (not supplied)
You can connect a separate, external monitor to your projector to ... OUT connector on LV-7250. • The LV-X6 does not have the AUDIO OUT connector. • Use an audio cable without a built-in resistor. Using an audio cable with a built...
LV-7250_LV-X6_manual.pdf - Page 26

Connecting Your DVD Player with Component Output
2. Installation and Connections
LV-7250
AUDIO IN
ANALOG IN-1
S-VIDEO IN
VIDEO IN
L
SERVICE PORT R
AUDIO IN
AUDIO IN
ANALOG IN-1
AUDIO OUT
ANALOG IN-2
LV-X6
ANALOG IN
ANALOG IN
Audio cable (not supplied)
Optional 15-pin - to - RCA (female) ן3 cable (LV-CA32)
Audio Equipment
AUDIO IN LR
Component video RCA&#...
LV-7250_LV-X6_manual.pdf - Page 27

... VCR or Laser Disc Player
2. Installation and Connections
S-VIDEO IN
AUDIO IN
S-VIDEO IN
VIDEO IN
L
SERVICE PORT R
AUDIO IN
VIDEO IN
AUDIO IN
ANALOG IN-1
AUDIO OUT
ANALOG IN-2
S-Video cable (not supplied) Video cable (not supplied)
VCR/ Laser disc player
L R S-VIDEO VIDEO AUDIO OUT VIDEO OUT
Audio equipment
AUDIO IN LR
Audio cable (not supplied)
NOTE: The AUDIO IN L/MONO and R jacks...
LV-7250_LV-X6_manual.pdf - Page 40

..., you may have to restart your computer or change your computer settings.
Computer
To USB port of PC or Macintosh
Remote mouse receiver
When operating a computer via the remote mouse receiver
7m/22 feet
30° 30°
Remote sensor on the remote mouse receiver
Remote Control Precautions • Handle the remote control carefully. • If the remote control gets wet, wipe it dry immediately...
LV-7250_LV-X6_manual.pdf - Page 66

... source (LV-7250: Computer 1, Computer 2, Video or S-Video / LV-X6: Computer, Video or S-Video). See page 22.
• Adjust the computer image manually with the [Horizontal position] or [Vertical position] in the [Display settings]. See page 43.
Remote control does not work
• Install new batteries.See page 10. • Make sure there are no obstacles between you and the projector. •...