Dell PowerEdge 7150 driver and firmware

Related Dell PowerEdge 7150 Manual Pages
Download the free PDF manual for Dell PowerEdge 7150 and other Dell manuals at ManualOwl.com
Rack
Installation Guide - Page 3
...any server, storage system, or appliance, as well as to various peripherals or supporting hardware.
WARNING: Installing Dell system components in a Dell rack without the front and side stabilizers installed could cause the... to be installed in a Dell rack by trained service technicians. If you install the kit in any other rack, be sure that the rack meets the specifications of a Dell rack. •...
Rack
Installation Guide - Page 5
... Restrictions 1-3 Rack Stabilizer Feet 1-3 Recommended Tools and Supplies 1-4 Installation Tasks 1-4 Removing the Doors From the Rack 1-5 Marking the Rack 1-5 Installing the Slide Assemblies in the Rack 1-7 Installing a System in the Rack 1-9 Installing the System 1-9 Installing the Cable Tray 1-11 Installing the Cable-Management Arm 1-13 Replacing the Rack Doors 1-13
Index
Figures...
Rack
Installation Guide - Page 7
FILE LOCATION: S:\SYSTEMS\Bordeaux\rack_inst\RIG\54UMJ_a00\post\54UMJebk0LOF.fm
Figures
Figure 1-1. Figure 1-2. Figure 1-3. Figure 1-4. Figure 1-5. Figure 1-6.
Rack Kit Contents 1-2 One Rack Unit 1-6 Marking the Rack 1-7 Installing the Slide Assemblies 1-8 Installing the System in the Rack 1-10 Installing the Cable Tray and Cable-Management Arm 1-12
DELL CONFIDENTIAL - PRELIMINARY 7/24/01
Rack
Installation Guide - Page 9
Rack Installation Guide
This installation guide provides instructions for trained service technicians to install one or more Dell™ systems in a Dell four-post rack cabinet. All Dell four-post rack cabinets are accommodated. One rack kit is required for each system to be installed in the rack cabinet.
Before attempting this installation, you should read this entire document carefully.
Rack ...
Rack
Installation Guide - Page 10
...-mounted glass. If it does, you will need to order a new rack door from Dell before installing your new system in the rack.
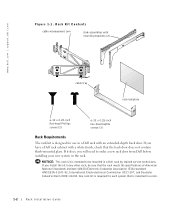
NOTICE: This rack kit is intended to be installed in a Dell rack by trained service technicians. If you install the kit in any other rack, be sure that the rack meets the specifications...
Rack
Installation Guide - Page 11
... rack kit is intended to be installed in a Dell rack by trained service technicians. If you install the kit in any other rack, be sure that the rack meets the specifications of the Dell rack.
Rack Stabilizer Feet
CAUTION: Installing systems in a Dell rack without the front and side stabilizer feet installed and anchored to the floor could...
Rack
Installation Guide - Page 12
...
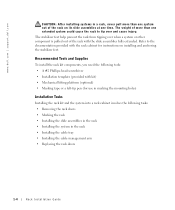
Installation Tasks Installing the rack kit and the system into a rack cabinet involves the following tasks: • Removing the rack doors • Marking the rack • Installing the slide assemblies in the rack • Installing the system in the rack • Installing the cable tray • Installing the cable management arm • Replacing the rack doors
1-4
Rack Installation Guide
Rack
Installation Guide - Page 13
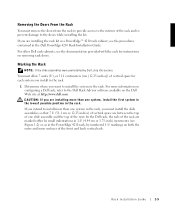
... rack and to prevent damage to the doors while installing the kit.
If you are installing the rack kit in a PowerEdge™ 4210 rack cabinet, see the procedures contained in the Dell PowerEdge 4210 Rack Installation Guide.
For other Dell rack cabinets, see the documentation provided with the rack for instructions on removing rack doors.
Marking the Rack
NOTE...
Rack
Installation Guide - Page 14

www.dell.com | support.dell.com
Figure 1-2. One Rack Unit
4.44 cm or 1.75 inches (1 U)
12.7 mm or 0.5 inch
15.9 mm or 0.625 inch
15.9 mm or 0.625 inch
12.7 mm or 0.5 inch
2 Place the front of the template on the front vertical rails where you want to install ... (see Figure 1-3) and on the vertical rails next to the template's V-shaped notches that are marked in red.
1-6
Rack Installation Guide
Rack
Installation Guide - Page 15
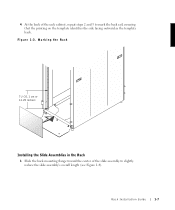
... the printing on the template identifies the side facing outward as the template back.
Figure 1-3. Marking the Rack
7U (31.1 cm or 12.25 inches)
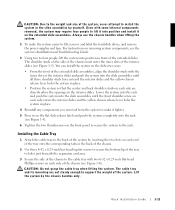
Installing the Slide Assemblies in the Rack 1 Slide the back mounting flange toward the center of the slide assembly to slightly reduce the slide assembly's overall...
Rack
Installation Guide - Page 16
www.dell.com | support.dell.com
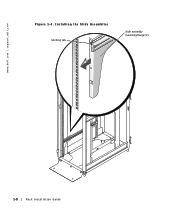
Figure 1-4. Installing the Slide Assemblies latching tab
slide assembly mounting flange (2)
1-8
Rack Installation Guide
Rack
Installation Guide - Page 17
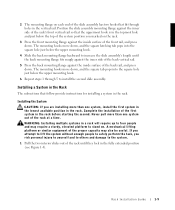
... Repeat steps 1 through 5 to install the second slide assembly.
Installing a System in the Rack
The subsections that follow provide instructions for installing a system in the rack.
Installing the System CAUTION: If you are installing more than one system, install the first system in the lowest ... the rack until they lock in the fully extended position (see Figure 1-5).
Rack Installation Guide
1-9
Rack
Installation Guide - Page 18
www.dell.com | support.dell.com
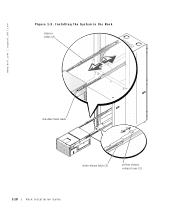
Figure 1-5. Installing the System in the Rack
interior slides (2)
shoulder-head studs
slide release latch (2)
yellow chassis release lever (2)
1-10
Rack Installation Guide
Rack
Installation Guide - Page 19
... remove and label the hard-disk drives, and remove the power supplies and fans. For instructions on removing system components, see the system's Installation and Troubleshooting Guide.
3 Using two to four...cable tray when lifting the system. The cable tray and its mounting are not sturdy enough to support the weight of the system. Lift the system by the chassis handles only.
Rack Installation Guide...
Rack
Installation Guide - Page 20
www.dell.com | support.dell.com
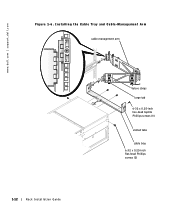
Figure 1-6. Installing the Cable Tray and Cable-Management Arm cable-management arm
1-12
Rack Installation Guide
Velcro strips
large tab
6-32 x 0.25-inch hex-head taptite Phillips screws (3)
slotted tabs
cable tray 6-32 x 0.25-inch flat-head Phillips screws (2)
Rack
Installation Guide - Page 21

... cables are routed correctly. Make sure that the cables are not pinched in the cable-management arm joints.
Replacing the Rack Doors If you have a Dell PowerEdge 4210 rack, see the procedures contained in the Dell PowerEdge 4210 Rack Installation Guide.
For other Dell rack cabinets, see the documentation provided with the rack for instructions on replacing the rack doors.
Rack Installation Guide...
Rack
Installation Guide - Page 23

Index
B
before you begin, 1-3
C
cabinet doors, 1-5 cable management arm
installing, 1-12 cable tray
installing, 1-11 contents illustrated, 1-2 contents of kit, 1-1
D
doors removing, 1-5 replacing, 1-13
I
installation restrictions, 1-3 installing
cable management arm, 1-12 cable tray, 1-12 slide assemblies, 1-7 system in rack, 1-9, 1-10 installing slide
assemblies, 1-7
K
kit contents, 1-1 list of...