Gigabyte GV-N520SL-1GI driver and firmware
Drivers and firmware downloads for this Gigabyte item
Related Gigabyte GV-N520SL-1GI Manual Pages
Download the free PDF manual for Gigabyte GV-N520SL-1GI and other Gigabyte manuals at ManualOwl.com
Manual - Page 1
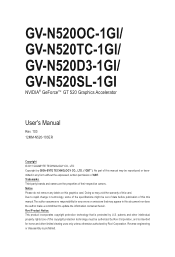
GV-N520OC-1GI/ GV-N520TC-1GI/ GV-N520D3-1GI/ GV-N520SL-1GI
NVIDIA® GeForceTM GT 520 Graphics Accelerator
User's Manual
Rev. 103 12MM-N520-103ER
Copyright © 2011 GIGABYTE TECHNOLOGY CO., LTD Copyright by GIGA-BYTE TECHNOLOGY CO., LTD. ("GBT"). No part of this manual may be reproduced or transmitted in any form without the expressed, written permission of GBT. Trademarks Third...
Manual - Page 6
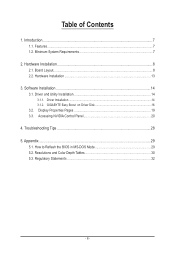
... 8 2.1. Board Layout...8 2.2. Hardware Installation...13
3. Software Installation 14 3.1. Driver and Utility Installation 14
3.1.1. Driver Installation...14 3.1.2. GIGABYTE Easy Boost on Driver Disk 16 3.2. Display Properties Pages 19 3.3. Accessing NVIDIA Control Panel 20
4. Troubleshooting Tips 28 5. Appendix...29
5.1. How to Reflash the BIOS in MS-DOS Mode 29 5.2. Resolutions and Color...
Manual - Page 7
... • Supports 1 DVI-I connectors • Supports HDCP (High-Bandwidth Digital Content Protection) technology
1.2. Minimum System Requirements
• Hardware - Intel® Pentium®/CoreTM 2 or AMD AthlonTM/PhenomTM - 128 MB of system memory; 2 GB or more for best performance - Optical drive for software installation (CD-ROM or DVD-ROM drive) - A 450 Watt power supply...
Manual - Page 8
2. Hardware Installation
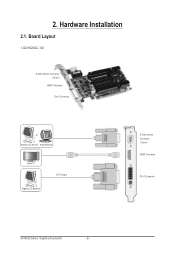
2.1. Board Layout
1.GV-N520OC-1GI
D-Sub monitor Connector (15-pin)
HDMI Connector DVI-I Connector
or Analog LCD Monitor Analog Monitor
HDMI TV Digital LCD Monitor
DVI Output
D-Sub monitor Connector (15-pin) HDMI Connector
DVI-I Connector
GV-N520 Series Graphics Accelerator
- 8 -
Manual - Page 9
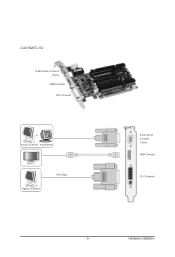
2.GV-N520TC-1GI
D-Sub monitor Connector (15-pin)
HDMI Connector DVI-I Connector
or Analog LCD Monitor Analog Monitor
HDMI TV Digital LCD Monitor
DVI Output
D-Sub monitor Connector (15-pin) HDMI Connector
DVI-I Connector
- 9 -
Hardware Installation
Manual - Page 11
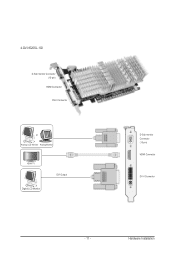
4.GV-N520SL-1GI
D-Sub monitor Connector (15-pin)
HDMI Connector DVI-I Connector
or Analog LCD Monitor Analog Monitor
HDMI TV Digital LCD Monitor
DVI Output
D-Sub monitor Connector (15-pin) HDMI Connector
DVI-I Connector
- 11 -
Hardware Installation
Manual - Page 12
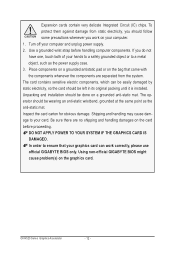
... there are no shipping and handling damages on the card before proceeding. DO NOT APPLY POWER TO YOUR SYSTEM IF THE GRAPHICS CARD IS DAMAGED. In order to ensure that your graphics card can work correctly, please use official GIGABYTE BIOS only. Using non-official GIGABYTE BIOS might cause problem(s) on the graphics card.
GV-N520 Series Graphics Accelerator
- 12 -
Manual - Page 13
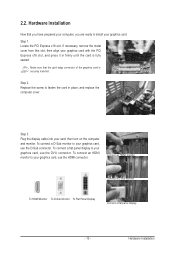
... computer cover.
Step 3. Plug the display cable into your card; then turn on the computer and monitor. To connect a D-Sub monitor to your graphics card, use the D-Sub connector. To connect a flat panel display to your graphics card, use the DVI-I connector. To connect an HDMI monitor to your graphics card, use the HDMI connector.
Connect an HDMI monitor
Connect a D-Sub monitor
To HDMI...
Manual - Page 14
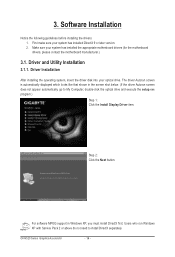
... appear automatically, go to My Computer, double-click the optical drive and execute the setup.exe program.)
Step 1: Click the Install Display Driver item.
Step 2: Click the Next button.
For software MPEG support in Windows XP, you must install DirectX first. Users who run Windows XP with Service Pack 2 or above do not need to install DirectX separately.
GV-N520 Series Graphics Accelerator
- 14...
Manual - Page 15
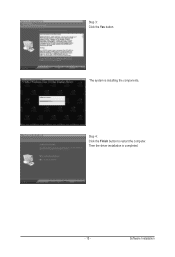
Step 3: Click the Yes button.
The system is installing the components.
Step 4: Click the Finish button to restart the computer. Then the driver installation is completed.
- 15 -
Software Installation
Manual - Page 16
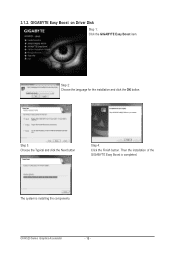
3.1.2. GIGABYTE Easy Boost on Driver Disk
Step 1: Click the GIGABYTE Easy Boost item.
Step 2: Choose the language for the installation and click the OK button.
Step 3: Choose the Typical and click the Next button
Step 4: Click the Finish button. Then the installation of the GIGABYTE Easy Boost is completed.
The system is installing the components.
GV-N520 Series Graphics Accelerator
- 16 -
Manual - Page 17
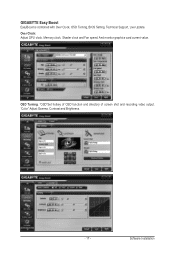
GIGABYTE Easy Boost
EasyBoost is combined with Over Clock, OSD Turning, BIOS Setting, Technical Support, Live Update. Over Clock: Adjust GPU clock, Memory clock, Shader clock and Fan speed. And monitor graphics card current value.
OSD Turning: "OSD"Set hotkey of OSD function and directory of screen shot and recording video output. "Color" Adjust Gamma, Contrast and Brightness.
- 17 -
Software ...
Manual - Page 19
...)
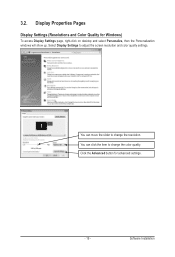
To access Display Settings page, right-click on desktop and select Personalize, then the Personalization windows will show up. Select Display Settings to adjust the screen resolution and color quality settings.
You can move the slider to change the resolution. You can click the item to change the color quality. Click the Advanced button for advanced settings.
- 19 -
Software Installation
Manual - Page 20
... Control Panel
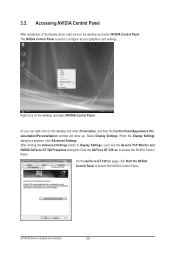
After installation of the display driver, right-click on the desktop and select NVIDIA Control Panel. The NVIDIA Control Panel is used to configure all your graphics card settings.
Right-click on the desktop and select NVIDIA Control Panel.
Or you can right-click on the desktop and select Personalize, and then the Control Panel\Appearance Personalization\Personalization window...
Manual - Page 21
... The following pages provide details on configuring advanced settings.
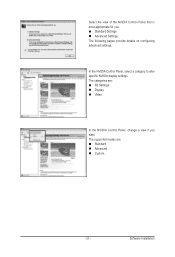
In the NVIDIA Control Panel, select a category to alter specific NVIDIA display settings. The categories are: 3D Settings Display Video
In the NVIDIA Control Panel, change a view if you want. The supported modes are: Standard Advanced Custom
- 21 -
Software Installation
Manual - Page 23
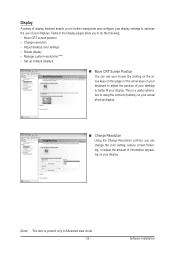
... to better fit your display. This is a useful alternative to using the controls (buttons) on your actual physical display.
Change Resolution Using the Change Resolution controls, you can change the color setting, reduce screen flickering, or adjust the amount of information appearing on your display.
(Note) This item is present only in Advanced view mode. - 23 -
Software Installation
Manual - Page 25
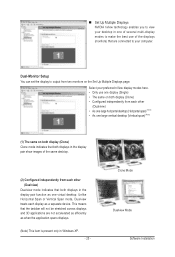
... technology enables you to view your desktop in one of several multi-display modes to make the best use of the displays (monitors) that are connected to your computer.
Dual-Monitor Setup
You can set the display to output from two monitors on the Set Up Multiple Displays page.
Select your preferred nView display modes here. • Only use one...
Manual - Page 26
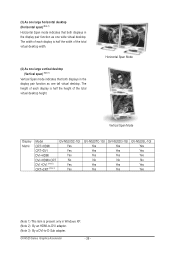
... desktop height.
Horizontal Span Mode
Vertical Span Mode
Display Matrix
Model CRT+HDMI CRT+DVI DVI+HDMI DVI+HDMI+CRT DVI +DVI (Note 2) CRT+CRT (Note 3)
GV-N520OC-1GI Yes Yes Yes No Yes Yes
GV-N520TC-1GI Yes Yes Yes No Yes Yes
GV-N520D3-1GI Yes Yes Yes No Yes Yes
GV-N520SL-1GI Yes Yes Yes No Yes Yes
(Note 1) This item is present only in Windows...
Manual - Page 27
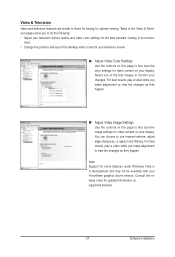
..., adjust edge sharpness, or apply noise filtering. For best results, play a video while you make adjustment to view the changes as they happen.
Note: Support for some features under Windows Vista is in development and may not be available with your ForceWare graphics driver version. Consult the release notes for updated information on supported features.
- 27 -
Software Installation
Manual - Page 28
... motherboard. For more information, consult your computer's manual or manufacturer. (NOTE: Some manufacturers do not allow the built-in graphics to be disabled or to become the secondary display.) Make sure you selected the appropriate display device and graphics card when you install the graphics driver. Restart your computer. Press on your keyboard after system starts up. When the Windows...