HP G60 440US - Pavilion - Pentium 2.1 GHz driver and firmware
Drivers and firmware downloads for this Hewlett-Packard item

Related HP G60 440US Manual Pages
Download the free PDF manual for HP G60 440US and other HP manuals at ManualOwl.com
Service Guide - Page 2

..., Celeron, Core, and Pentium are trademarks of Intel Corporation in the U.S. and other countries. Microsoft, Windows, and Windows Vista are U.S. registered trademarks of Microsoft Corporation. SD Logo is a trademark of its proprietor.
The information contained herein is subject to change without notice. The only warranties for HP products and services are set forth in the express...
Service Guide - Page 10
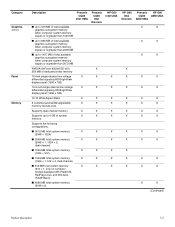
...■ 512-MB total system memory
X
(512 × 1, only on computer
models equipped with FreeDOS,
RedFlag Linux, and Windows
Vista® Basic)
■ 4096-MB total system memory (2048 x 2)
Presario CQ60 Intel
Discrete
HP G60 Intel UMA
X
X
X
X
X
X
X
X
X
X
X
X
X
X
X
X
X
X
X
X
X
X
X
HP G60 Intel
Discrete
X X X X X X X
X X X X X
Presario HP G60 CQ60 AMD UMA
AMD UMA...
Service Guide - Page 13
...
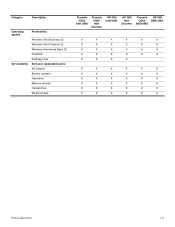
Description
Operating system
Serviceability
Preinstalled:
Windows Vista Business 32 Windows Vista Premium 32 Windows Vista Home Basic 32 FreeDOS RedFlag Linux End-user replaceable parts: AC adapter Battery (system) Hard drive Memory module Optical drive WLAN module
Presario CQ60
Intel UMA
Presario CQ60 Intel
Discrete
HP G60 Intel UMA
HP G60 Intel
Discrete
Presario HP G60 CQ60 AMD UMA...
Service Guide - Page 16
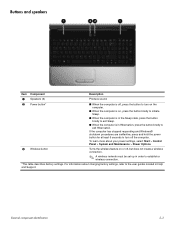
... stopped responding and Windows® shutdown procedures are ineffective, press and hold the power button for at least 5 seconds to turn off the computer. To learn more about your power settings, select Start > Control Panel > System and Maintenance > Power Options.
Turns the wireless feature on or off, but does not create a wireless connection.
✎ A wireless network must be set up in order...
Service Guide - Page 17
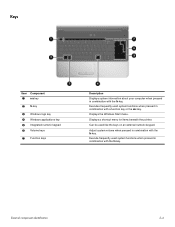
... key 5 Integrated numeric keypad 6 Volume keys
7 Function keys
Description
Displays system information about your computer when pressed in combination with the fn key.
Executes frequently used system functions when pressed in combination with a function key or the esc key.
Displays the Windows Start menu.
Displays a shortcut menu for items beneath the pointer.
Can be used...
Service Guide - Page 22
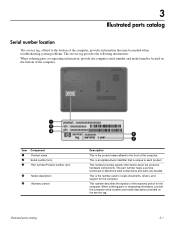
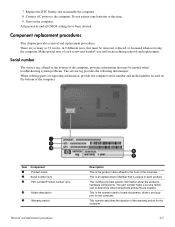
... components. The part number helps a service technician to determine what components and parts are needed.
This is the number used to locate documents, drivers, and support for the computer.
This number describes the duration of the warranty period for the computer. When ordering parts or requesting information, provide the computer serial number and model description provided on...
Service Guide - Page 43

...
Electronic components are sensitive to electrostatic discharge (ESD). Circuitry design and structure determine the degree of sensitivity. Networks built into many integrated circuits provide some protection, but in many cases, ESD contains enough power to alter device parameters or melt silicon junctions.
A discharge of static electricity from a finger or other conductor can destroy...
Service Guide - Page 46
... AC power to the computer. Do not reinsert any batteries at this time. 9. Turn on the computer. All passwords and all CMOS settings have been cleared.
Component replacement procedures
This chapter provides removal and replacement procedures. There are as many as 72 screws, in 9 different sizes, that must be removed, replaced, or loosened when servicing the computer...
Service Guide - Page 48
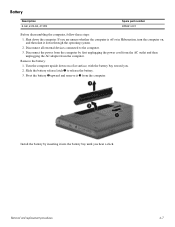
... then shut it down through the operating system. 2. Disconnect all external devices connected to the computer. 3. Disconnect the power from the computer by first unplugging the power cord from the AC outlet and then unplugging the AC adapter from the computer.
Remove the battery: 1. Turn the computer upside down on a flat surface, with the battery bay toward you...
Service Guide - Page 50
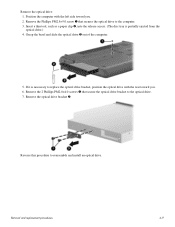
... bezel and slide the optical drive 3 out of the computer.
5. If it is necessary to replace the optical drive bracket, position the optical drive with the rear toward you. 6. Remove the 2 Phillips PM2.0×4.0 screws 1 that secure the optical drive bracket to the optical drive. 7. Remove the optical drive bracket 2.
Reverse this procedure to reassemble and install an optical drive.
Removal and...
Service Guide - Page 52
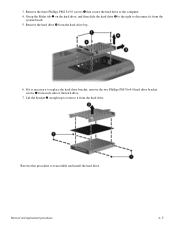
... board. 5. Remove the hard drive 4 from the hard drive bay.
6. If it is necessary to replace the hard drive bracket, remove the two Phillips PM3.0×4.0 hard drive bracket screws 1 from each side of the hard drive.
7. Lift the bracket 2 straight up to remove it from the hard drive.
Reverse this procedure to reassemble and install the hard drive...
Service Guide - Page 53
... devices connected to the computer.
3. Disconnect the power from the computer by first unplugging the power cord from the AC outlet and then unplugging the AC adapter from the computer.
4. Remove the battery (see "Battery" on page 4-7).
5. Remove the hard drive cover (see "Hard drive" on page 4-10).
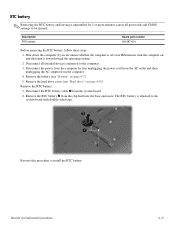
Remove the RTC battery: 1. Disconnect the RTC battery cable 1 from the system board...
Service Guide - Page 55

.... (The edge of the module opposite the slot rises away from the computer.)
4. Remove the memory module 2 by pulling the module away from the slot at an angle.
✎ Memory modules are designed with a notch 3 to prevent incorrect insertion into the memory module slot.
Reverse this procedure to install a memory module.
Removal and replacement procedures
4-14
Service Guide - Page 57
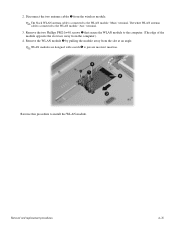
2. Disconnect the two antenna cables 1 from the wireless module.
✎ The black WLAN antenna cable is connected to the WLAN module "Main" terminal. The white WLAN antenna cable is connected to the WLAN module "Aux" terminal.
3. Remove the two Phillips PM2.0×4.0 screws 2 that secure the WLAN module to the computer. (The edge of the module...
Service Guide - Page 60
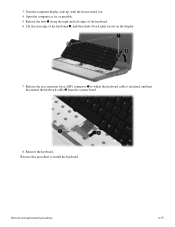
... rear edge of the keyboard 2, and then slide it back until it rests on the display.
7. Release the zero insertion force (ZIF) connector 1 to which the keyboard cable is attached, and then disconnect the keyboard cable 2 from the system board.
8. Remove the keyboard. Reverse this procedure to install the keyboard.
Removal and replacement procedures
4-19
Service Guide - Page 62
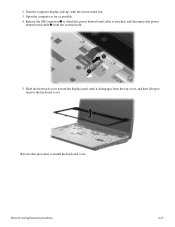
... up, with the front toward you.
3. Open the computer as far as possible.
4. Release the ZIF connector 1 to which the power button board cable is attached, and disconnect the power button board cable 2 from the system board.
5. Slide the keyboard cover toward the display panel until it disengages from the top cover, and then lift up to remove the...
Service Guide - Page 63

... it down through the operating system. 2. Disconnect all external devices connected to the computer. 3. Disconnect the power from the computer by first unplugging the power cord from the AC outlet and then unplugging the AC adapter from the computer. 4. Remove the battery (see "Battery" on page 4-7). 5. Disconnect the wireless antenna cables from the WLAN module (see "WLAN module" on...
Service Guide - Page 116
... do not have a partition. Use these discs to recover your operating system and software. To check for the presence of a recovery partition, select Start > Computer. If the partition is present, an HP Recovery drive is listed in the Hard Disk Drives section of the window.
Creating recovery discs
✎ HP recommends that you create recovery discs to be sure that you can restore...
Service Guide - Page 117
...computer is repaired or restored ■ Before you add or modify hardware or software
Backup suggestions
■ Create a set of recovery discs using Recovery Manager. ■ Create system restore points using the Windows System Restore feature, and periodically copy...save and name a snapshot of your hard drive at a specific point in time. You can then recover back to that point if you want to ...
Service Guide - Page 118
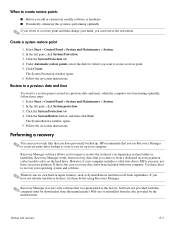
... button, and then click Next.
The System Restore window opens. 5. Follow the on-screen instructions.
Performing a recovery
✎ You can recover only files that you have previously backed up. HP recommends that you use Recovery Manager to create an entire drive backup as soon as you set up your computer.
Recovery Manager software allows you to repair or restore the system...