MSI X58M - Motherboard - Micro ATX driver and firmware
Drivers and firmware downloads for this MSI item

Related MSI X58M Manual Pages
Download the free PDF manual for MSI X58M and other MSI manuals at ManualOwl.com
User Guide - Page 2
... solution can be obtained from the user's manual, please contact your place of purchase or local distributor. Alternatively, please try the following help resources for further guidance.
◙ Visit the MSI website for FAQ, technical guide, BIOS updates, driver updates,
and other information: http://global.msi.com.tw/index.php?func=service
◙ Contact our technical staff at: http...
User Guide - Page 4
... void the user's authority to operate the equipment. Notice 2 Shielded interface cables and A.C. power cord, if any, must be used in order to comply with the emission limits.
OIR LA NOTICE D'INSTALLATION AVANT DE RACCORDER AU RESEAU.
Micro-Star International MS-7593
This device complies with Part 15 of the FCC Rules. Operation is subject...
User Guide - Page 9
MS-7593
Green Powr 3-16 BIOS Setting Password 3-17 Cell Menu 3-18 Overclocking Profile 3-24 M-Flash 3-25 Load Fail-Safe/ Optimized Defaults 3-28 Appendix A Realtek Audio A-1 Installing the Realtek HD Audio Driver A-2 Software Configuration A-4 Hardware Setup A-19 Appendix B Overclocking Center B-1 Activating Overclocking Center B-2 System Info B-3 DOT B-5
ix
User Guide - Page 15
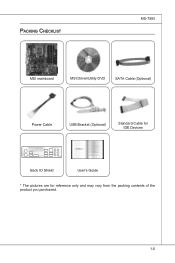
Packing Checklist
MS-7593
MSI mainboard
MSI Driver/Utility DVD
SATA Cable (Optional)
Power Cable
USB Bracket (Optional)
Standard Cable for IDE Devices
Back IO Shield
User's Guide
* The pictures are for reference only and may vary from the packing contents of the product you purchased.
1-
User Guide - Page 17
... chapter provides you with the information about hardware setup procedures. While doing the installation, be careful in holding the components and follow the installation procedures. For some components, if you install in the wrong orientation, the components will not work properly. Use a grounded wrist strap before handling computer components. Static electricity may damage the components...
User Guide - Page 19
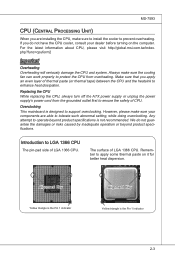
... heat dissipation.
Replacing the CPU While replacing the CPU, always turn off the ATX power supply or unplug the power supply's power cord from the grounded outlet first to ensure the safety of CPU.
Overclocking This mainboard is designed to support overclocking. However, please make sure your components are able to tolerate such abnormal setting, while doing overclocking. Any...
User Guide - Page 20
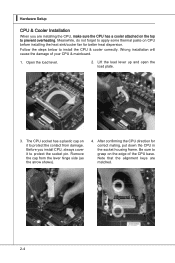
... heat sink/cooler fan for better heat dispersion.
Follow the steps below to install the CPU & cooler correctly. Wrong installation will cause the damage of your CPU & mainboard.
1. Open the load level.
2. Lift the load lever up and open the load plate.
3. The CPU socket has a plastic cap on it to protect the contact from damage. Before you...
User Guide - Page 21
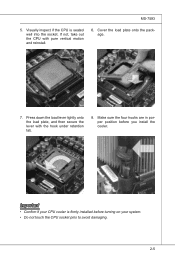
... onto the package.
7. Press down the load lever lightly onto the load plate, and then secure the lever with the hook under retention tab.
8. Make sure the four hooks are in porper position before you install the cooler.
Important
• Confirm if your CPU cooler is firmly installed before turning on your system. • Do...
User Guide - Page 22
▍ Hardware Setup
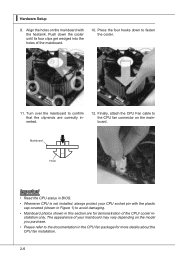
9. Align the holes on the mainboard with the heatsink. Push down the cooler until its ...-ends are correctly inserted.
12. Finally, attach the CPU Fan cable to the CPU fan connector on the mainboard.
Mainboard
Hook
Important
• Read the CPU status in BIOS. • Whenever CPU is not installed, always protect your CPU socket pin with the plastic
cap covered (shown in ...
User Guide - Page 23
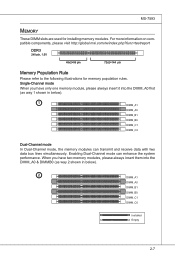
... DIMM slots are used for installing memory modules. For more information on compatible components, please visit http://global.msi.com.tw/index.php?func=testreport
DDR3
240-pin, 1.5V
48x2=96 pin
72x2=144 pin
Memory Population Rule
Please refer to the following illustrations for memory population rules. Single-Channel mode When you have only...
User Guide - Page 25
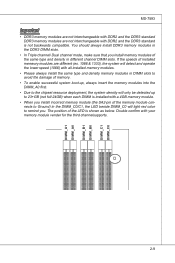
... the lower speed (1066) with all installed memory modules.
• Please always install the same type and density memory modules in DIMM slots to avoid the damage of memory.
• To enable successful system boot-up, always insert the memory modules into the DIMM_A0 first.
• Due to the chipset resource deployment, the system density will only...
User Guide - Page 41
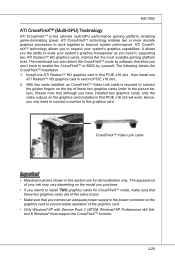
... detect the CrossFireXTM mode by software, therefore you don't have to enable the CrossFireXTM in BIOS by yourself. The following details the CrossFireXTM installation. 1. Install one ATI RadeonTM HD graphics card in first PCIE x16 slot , then install one
ATI RadeonTM HD graphics card in second PCIE x16 slot. 2. With two cards installed, an CrossFireXTM Video Link cable is required to connect...
User Guide - Page 42
▍ Hardware Setup
3. When all of the hardware and software has been properly set up and installed, reboot the system. After entering the O.S., click the "CatalystTM Control Center" icon on the desktop. There is a setting in the CatalystTM Control Center that needs to be enabled for CrossFireXTM to operate. The following aspect appears in CatalystTM Control Center:
Select the Advanced...
User Guide - Page 44

▍ Hardware Setup
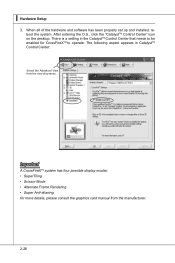
2. After the hardware installation is completed, restart the system and install the NV SLI driver/utility. A configuration panel will be provided for Multi-GPU control. Check the Enable multi-GPU box to enable the SLI function for the onboard graphics cards (concerning the details of multi-GPU settings, please refer to your graphics card manual).
Check the box
3. Restart...
User Guide - Page 71
...MS-7593
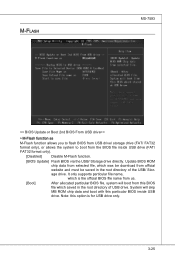
== BIOS Update or Boot 2nd BIOS From USB drive==
▶ M-Flash function as
M-Flash function allows you to flash BIOS from USB drive/ storage drive (FAT/ FAT32 format only), or allows the system to boot from the BIOS file inside USB drive (FAT/ FAT32 format only).
[Disabled]
Disable M-Flash function.
[BIOS Update] Flash BIOS via the USB/ Storage drive directly. Update BIOS ROM
chip...
User Guide - Page 76
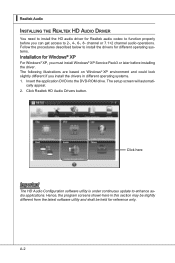
... and could look slightly different if you install the drivers in different operating systems. 1. Insert the application DVD into the DVD-ROM drive. The setup screen will automati-
cally appear. 2. Click Realtek HD Audio Drivers button.
Click here
Important
The HD Audio Configuration software utility is under continuous update to enhance audio applications. Hence, the program screens shown here...
User Guide - Page 77
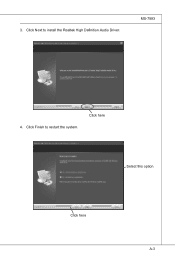
3. Click Next to install the Realtek High Definition Audio Driver.
MS-7593
4. Click Finish to restart the system.
Click here
Select this option
Click here Click here
A-
User Guide - Page 78
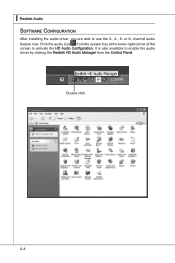
▍ Realtek Audio Software Configuration
After installing the audio driver, you are able to use the 2-, 4-, 6- or 8- channel audio feature now. Click the audio icon from the system tray at the lower-right corner of the screen to activate the HD Audio Configuration. It is also available to enable the audio driver by clicking the Realtek HD Audio Manager from the Control Panel.
Double click
A-
User Guide - Page 96

...; Realtek Audio
■ 8-Channel Mode for Stereo-Speaker Output
1] Line In 2] Line Out (Front channels) 3] MIC 4] Line Out (Rear channels) 5] Line Out (Center and Subwoofer channel) 6] Line Out (Side channels)
Important
To enable 7.1 channel audio-out function on Windows Vista operating system, you have to install the Realtek Audio Driver. Or, the mainboard will support 5.1 channel audio-out...
User Guide - Page 97
... and powerful utility that MSI has spent much research and efforts to develop, helps users to monitor or configure the hardware status of MSI Mainboard in windows, such as CPU clock, voltage, fan speed and temperature. Before you install the Overclocking Center, please make sure the system has meet the following requirements: 1. 256MB system memory. 2. CD-ROM drive for software installation...