Samsung YXM1Z - Helix 1 GB driver and firmware


Related Samsung YXM1Z Manual Pages
Download the free PDF manual for Samsung YXM1Z and other Samsung manuals at ManualOwl.com
Quick Guide (easy Manual) (ver.1.0) (English) - Page 2

... MP3/WMA Files ........ 62
Updating Helix Firmware ........ 64 Using XM+Napster 64 Using the Update Tool 65 Using the Web 65
Settings 66 FM Modulator 66 Aiming the Antenna 69 Audio 70 Display 71 Channel Access 73 Clock and Sleep Timer 75 Vehicle Mode 76 Memory Partition 77 Restoring Factory Defaults 78
Customer Support 80 Troubleshooting 80 Specifications 83...
Quick Guide (easy Manual) (ver.1.0) (English) - Page 3

...the Samsung Helix™. It's the next-generation XM2go® radio, with an XM receiver, built-in antenna, and storage for XM, MP3, or WMA music files in one portable device. ...Windows® PC. One device, all the music you could ever hope for, and the easiest way to find the music you want - now that's a music experience!
4 Introduction
Introduction
Helix, Undocked I Listen to live and recorded...
Quick Guide (easy Manual) (ver.1.0) (English) - Page 6

...
Introduction
ENG
Helix (YX-M1)
Battery (AH43-00007A)
Earbuds (EP-360)
Remote (YA-RC100)
10 Introduction
Home dock/cradle (YA-CD100)
Home XM antenna (AH42-00024A)
AC power adapter (AH61-02211A)
Travel power cable
(AH61-02212A)
RCA audio cable (AH39-00901A)
USB cable (AH39-00902A)
Carrying case/holster (AH61-02213A)
Also included: User guide
(AH81-02210A) XM+Napster install CD
(AH59...
Quick Guide (easy Manual) (ver.1.0) (English) - Page 11

... the antenna is not blocked by buildings or trees.
To AC power adapter
To your audio system's line input or AUX input To home antenna
20 Using Your Helix Alone
MODE
DISPLAY
Using Your Helix Alone
While Traveling If you're traveling, you can connect the power adapter directly to Helix using the travel power cable.
Using Your Helix Alone 21
ENG
Quick Guide (easy Manual) (ver.1.0) (English) - Page 12

... set Helix to transmit on that same frequency.
1. Mount antenna to the roof or trunk of the vehicle. During installation, make sure you are outdoors and the antenna is not obstructed by tall buildings.
Using Your Helix Alone
2. Insert Helix into car cradle. 3. Connect car cradle to antenna cable and power adapter.
22 Using Your Helix Alone
Using Your Helix...
Quick Guide (easy Manual) (ver.1.0) (English) - Page 13

... install the vent mount, find a horizontal vent that is strong enough to hold your Helix and its cradle. To remove the vent mount, push it into the vent and lift upward slightly to release the mount's hooks from the vent vane.
6. Find an unused FM frequency on your car stereo. 7. Set your Helix to...
Quick Guide (easy Manual) (ver.1.0) (English) - Page 18

... Session. Make sure the time shown on your Helix is correct; otherwise the recording session may not start. If the time is not correct, set the time zone for your location (page 75) and wait until the XM signal updates Helix's clock.
2. The "Scheduled Rec" display allows you to set various options. Use the up and down...
Quick Guide (easy Manual) (ver.1.0) (English) - Page 20

...music by artist,
select Artists. View all songs on your Helix. You can also sort songs by artists, by categories, by channels, or by recording sessions.
3. Press the up or down arrow buttons to ... XM button to select an artist.
38 Using Your Helix Alone
Using Your Helix Alone
Shows the artist's songs in the order they were recorded. Opens the Edit window, allowing you to add an artist to a playlist...
Quick Guide (easy Manual) (ver.1.0) (English) - Page 25

... disk space for XM+Napster application I Internet Explorer 5.1 or higher I Windows Media Player 9 or higher; Windows Media Player 10 recommended for Windows XP I Active Internet connection; we recommend a broadband (cable, DSL, or fiber) connection for
optimal performance
*The following operating systems are not supported: Windows 95, Windows 98, Windows NT, Windows Me, and Mac OS. 48 Using Helix...
Quick Guide (easy Manual) (ver.1.0) (English) - Page 26

...desktop.
5. Set up Helix as shown and plug the USB cable into the PC. You can also connect the USB cable directly between your PC and Helix without using the home cradle, home antenna, and AC power adapter.
WARNING: Only use the USB cable supplied in the package. Other USB cables may not allow your Helix... onto your Helix
Additional monthly subscription with XM+Napster required
Download and listen ...
Quick Guide (easy Manual) (ver.1.0) (English) - Page 27

... your credit card information. For XM+Napster Light, simply click here.
4. The next time you use XM+Napster, sign in with your user name and password to access the XM+Napster service. You can also use the XM+Napster software offline, without signing in, and still retain the ability to manage your Helix.
Using Helix with...
Quick Guide (easy Manual) (ver.1.0) (English) - Page 28

...?
Using XM+Napster, you can:
I Manage songs, playlists, and recording sessions on your Helix I Transfer MP3 and WMA files between Helix and your PC I Explore and purchase music from XM+Napster's enormous online..."playlist/radio" pane to play them on your PC.
Using Helix with a PC
Purchasing Music
The XM+Napster store allows you to stream, download, or buy songs or albums. I Stream - Listen to ...
Quick Guide (easy Manual) (ver.1.0) (English) - Page 30

... multi-byte character sets (Asian languages such as Chinese, Korean, or Japanese) are not supported. WARNING: Though you can transfer non-MP3/WMA files to your Helix using Windows, those files cannot be played as audio files. Furthermore, do not attempt to format the Helix storage; doing so may cause damage to the device.
Using Helix with a PC 59...
Quick Guide (easy Manual) (ver.1.0) (English) - Page 31

... PC
Before you remove your Helix from its dock or unplug the USB cable from the dock or the PC, you must disconnect using one of the following methods: I In Windows: right-click on the Safely Remove Hardware icon , which is on the
right side of the Windows taskbar. Select "USB Mass Storage Device," and click on Stop...
Quick Guide (easy Manual) (ver.1.0) (English) - Page 33

... Helix firmware manually. 1. Insert the XM+Napster CD in your PC's
CD-ROM or DVD drive. The XM+Napster software should start automatically. 2. Click on Browse CD. 3. Click on Utils, then click on XMFirmwareUpdateClient. 4. Follow the instructions on the PC screen. You can run this firmware update tool at any time. If the firmware needs to be updated, the tool will install...
Quick Guide (easy Manual) (ver.1.0) (English) - Page 38

.... Select XM ¨ Settings ¨ Setup ¨
Set Time ¨ Set Clock ¨ Select Time Zone to set the correct time zone for your location. 2. Your Helix automatically adjusts for Daylight Savings Time. To turn this feature off, select XM ¨ Settings ¨ Setup ¨ Set Time ¨ Set Clock ¨ Daylight Savings Time ¨ No. 3. To display time in 12...
Quick Guide (easy Manual) (ver.1.0) (English) - Page 41

... expect, first consult this troubleshooting guide. To reset your Helix, remove the battery then re-insert it.
If you see this on the display: No Signal
Antenna
Off Air
Loading
Updating
--- (no artist or title) Channel All Recording Features Not Available
This Channel Not Available for Recording
This Program Not Available for Recording
Connect to XM Antenna Within...
Quick Guide (easy Manual) (ver.1.0) (English) - Page 42
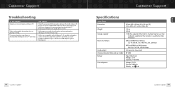
... Support
Customer Support
Specifications
Helix Player Dimensions Weight Storage capacity
Music file formats
Audio output Antenna connector (home and car cradles) Battery
External power
56 mm (W) x 94 mm (H) x 16 mm (D) 2.2 in (W) x 3.7 in (H) x 0.6 in (D)
128 g 4.5 oz
1 GB (The capacity of the built-in memory may be less than indicated; a portion of the memory is used by the Helix firmware...
Quick Guide (easy Manual) (ver.1.0) (English) - Page 43

Customer Support
Specifications
Remote Dimensions
Weight
Battery
Model Numbers Helix player Remote Home kit Car accessory kit Battery Earbuds Home antenna AC adapter Travel power cable RCA audio cable USB cable Carrying case/holster CD-ROM User guide 84 Customer Support
39 mm (W) x 95 mm (H) x 12 mm (D) 1.5 in (W) x 3.7 in (H) x 0.47 in (D) 40 g 1.4 oz Type: CR2032 Voltage: 3 V
YX-M1 YA-RC100 YA...
Quick Guide (easy Manual) (ver.1.0) (English) - Page 44

.... NOTE: This equipment has been tested and found to comply with the limits for a Class B
Customer Support
digital device, pursuant to part 15 of the FCC Rules. These limits are designed to provide reasonable protection against harmful interference in a residential installation. This equipment generates, uses, and can radiate radio frequency energy and, if not...