Sony NEX-5 - alpha; Interchangeable Lens Digital Camera driver and firmware
Drivers and firmware downloads for this Sony item
Related Sony NEX-5 Manual Pages
Download the free PDF manual for Sony NEX-5 and other Sony manuals at ManualOwl.com
α Handbook - Page 110
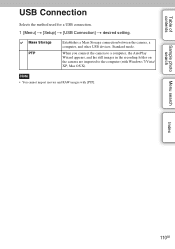
... for a USB connection. 1 [Menu] t [Setup] t [USB Connection] t desired setting.
Mass Storage PTP
Establishes a Mass Storage connection between the camera, a computer, and other USB devices. Standard mode.
When you connect the camera to a computer, the AutoPlay Wizard appears, and the still images in the recording folder on the camera are imported to the computer (with Windows 7/Vista/ XP, Mac OS...
α Handbook - Page 112
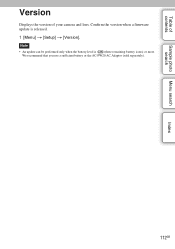
Table of contents
Sample photo Menu search search
Index
Version
Displays the version of your camera and lens. Confirm the version when a firmware update is released. 1 [Menu] t [Setup] t [Version]. Note
• An update can be performed only when the battery level is (three remaining battery icons) or more. We recommend that you use a sufficient battery or the AC-...
α Handbook - Page 122

...-Fi manager recorded on the card to your computer before formatting the card.
• Use an Eye-Fi card after updating the firmware to the latest version. For details, refer to the manual that comes with the Eye-Fi card.
• The power save function of the camera does not work while it is transferring images. • If (error) is displayed, remove the memory card and...
α Handbook - Page 125
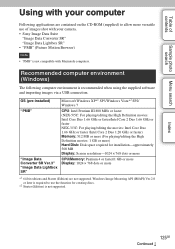
... the High Definition movies: 1 GB or more) Hard Disk: Disk space required for installation-approximately 500 MB Display: Screen resolution-1024 × 768 dots or more
CPU/Memory: Pentium 4 or faster/1 GB or more Display: 1024 × 768 dots or more
*1 64-bit editions and Starter (Edition) are not supported. Windows Image Mastering API (IMAPI) Ver.2.0
or later is required...
α Handbook - Page 126
...)
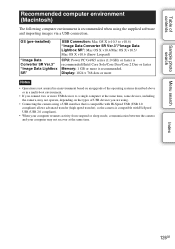
The following computer environment is recommended when using the supplied software and importing images via a USB connection.
OS (pre-installed)
"Image Data Converter SR Ver.3" "Image Data Lightbox SR"
USB Connection: Mac OS X (v10.3 to v10.6) "Image Data Converter SR Ver.3"/"Image Data Lightbox SR": Mac OS X v10.4/Mac OS X v10.5/ Mac OS X v10.6 (Snow Leopard)
CPU: Power PC G4/G5...
α Handbook - Page 127

... the software
Installing the software (Windows)
Log on as Administrator.
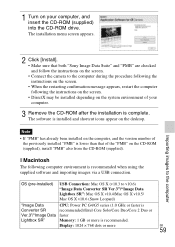
1 Turn on your computer, and insert the CD-ROM (supplied) into the CD-ROM drive.
The installation menu screen appears. • If it does not appear, double-click [Computer] (For Windows XP: [My Computer]) t
(SONYPMB) t [Install.exe]. • If the AutoPlay screen appears, select "Run Install.exe" and follow the instructions...
α Handbook - Page 128
... search
Index
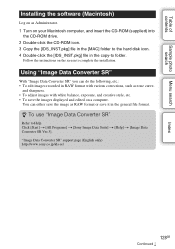
Installing the software (Macintosh)
Log on as Administrator. 1 Turn on your Macintosh computer, and insert the CD-ROM (supplied) into
the CD-ROM drive. 2 Double-click the CD-ROM icon. 3 Copy the [IDS_INST.pkg] file in the [MAC] folder to the hard disk icon. 4 Double-click the [IDS_INST.pkg] file in the copy-to folder.
Follow the instructions on the...
α Handbook - Page 129
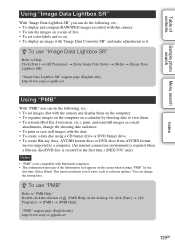
... Data Lightbox SR].
"Image Data Lightbox SR" support page (English only) http://www.sony.co.jp/ids-se/
Using "PMB"
With "PMB" you can do the following, etc.: • To set images shot with the camera and display them on the computer. • To organize images on the computer on a calendar by shooting date to view them...
α Handbook - Page 134
... discs. You cannot add contents to either type of disc once it has been created. Click [BD Add-on Software] on the installation screen of "PMB," and install this plug-in according to the on-screen instructions. Connect your computer to the Internet when you install [BD Add-on Software]. See "PMB Help" for details.
Index
134GB
Continued r
α Handbook - Page 135
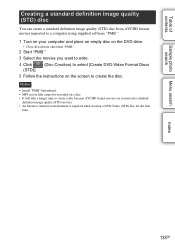
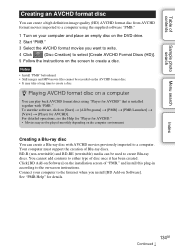
... on the DVD drive.
• Close all software other than "PMB."
2 Start "PMB."
3 Select the movies you want to write.
4 Click
(Disc Creation) to select [Create DVD-Video Format Discs
(STD)].
5 Follow the instructions on the screen to create the disc.
Notes
• Install "PMB" beforehand. • MP4 movie files cannot be recorded on a disc...
α Handbook - Page 140

... USB cable (supplied) for connection. • Disconnect the USB cable, and connect it again firmly. • Set [USB Connection] to [Mass Storage] (page 110). • Disconnect all equipment other than the camera, the keyboard and the mouse from the USB terminals of your computer. • Connect the camera directly to your computer without passing through a USB hub or other device.
Cannot copy...
α Handbook - Page 159
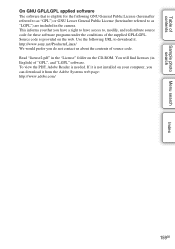
... of source code. Read "license2.pdf" in the "License" folder on the CD-ROM. You will find licenses (in English) of "GPL", and "LGPL" software. To view the PDF, Adobe Reader is needed. If it is not installed on your computer, you can download it from the Adobe Systems web page: http://www.adobe.com/
159GB
3D functions provided by firmware update 02 - Page 1
NEX-3/NEX-5/NEX-5C
The 3D functions provided by this firmware update are described in this booklet. Please refer to the "Instruction Manual" and the "α Handbook" contained on the supplied CD-ROM.
© 2010 Sony Corporation
A-DRG-100-12(1)
3D functions provided by firmware update 02 - Page 3
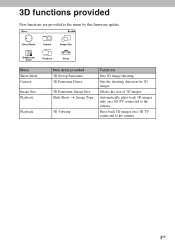
...firmware update.
Menu Shoot Mode Camera
Image Size Playback
Playback
New items provided 3D Sweep Panorama 3D Panorama Direct.
3D Panorama: Image Size Slide Show t Image Type
3D Viewing
Functions
Sets 3D image shooting.
Sets... the shooting direction for 3D images.
Selects the size of 3D images.
Automatically plays back 3D images only on a 3D TV connected to the camera....
Instruction Manual - Page 8
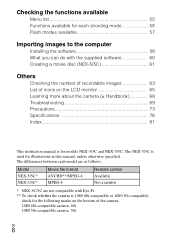
... to the computer
Installing the software 58 What you can do with the supplied software 60 Creating a movie disc (NEX-5/5C 61
Others
Checking the number of recordable images 63 List of icons on the LCD monitor 65 Learning more about the camera (α Handbook 68 Troubleshooting 69 Precautions 73 Specifications 76 Index 81
This instruction manual is for...
Instruction Manual - Page 58
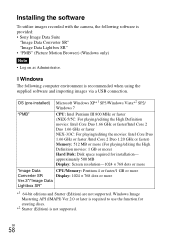
...: 1 GB or more) Hard Disk: Disk space required for installation- approximately 500 MB Display: Screen resolution-1024 × 768 dots or more
"Image Data
CPU/Memory: Pentium 4 or faster/1 GB or more
Converter SR
Display: 1024 × 768 dots or more
Ver.3"/"Image Data
Lightbox SR"
*1 64-bit editions and Starter (Edition) are not supported. Windows Image
Mastering API (IMAPI...
Instruction Manual - Page 59
..." also from the CD-ROM (supplied).
x Macintosh
The following computer environment is recommended when using the supplied software and importing images via a USB connection.
OS (pre-installed)
USB Connection: Mac OS X (v10.3 to v10.6) "Image Data Converter SR Ver.3"/"Image Data Lightbox SR": Mac OS X v10.4/Mac OS X v10.5/ Mac OS X v10.6 (Snow Leopard)
"Image Data
CPU: Power PC G4/G5 series...
Instruction Manual - Page 60
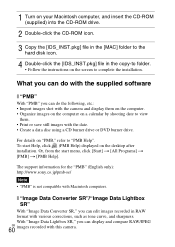
... computer, and insert the CD-ROM (supplied) into the CD-ROM drive.
2 Double-click the CD-ROM icon. 3 Copy the [IDS_INST.pkg] file in the [MAC] folder to the
hard disk icon.
4 Double-click the [IDS_INST.pkg] file in the copy-to folder. • Follow the instructions on the screen to complete the installation.
What you can do with the supplied software...
Instruction Manual - Page 68
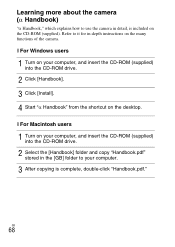
... for in-depth instructions on the many functions of the camera.
x For Windows users
1 Turn on your computer, and insert the CD-ROM (supplied) into the CD-ROM drive.
2 Click [Handbook]. 3 Click [Install]. 4 Start "α Handbook" from the shortcut on the desktop.
x For Macintosh users
1 Turn on your computer, and insert the CD-ROM (supplied) into the CD-ROM drive.
2 Select the [Handbook...
Instruction Manual - Page 82
... Macro 40 Manual Exposure 39 Memory card 21 Menu 50 Metering Mode 52 MF Assist 54 Moisture condensation 74 Movie 28 Movie Audio Rec 54
N
New Folder 55 Night Portrait 40 Night View 40
P
Panorama 41 Panorama Direction 51 Playback 29 Playback Display 55 Playback on TV 49 Playback zoom 47 PMB 60 Portrait 40 Power Save...