Sony SDM-X202 driver and firmware


Related Sony SDM-X202 Manual Pages
Download the free PDF manual for Sony SDM-X202 and other Sony manuals at ManualOwl.com
Operating Instructions - Page 2

... Center 1 Sony Drive, Mail Drop #T1-11, Park Ridge, NJ 07656
(for the gray model)
Declaration of Conformity
Trade Name: Model No.: Responsible Party: Address: Telephone No.: SONY SDM-X202 Sony Electronics Inc. 680 Kinderkamack Road,Oradell,NJ 07649 USA 201-930-6972
This monitor complies with the TCO'95 guidelines.
(for the black model)
This device complies...
Operating Instructions - Page 3

... (digital RGB) ...7 Setup 2: Connect a computer equipped with an HD15 output connector (analog RGB) ...7 Setup 3: Connect the audio cord ...8 Setup 4: Connect the power cord ...8 Setup 5: Bundle the cords and cables ...9 Setup 6: Turn on the monitor and computer ...9 Setup 7: Adjust the tilt and swivel ...10 Selecting the input signal (INPUT button) ...11 Connecting Universal Serial Bus (USB...
Operating Instructions - Page 4

... example near an open window or an outdoor exit. If setting up temporarily in an outdoor environment, be sure to take adequate precautions against airborne dust and dirt. Otherwise irreparable malfunctions could occur.
Transportation
• Disconnect all cables from the monitor and grasp the support and base sections of the display stand firmly with both...
Operating Instructions - Page 7

...LCD display • Power cord • HD15-HD15 video signal cable (analog RGB) • DVI-D video signal cable (digital RGB) • Audio cord (stereo miniplug) • USB upstream cable • Utility/Instruction Manual CD-ROM (utility software for Windows/Macintosh, Operating Instructions) • Warranty card • Quick Setup Guide
Using the supplied DVI-D video signal cable (digital...
Operating Instructions - Page 9

... cover. Secure the video signal cable and audio cord using the cable holder on the cabinet. Bundle all of the cords and cables inside of the stand.
Setup 6: Turn on the monitor and computer
1 Press the MAIN POWER switch on the right side of the monitor in the direction of the [. The 1 (power) indicator lights up in red...
Operating Instructions - Page 10

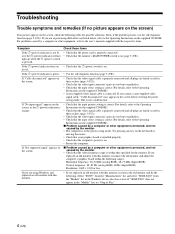
... that the video signal cable is properly connected. - Check that the input signal setting is correct by pressing the INPUT button (page 11). • If "Not supported signal" appears on the screen, reconnect the old monitor. Then adjust the computer's graphics board within the following ranges. Analog RGB Horizontal frequency Vertical frequency Resolution 28-92 kHz...
Operating Instructions - Page 11

...Notes • Not all computers and/or operating systems support USB configurations. Check your computer's instruction manual to see if you can connect USB devices. • In most cases, USB driver software needs to be installed on the host computer. Refer to the peripheral device's instruction manual for further details. • When you connect a computer whose power is already connected to the...
Operating Instructions - Page 14

...the color temperature The setting is stored in memory for INPUT1, INPUT2 (DVI-D), and INPUT2 (HD15), respectively.
R: G: B: 110 128 140
x Selecting the Smoothing
If the picture displayed at the "Full2"... • Standard (The default setting): Standard smoothing effect. • Graphics: To make the pictures appear clean. (This mode is suited for CD-ROM software for photo images or illustrations.)...
Operating Instructions - Page 15

... : DVI-D • Input2 Priority
1600 × 1200/60 Hz
Select Set
OK
Adjust the picture's sharpness manually (Phase/Pitch) You can adjust the picture's sharpness as follows. This adjustment is effective when the computer is connected to the monitor's HD15 input connector (analog RGB). 1 2 Load the Utility Disk. Start the Utility Disk and display the test pattern. For Windows...
Operating Instructions - Page 16

... picture's position manually (H Center /V Center) If the picture is not in the center of the screen, adjust the picture's centering as follows. 1 2 3 Set the resolution to 1600 × 1200 on the computer. Load the Utility Disk. Start the Utility Disk and display the test pattern. For Windows Click [Utility] t [Windows]/[Win Utility.exe]. For Macintosh Click [Utility] t [Mac]/[Mac Utility]. Press...
Operating Instructions - Page 21

... Hz (analog RGB), 60 Hz (digital RGB) Resolution: 1600 × 1200 or less • If you replaced an old monitor with this monitor, reconnect the old monitor and do the following. Select "SONY" from the "Manufacturers" list and select "SDM-X202" from the "Models" list in the Windows device selection screen. If "SDM-X202" does not appear in the...
Quick Setup Guide - Page 2

...your computer. You can download it for free from the Adobe Web site.
Setup
Unpacking
Make sure your carton contains everything listed below. • LCD display • Power cord • HD15-HD15 video signal cable (analog RGB) • DVI-D video signal cable (digital RGB) • Audio cord (stereo miniplug) • USB upstream cable • Utility/Instruction Manual CD-ROM (utility software...
Quick Setup Guide - Page 4
... Hz (analog RGB), 60 Hz (digital RGB) Resolution: 1600 × 1200 or less
• If you replaced an old monitor with this monitor, reconnect the old monitor and do the following. Select "SONY" from the "Manufacturers" list and select "SDM-X202" from the "Models" list in the Windows device selection screen. If "SDM-X202" does not appear in the...
Marketing Specifications - Page 2

... Card Au.di.o . . . Cable Warranty Card USB Cable Audio Cable, Warranty Card . . .
Limited Warranty
3 years (Parts, Labor, Backlight)
3 years (Parts, Labor, Backlight)
3 years (Parts, Labor, Backlight)
3 years (Parts, Labor, Backlight)
Sony Electronics Inc. 16450 West Bernardo Drive San Diego, California 92127 For more information: 1.800.352.SONY Web address: sony.com/displays
Computer...