Sony TCD-D7 driver and firmware

Related Sony TCD-D7 Manual Pages
Download the free PDF manual for Sony TCD-D7 and other Sony manuals at ManualOwl.com
Primary User Manual - Page 2
... to them whenever you call upon your Sony dealer regarding this product.
Model No. TCD-D7 Serial No.
WARNING To prevent fire or shock hazard, do not expose the unit to rain or moisture.
This equipment has been tested and found to comply with the limits for a Class B digital device, pursuant to Part 15 of the...
Primary User Manual - Page 3
...
17
To playback
18
Adjustable (automatic/manual) recording level The recording level can be adjusted either manually or automatically to suit every
Useful function
Start ID
21
Serial Copy Management System
23
Display window
24
recording situation.
Maintenance
26
Date function The date and time are automatically registered
Specifications Troubleshooting guide
27 29
at the time of...
Primary User Manual - Page 4
... the AC power adaptor, unplug the AC power adaptor from the...power input) jack.
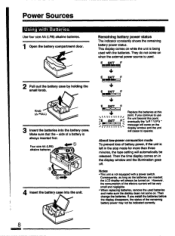
On Power Sources
•For AC operation: Use only the recommended AC power adaptor (not supplied). Do not use any other AC power...power source (batteries, AC power adaptor, car battery cord etc.) from the unit.
On Installation
•Do not install...... •Operation buttons and controls may not
function properly. &#...
Primary User Manual - Page 6

... illuminate the display window when
using the unit in the dark.
GO O RESET/+ button 0 COUNTER/- button 411419 ee 0 CLOCK/SET button
00 a DIGITAL I/O • REMOTE (digital input/output • remote) jack Connect equipment with digital inputs/outputs using the connecting cord POC-DA12 or RK-DA10 (not supplied), the adaptor kit RM-D3K, or the remote controller RMT-D7 etc.
0 Battery...
Primary User Manual - Page 7
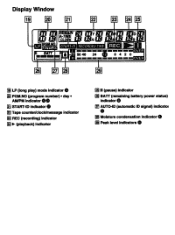
Display Window
19
21
22
BATT mm
26
•
• ••
50 40 24
28
0
M
'REC,
• 4 2 0
OVER
E LP (long play) mode indicator
E PGM.NO (program number) • day •
AM/PM indicator 00
E START-ID indicator 0
Tape counter/clock/message indicator
El RED (recording) indicator E l• (playback) indicator
E II (pause) indicator
E BAIT...
Primary User Manual - Page 8
...the tape setting will automatically be released. Then the time display comes on in the display window and the illumination goes
off.
Notes •This unit is not equipped with a power switch. Consequently...
and make sure the display does not come on. Then change the batteries. If you install the batteries before the display disappears, the status of the remaining battery power may not be indicated ...
Primary User Manual - Page 10
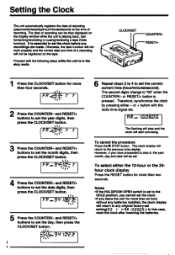
.../month/date/day/hour/minute/second) at the time of recording. The date of recording can be then displayed on the display window while the unit is playing back, fastforwarding/rewinding or cueing/reviewing a tape (Date function). It is essential to set the clock before any recordings are made. Otherwise, the date function will not work properly...
Primary User Manual - Page 11

... C. C.
;OPEt z e$ t•
Notes •When disconnecting the unit from the power source, make sure that the cassette compartment door is closed. Otherwise, you may not be... cassette with the window facing upward.
HOLD/PUSH OPEN While pressing
Record-protect shutter Slide the record-protect shutter to the left to protect a recorded tape from being accidentally erased by recording on the tape for...
Primary User Manual - Page 14
...of what is being shown on the display window.
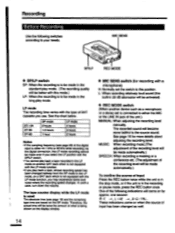
♦ MIC SENS switch (for recording with a microphone)
H: Normally set the switch to this position. L: When recording relatively loud sound (the
built-in 20... another device such as a microphone or a stereo set is connected to either the MIC or the LINE IN jack of the unit.) MANUAL: When adjusting the recording level
manually. The recorded sound will...
Primary User Manual - Page 16
... you forcibly press the button, the switch may be damaged.
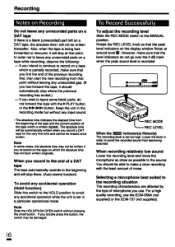
To Record Successfully
To adjust the recording level Slide the REC MODE switch to the MANUAL position. Rotate the REC LEVEL knob so that the peak
®. level indicators on the display window flicker at
around level However, make sure that the level indicators do...
Primary User Manual - Page 17
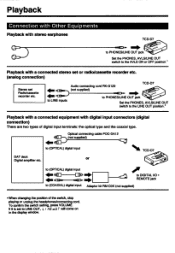
...)
Stereo set Radio/cassette recorder etc.
to LINE inputs
TCD-D7
Audio connecting cord RK-G129
(not supplied)
EN•lo•
to PHONES/UNE OUT jack
1%-4Aid.
Set the PHONES, AVLS/UNE OUT switch to the LINE OUT position.*
Playback with a connected equipment with digital input connectors (digital connection)
There are two types of digital input terminals: the optical type and...
Primary User Manual - Page 21

... written depends on the way the recording has been done. See the chart below.
Recording via MIC input Only when the recording Recording via LINE input has started (including
when the pause mode is released)
Recording from a CD player via digital input
At the beginnings of programs (tracks)*
Recording from a DAT player via digital input
All the start ID signals...
Primary User Manual - Page 23
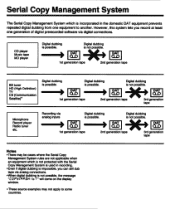
Serial Copy Management System
The Serial Copy Management System which is incorporated in the domestic DAT equipment prevents repeated digital dubbing from one equipment to another. However, this system lets you record at least one generation of digital prerecorded software via digital connections.
CD player Music tape MD player
Digital dubbing is possible.
Digital dubbing 4is not possible.
...
Primary User Manual - Page 24
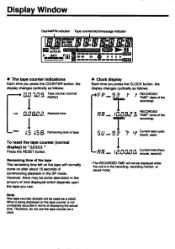
Display Window
Day/AM/PM indicator Tape counter/clocWmessage indicator
,r!
LP
T'r AUTO-ID
Emalla
I
START-ID RECORDED TIME 00 40 24
j
REC 6 4 2 0
• The tape counter indications Each time you press the COUNTER button, the display changes cyclically as follows:
n
Tape counter (normal
U.U hoU -Fs display)
Absolute time
M a5
a Remaining time of tape
To reset the...
Primary User Manual - Page 27
...
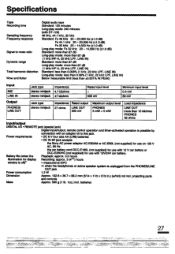
Load impedance
LINE OUT more than 10 kilohms PHONES 32 ohms
Input/output
DIGITAL VO • REMOTE jack (special jack)
Digital input/output, remote control operation and timer-activated operation is possible by
connection with an adaptor kit to this jack.
Power requirements
• DC 6 V four size AA (LR6) batteries
• DC IN 6V jack accepts:
the Sony AC power...
Primary User Manual - Page 29
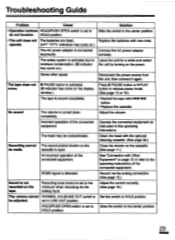
.... (II indicator has come on the display window.)
The tape is wound completely.
Disconnect the power source from the unit, then connect it...instructions of the connected equipment.
SCMS signal is detected.
Sound is not recorded on the tape.
Recording level control is set to the minimum when recording via the analog input.
The volume cannot PHONES, AVLS/LINE OUT switch is
be adjusted.
set...