Sony VPL-HW55ES driver and firmware


Related Sony VPL-HW55ES Manual Pages
Download the free PDF manual for Sony VPL-HW55ES and other Sony manuals at ManualOwl.com
Operating Instructions - Page 2

... to comply with the limits for a digital device pursuant to Subpart B of part 15 of FCC Rules.
If you have any questions about this product, you may call; Sony Customer Information Service Center 1-800-222-7669 or http://www.sony.com/
Declaration of Conformity
Trade Name: SONY
Model:
VPL-HW55ES
Responsible party: Sony Electronics Inc.
Address:
16530 Via Esprillo,
San Diego...
Operating Instructions - Page 4

... the Menus ...........41 Picture Menu 45 Advanced Picture Menu 50 Screen Menu 51 Setup Menu 53 Function Menu 55
Items Locked by Settings Lock 58 Installation Menu 59 Information Menu 61 About the Preset Memory No. ....62
Others
About the Control for HDMI 63 About the x.v.Color 64 About the simulated 3D feature ........64 Troubleshooting 65...
Operating Instructions - Page 7

... cause malfunction, be careful in adjusting temperature settings of the air conditioner. If condensation occurs, leave the projector turned on for about two hours before use.
SONY WILL NOT BE LIABLE FOR DAMAGES OF ANY KIND RESULTING FROM A FAILURE TO IMPLEMENT PROPER SECURITY MEASURES ON TRANSMISSION DEVICES, UNAVOIDABLE DATA LEAKS RESULTING FROM TRANSMISSION SPECIFICATIONS...
Operating Instructions - Page 11

... lens cap when you use the projector. • 3D glasses (2) • Pouch for the 3D glasses (2) • USB charging cable (APY5244010020/ SONY) (1.2 m) (2) • Conversion cable (LAN(M)-MD03(J)/ SONY) (18 cm) (1) • Operating Instructions (this manual) • Operating Instructions for the 3D glasses (1)
Inserting the batteries into the remote control
Insert the batteries E side first...
Operating Instructions - Page 13

Connections and Preparations
Step 1: Installing the Projector
The projector displays pictures output from a VCR or other device. The lens shift allows you to have broader options for placing the projector and viewing pictures easily.
Before Setting Up the Projector
Installing the projector in such a location may cause a malfunction of the unit due to moisture condensation or rise in temperature...
Operating Instructions - Page 14

... of the unit, operate the disconnect device to switch the power supply off, or disconnect the power plug.
Safety precautions for installing the unit on a ceiling
• Never mount the projector on the ceiling or move it by yourself. Be sure to consult with qualified Sony personnel (charged).
• When installing the unit on a ceiling, be sure...
Operating Instructions - Page 15

...and a screen varies depending on the size of the screen or whether or not you use the lens shift features. Install this unit so that it fits the size of your screen. For details on the distance between the unit and the..., stripes pattern may rarely appear on the screen depending on the distance between the screen and the projector or the zooming magnifications. This is not a malfunction of the...
Operating Instructions - Page 16

Step 2: Adjusting the Picture Position
Project an image on the screen and then adjust the picture position.
1 ON/STANDBY indicator
4 Lens shift dials
Remote control detector
5, 6
Zoom lever, Focus ring
2 ?/1 (On/
standby)
switch
3 PATTERN button
Tip The ?/1 (ON/STANDBY), INPUT, MENU, and M/m/
Operating Instructions - Page 20

To adjust the tilt of the installation surface
If the projector is installed on an uneven surface, use the front feet (adjustable) to keep the projector level.
Turn to adjust.
Front feet (adjustable)
Notes • Pointing the projector at too high or too low of a tilt will result in trapezoidal distortion in the
projected image. •...
Operating Instructions - Page 24
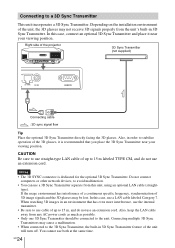
... • The 3D SYNC connector is dedicated for the optional 3D Sync Transmitter. Do not connect
computers or other network devices, to avoid malfunction. • You can use a 3D Sync Transmitter separate from this unit, using an optional LAN cable (straight-
type). If the usage environment has interference of a continuous specific frequency, synchronization of 3D...
Operating Instructions - Page 34

... other infrared communication devices nearby
3D glasses communication range
Figures A and B below indicate the communication range of the 3D glasses. If you try to watch 3D video images from a distance greater than the communication range or install the projector outside the communication range, the 3D glasses may not be able to display the images...
Operating Instructions - Page 35

... projecting downward from a unit that is recessed, if the unit is not installed on the ceiling, the signal from the 3D Sync Transmitter may not be projected properly to the screen, and the 3D glasses will not operate normally. (Installation A) Install the unit with its lens at the edge of, or outside of...
Operating Instructions - Page 37

...
downloaded from the Sony website. http://esupport.sony.com/US/p/select-system.pl http://www.pro.sony.eu/pro/article/projectors-home-cinema-article • When connecting the REMOTE connector with a computer, connect while the power of the computer and the unit is off. • You cannot adjust the picture quality when "Gamma Correction" in the Picture menu is set...
Operating Instructions - Page 39

Projecting
Adjusting the Picture Using Real Color Processing
The Real Color Processing (RCP) feature allows you to adjust the color, hue, and brightness of each target of the projected picture you specify independently. You can thus obtain a picture more suitable to your taste.
Tip Freeze the scene of the video source when you are adjusting the picture using Real Color Processing.
2, 3, 4, 5
...
Operating Instructions - Page 40

2 Press M/m to select "Position" or "Range," and specify it more delicate color position and color range you want to adjust using
Operating Instructions - Page 41

... different from the actual menu display.
Operation through the Menus
The projector is equipped with an on-screen menu for making various adjustments and settings. Some of the adjustable/setting items are displayed in a pop-up menu, in a setting menu or adjustment menu with no main menu, or in the next menu window. If you select an...
Operating Instructions - Page 42

1 Press MENU.
The menu window appears.
2 Press M/m to select a menu item,
and press , or . The items that can be set or adjusted with the selected menu appear. The item presently selected is shown in white.
GB 42
Operating Instructions - Page 43

Using the Menus
Pop-up menu Setting items
3 Press M/m to select an item you
want to set or adjust and press , or .
The setting items are displayed in a pop-up menu, in a setting menu, in an adjustment menu or in the next menu window.
Setting menu
Adjustment menu Next menu window
Setting items
43 GB
Operating Instructions - Page 52

...displayed. Select this setting
when noise appears along the edge of the picture. Off: Projects the whole of the input picture.
Tip
To display the displayable region within the four directions of the screen, refer to "Blanking" on the Installation...signal for pictures from a computer. Phase: Adjusts the dot phase and the phase of computer signal of
pictures from a computer. Adjusts the picture to the...
Operating Instructions - Page 58

... Color Space
Advanced Picture menu
• RCP
Level B
Setup menu
• Status • Language • Menu Position • Cooling Setting • Standby Mode • Power Saving • Lamp Setting
Function menu
• 3D SYNC Output • HDMI Setting • HDMI Dynamic Range • Auto Input Search • Background
Installation menu
• V Keystone • Image Flip •...