Sony VPLVW100 - Full HD Widescreen Projector driver and firmware
Drivers and firmware downloads for this Sony item


Related Sony VPLVW100 Manual Pages
Download the free PDF manual for Sony VPLVW100 and other Sony manuals at ManualOwl.com
Operating Instructions - Page 2

... may call: Sony Customer Information Service Center 1-800-222-7669 or http://www.sony.com/ The number below is for FCC related matters only. Declaration of Conformity Trade Name: SONY Model No.: VPL-VW100 Responsible Party: Sony Electronics Inc.
2 GB
Address: 16450 W. Bernardo Dr, San Diego, CA 92127 U.S.A. Telephone Number: 858-942-2230
This device complies with...
Operating Instructions - Page 3

... in Canada This Class B digital apparatus complies with Canadian ICES-003.
Voor de klanten in Nederland
Gooi de batterij niet weg maar lever deze in als klein chemisch afval (KCA).
The socket-outlet should be installed near the equipment and be... of this product, please contact your local Civic Office, your household waste disposal service or the shop where you purchased the product.
GB
3 GB
Operating Instructions - Page 5

...47 Function menu 50 Installation Menu 51 Setup Menu 53 Information Menu 55
About the Preset Memory No. ... 55
Operating the Projector from a Computer
Accessing the Projector from a Computer 56 Checking the Status of the Projector 56 Controlling the Projector from a Computer 57 Setting up the Projector 57
Projecting
Projecting the Picture on the Screen 29
Turning Off the Power 32
Others...
Operating Instructions - Page 6

... Air Filter 66 Replacing the Air Filter 67 Specifications 69
Preset Signals 71 Input Signals and Adjustable/
Setting Items 74 Ceiling Installation 76
When Using the PSS-H10 Projector Suspension Support ......... 77
When Using the PSS-610 Projector Suspension Support ......... 80
Making Fine Adjustments to the Horizontal Picture Position 83 Index 86
6 GB Table of Contents
Operating Instructions - Page 12
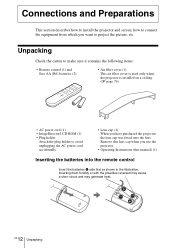
... power cord (1) • ImageDirector2 CD-ROM (1) • Plug holder
Attach the plug holder to avoid unplugging the AC power cord accidentally.
• Lens cap (1) When you have purchased the projector, the lens cap was fitted onto the lens. Remove this lens cap when you use the projector.
• Operating Instructions (this manual) (1)
Inserting the batteries into the remote control...
Operating Instructions - Page 13

Connections and Preparations
Step 1: Installing the Projector
Before Setting Up the Projector
Hot and humid
Unsuitable installation Do not place the projector in the following situations, which may cause malfunction or damage to the projector.
Poorly ventilated location
Locations subject to direct cool or warm air from an air-conditioner
20 cm
: Exhaust 20 cm
To maintain the...
Operating Instructions - Page 14

... surface or on the ceiling. Improper installation of the projector may cause a malfunction.
When installing the unit at altitudes
When using the projector at an altitude of 1,500
m or higher, set "High Altitude Mode" in the
Installation
menu to "On." (1 page 52)
Failing to set this mode when using the
projector at high altitudes could have adverse
effects...
Operating Instructions - Page 15
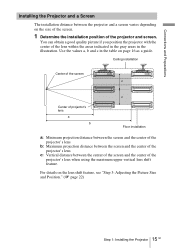
... in the gray areas in the illustration. Use the values a, b and c in the table on page 16 as a guide.
Ceiling installation
Center of the screen
c
c
Center of projector's lens
a
b
Floor installation
a: Minimum projection distance between the screen and the center of the projector's lens
b: Maximum projection distance between the screen and the center of the...
Operating Instructions - Page 16

...19 1/8) (25 1/2) (31 7/8) (38 1/4) (47 3/4) (57 3/8) (63 5/8) (79 5/8) (95 1/2)
To calculate the installation measurements (SS: Screen Size) a (minimum) = 31.5 (1 1/4) × SS - 48.2 (1 15/16) b (maximum)...3/8) (31 1/8) (39)
(46 3/4) (58 1/2) (70 1/8) (77 7/8) (97 3/8) (116 7/8)
To calculate the installation measurements (SS: Screen Size) a (minimum) = 38.551 (1 9/16) × SS - 48.2 (1 15/16)...
Operating Instructions - Page 17

... image on the screen and adjust the picture so that it
fits the screen. (1 page 22) To project an image, connect video equipment to the projector. (1 page 18)
Note When using a screen with an uneven surface, stripes pattern may rarely appear on the screen depending on the distance between the screen...
Operating Instructions - Page 22

Step 3: Adjusting the Picture Size and Position
Project an image on the screen and then adjust the picture position.
ON/STANDBY indicator
Adjusters Remote control detector
LIGHT
INPUT
DYNAMIC STANDARD CINEMA PICTURE MODE
USER 1 USER 2 USER 3
4 2
5,6,7
ENTER
LENS
ADJ PIC
MENU
Tip The ?/1 (on/standby), INPUT, LENS, MENU, and M/m/
Operating Instructions - Page 23

...projector.
The ON/STANDBY indicator flashes in green, and then lights in green.
ON/ STANDBY
Flashes in green for a few seconds, and then lights in green.
3 Turn on the equipment connected to the projector.
Refer to the operating instructions...
When "Auto Input Search" is set to "On" in the Function
menu, the channel
of the signal input is automatically displayed by pressing INPUT. (1 page 50...
Operating Instructions - Page 24

LENS
Tip
When "Lens Control" is set to "Off" on the Installation adjust the vertical picture position. (1 page 51) When "Test Pattern" is set to "Off" on the Function not displayed. (1 page 50)
menu, you cannot menu, the test pattern is
The picture moves up by a maximum of 0.65 of the screen size from the center...
Operating Instructions - Page 25

Connections and Preparations
6 Adjust the picture size.
Press the LENS button repeatedly until the Lens Zoom adjustment window (test pattern) appears. Then adjust the size of the picture by pressing the M/ m/
Operating Instructions - Page 26

To adjust the tilt of the installation surface
If the projector is installed on an uneven surface, use the adjusters to keep the projector level.
Turn to adjust. Adjusters
Note Be careful not to catch your finger when turning the adjusters.
26 GB
Step 3: Adjusting the Picture Size and Position
Operating Instructions - Page 31
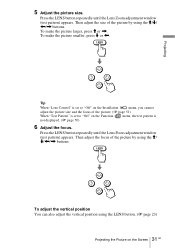
5 Adjust the picture size.
Press the LENS button repeatedly until the Lens Zoom adjustment window (test pattern) appears. Then adjust the size of the picture by using the M/m/
Operating Instructions - Page 42

.... : DVI Signal Sel. : Color System :
On English Component Video GBR Auto
Installation
Setup
Information
Sel:
Set:
Back: Exit:
3 Press M or m to select an item you want to set or adjust and
press , or ENTER. The setting items are displayed in a pop-up menu, in a setting menu, in an adjustment menu or in the next menu window.
Pop-up menu
Setting...
Operating Instructions - Page 43

Using the Menus
Next menu window Setting items
Picture Signal Function Installation Setup Information
Adjust Picture Contrast : Brightness : Color : Hue : Sharpness : NR : Black Level Adj. : Gamma Correction : Color Temp : Advanced Iris :
Cinema 80 50 50 50 50 Off Off Off Low Auto
Sel:
Set:
Back:
Exit:
4 Make the setting or adjustment of an item.
When changing the...
Operating Instructions - Page 56

...status of the projector on a computer display and control the projector from a computer. Confirm that the projector and computer are connected to the router/hub with the LAN cables, then turn on the projector, computer and router/hub.
1 Start Internet Explorer 5.0 (or
later version) on your computer.
2 Type "http://xxx.xxx.xxx.xxx (the
IP address of the projector)" as the "Address," then press the...
Operating Instructions - Page 57

... on a computer display. The functions of the buttons in the windows are the same as those on the remote control supplied with the projector.
Settings of the projector are lit. After you have changed the settings on the projector, click "Refresh" at the upper righthand corner of the window to update the status. The lighting buttons are changed.
Setting up the Projector
Click "Setup." The Password...