ViewSonic PJD7822HDL driver and firmware
Drivers and firmware downloads for this ViewSonic item
Related ViewSonic PJD7822HDL Manual Pages
Download the free PDF manual for ViewSonic PJD7822HDL and other ViewSonic manuals at ManualOwl.com
User Guide - Page 1
PJD7822HDL DLP Projector
User Guide
IMPORTANT: Please read this User Guide to obtain important information on installing and using your product in a safe manner, as well as registering your product for future service. Warranty information contained in this User Guide will describe your limited coverage from ViewSonic Corporation, which is also found on our web site at http:// www...
User Guide - Page 3

... undesired operation. This equipment has been tested and found to comply with the limits for a Class B digital device, pursuant to part 15 of the FCC Rules. These limits are designed to provide reasonable protection against harmful interference in a residential installation. This equipment generates, uses, and can radiate radio frequency energy, and if not...
User Guide - Page 5
... block any ventilation openings. Install the unit in accordance with the
manufacturer's instructions. 8. Do not install near any heat sources such as radiators, heat registers, stoves,
or other devices (including amplifiers) that produce... 14. Refer all servicing to qualified service personnel. Servicing is required when the unit has been damaged in any way, such as: if the power-supply cord or plug...
User Guide - Page 6

... trademark of the Video Electronics Standards Association. DPMS and DDC are trademarks of VESA. PS/2, VGA and XGA are registered trademarks of International Business Machines Corporation. Disclaimer: ViewSonic Corporation shall not be liable for technical or editorial errors or omissions contained herein; nor for incidental or consequential damages resulting from furnishing this material...
User Guide - Page 8
...safety instructions 2
Introduction 4
Projector features 4 Shipping contents 5 Projector exterior view 6 Controls and functions 7
Positioning your projector 12
Choosing a location 12 Projection dimensions 13
Connection 14
Connecting a computer or monitor .... 15 Connecting Video source devices ...... 16
Operation 19
Starting up the projector 19 Using the menus 20 Utilizing the password...
User Guide - Page 9
... your projector through a power stabilizer, surge protector or uninterruptible power supply (UPS). 6. Do not block the projection lens with any objects when the projector is under operation as this could cause the objects to become heated and deformed or even cause a fire. To temporarily turn off the lamp, press BLANK on the projector or remote control. 7. The...
User Guide - Page 10
... become wet, disconnect it from the power supply's wall socket and call your local service center to have the projector serviced.
18. This product is capable of displaying inverted pictures for ceiling mount installation.
Use only qualified ceiling mount kit for mounting the projector and ensure it is securely installed.
19. When the projector is under operation, you may...
User Guide - Page 13
... 12
13 14 15 16 17
19
18
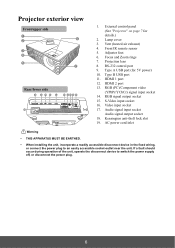
1. External control panel (See "Projector" on page 7 for details.)
2. Lamp cover 3. Vent (heated air exhaust) 4. Front IR remote sensor 5. Adjuster foot 6. Focus and Zoom rings 7. Projection lens 8. RS-232 control port 9. Type A USB port (for 5V power) 10. Type B USB port 11. HDMI 1 port 12. HDMI 2 port 13. RGB (PC)/Component video
(YPbPr/YCbCr) signal input...
User Guide - Page 16
....
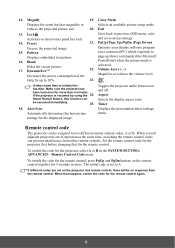
25.
Toggles the projector audio between on and off. Aspect
Selects the display aspect ratio. Timer
18. Auto Sync
Displays the presentation timer settings
Automatically determines the best picture
menu.
timings for the displayed image.
Remote control code
The projector can be assigned to two different remote control codes, A or B. When several adjacent projectors are in operation at...
User Guide - Page 17
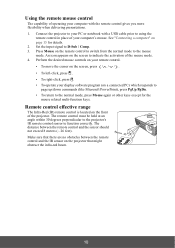
... capability of operating your computer with the remote control gives you more flexibility when delivering presentations.
1. Connect the projector to your PC or notebook with a USB cable prior to using the remote control in place of your computer's mouse. See "Connecting a computer" on page 15 for details.
2. Set the input signal to D-Sub / Comp. 3. Press Mouse on the remote control to switch from...
User Guide - Page 18
...
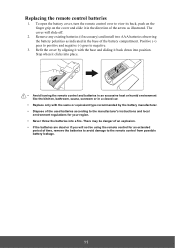
1. To open the battery cover, turn the remote control over to view its back, push on the finger grip on the cover and slide it in the direction of the arrow as illustrated. The cover will slide off.
2. Remove any existing batteries (if necessary) and install two AAA batteries observing the battery polarities...
User Guide - Page 19
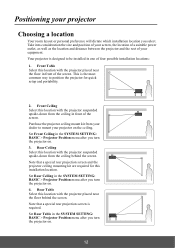
... behind the screen. Note that a special rear projection screen and the projector ceiling mounting kit are required for this installation location. Set Rear Ceiling in the SYSTEM SETTING: BASIC > Projector Position menu after you turn the projector on. 4. Rear Table Select this location with the projector placed near the floor behind the screen. Note that a special rear...
User Guide - Page 20
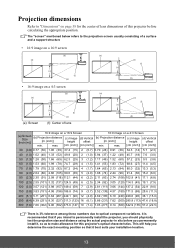
... of this projector before calculating the appropriate position.
The "screen" mentioned below refers to the projection screen usually consisting of a surface and a support structure
•...install the projector, you should physically test the projection size and distance using the actual projector in situ before you permanently install it, so as to make allowance for this projector's optical...
User Guide - Page 39

... Management
Only in permanent installations with controlled lighting levels such as boardrooms, lecture theaters, ...TVs, projectors, etc., you can project any image from the disc on the screen and enter the Color Management menu to make adjustments. To adjust the settings: 1. Go to the DISPLAY menu and highlight Color Management. 2. Press MODE/ENTER on the projector or Enter on the remote control...
User Guide - Page 52
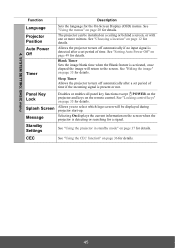
... functions except II POWER on the projector and keys on the remote control. See "Locking control keys" on page 35 for details. Allows you to select which logo screen will be displayed during projector start-up.
Message
Selecting On displays the current information on the screen when the projector is detecting or searching for a signal.
Standby Settings
See "Using the...
User Guide - Page 57
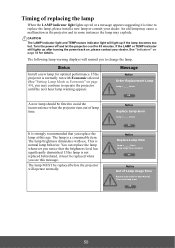
...install a new lamp or consult your dealer. An old lamp may cause a malfunction in the projector...power back on, please contact your dealer. See "Indicators" on page 54 for details.
The following lamp warning displays will remind you to change the lamp.
Status
Install a new lamp for optimal performance. If the projector is normally run with Economic selected (See "Setting... the projector will operate...
User Guide - Page 58
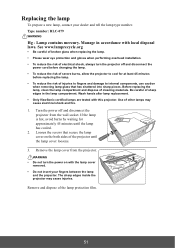
... eye protection and gloves when performing overhead installation. • To reduce the risk of electrical shock, always turn the projector off and disconnect the
power cord before changing the lamp. •... • Only ViewSonic certified lamps are tested with this projector. Use of other lamps may cause electrical shock and fire.
1. Turn the power off and disconnect the projector from the wall ...
User Guide - Page 65
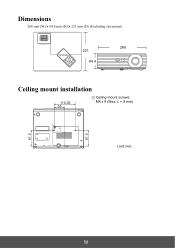
Dimensions
268 mm (W) x 84.4 mm (H) x 221 mm (D) (Excluding extrusions)
221
MENU EXIT
84.4
268
Ceiling mount installation
110.05 55
Ceiling mount screws: M4 x 8 (Max. L = 8 mm)
81.5 81.5
Unit: mm
58
User Guide - Page 82
... product due to shipment.
f. Removal or installation of the product.
g. Causes external to the product, such as electric power fluctuations or failure.
h. Use of supplies or parts not meeting ViewSonic's specifications.
i. Normal wear and tear.
j. Any other cause which does not relate to a product defect.
3. Removal, installation, one way transportation, insurance, and set-up service charges.
User Guide - Page 84
...a static image is displayed on the product for an extended period of time. 4. Removal, installation, insurance, and set-up service charges.
How to get service: For information about receiving service under warranty, contact ViewSonic Customer Support (Please refer to the attached Customer Support page). You will need to provide your product's serial number, so please record the product information...