eMachines D520 driver and firmware
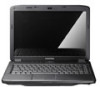
Related eMachines D520 Manual Pages
Download the free PDF manual for eMachines D520 and other eMachines manuals at ManualOwl.com
eMachines D720/D520 Series Quick Guide - Page 10
...;
and controls
•
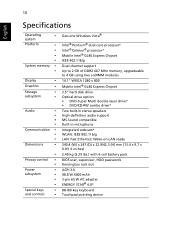
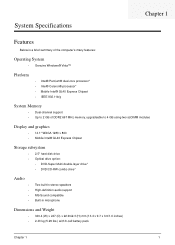
Genuine Windows Vista®
Intel® Pentium® dual-core processor* Intel® Celeron® processor* Mobile Intel® GL40 Express Chipset IEEE 802.11b/g
Dual-channel support Up to 2 GB of DDR2 667 MHz memory, upgradeable to 4 GB using two soDIMM modules 14.1" WXGA 1280 x 800 Mobile Intel® GL40 Express Chipset
2.5" hard disk drive Optical drive option...
eMachines D720/D520 Series Service Guide - Page 9
... Recovery 131
Clearing Password Check 131 BIOS Recovery by Crisis Disk 132
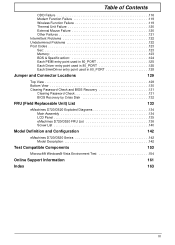
FRU (Field Replaceable Unit) List
133
eMachines D720/D520 Exploded Diagrams 134 Main Assembly 134 LCD Panel 135 eMachines D720/D520 FRU List 136 Screw List 140
Model Definition and Configuration
142
eMachines D720/D520 Series 142 Model Description 142
Test Compatible Components
153
Microsoft® Windows...
eMachines D720/D520 Series Service Guide - Page 11
...® processor* • Mobile Intel® GL40 Express Chipset • IEEE 802.11b/g
System Memory
• Dual-channel support • Up to 2 GB of DDR2 667 MHz memory, upgradeable to 4 GB using two soDIMM modules
Display and graphics
• 14.1" WXGA 1280 x 800 • Mobile Intel® GL40 Express Chipset
Storage subsystem
• 2.5" hard disk drive • Optical drive option...
eMachines D720/D520 Series Service Guide - Page 32
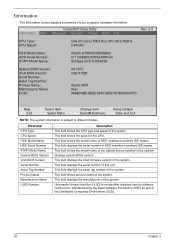
... the speed of the CPU. This field shows the model name of HDD installed on primary IDE master. This field displays the serial number of HDD installed on primary IDE master. This field shows the model name of the Optical device installed in the system. Displays system BIOS version. This field displays the VGA firmware version of the system. This field displays the serial number of this...
eMachines D720/D520 Series Service Guide - Page 35
...
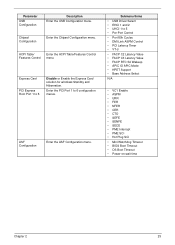
Enter the Chipset Configuration menu.
ACPI Table/
Enter the ACPI Table/Features Control
Features Control menu.
Express Card
PCI Express Root Port 1 to 6
Disable or Enable the Express Card solution for windows Standby and Hibernation.
Enter the PCI Port 1 to 6 configuration menus.
ASF Configuration
Enter the ASF Configuration menu.
Submenu Items
• USB Driver Select •...
eMachines D720/D520 Series Service Guide - Page 43
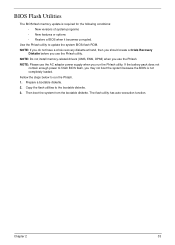
...; New versions of system programs • New features or options • Restore a BIOS when it becomes corrupted.
Use the Phlash utility to update the system BIOS flash ROM. NOTE: If you do not have a crisis recovery diskette at hand, then you should create a Crisis Recovery
Diskette before you use the Phlash utility. NOTE: Do not install memory-related drivers (XMS, EMS...
eMachines D720/D520 Series Service Guide - Page 118
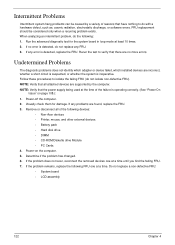
... power management settings in the BIOS to ensure they are not the cause of the problem (see
"Power" on page 29). 6. Remove all external and non-essential hardware connected to the computer that are not necessary to
boot the computer to the failure point. 7. Remove any recently installed software. 8. If the Issue is still not resolved, see "Online Support...
eMachines D720/D520 Series Service Guide - Page 120
...the view settings and control/mouse wheel
zoom feature in the application. c. If desktop display resolution is not normal, right-click on the desktop and select
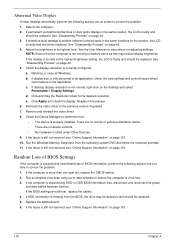
Personalize´ Display Settings. d. Click and drag the Resolution slider to the desired resolution. e. Click Apply and check the display. Readjust if necessary. 6. Roll back the video driver to the previous version if updated. 7. Remove...
eMachines D720/D520 Series Service Guide - Page 123
... to determine that: • The device is properly installed. • There are no red Xs or yellow exclamation marks. • There are no device conflicts. • No hardware is listed under Other Devices.
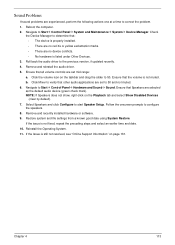
3. Roll back the audio driver to the previous version, if updated recently. 4. Remove and reinstall the audio driver. 5. Ensure that all volume controls are set mid range:
a. Click the...
eMachines D720/D520 Series Service Guide - Page 125
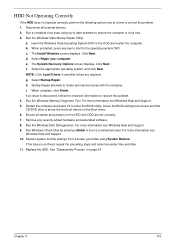
... information to resolve the problem. 4. Run the Windows Memory Diagnostic Tool. For more information see Windows Help and Support. 5. Restart the computer and press F2 to enter the BIOS Utility. Check the BIOS settings are correct and that CD/DVD drive is set as the first boot device on the Boot menu. 6. Ensure all cables and jumpers on the HDD and ODD...
eMachines D720/D520 Series Service Guide - Page 127
a. Double-click lDE ATA/ATAPI controllers. If a device displays a down arrow, right-click on the device and click Enable.
b. Double-click DVD/CD-ROM drives. If the device displays a down arrow, right-click on the device and click Enable.
c. Check that there are no yellow exclamation marks against the items in lDE ATA/ATAPI controllers. If a device has an exclamation mark, right-click on...
eMachines D720/D520 Series Service Guide - Page 130
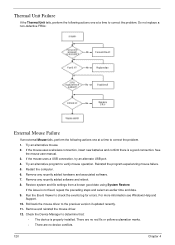
... the Event Viewer to check the events log for errors. For more information see Windows Help and
Support. 10. Roll back the mouse driver to the previous version if updated recently. 11. Remove and reinstall the mouse driver. 12. Check the Device Manager to determine that:
• The device is properly installed. There are no red Xs or yellow exclamation...
eMachines D720/D520 Series Service Guide - Page 132
... any problems are found, replace the FRU. 3. Remove or disconnect all of the following devices:
• Non-Acer devices • Printer, mouse, and other external devices • Battery pack • Hard disk drive • DIMM • CD-ROM/Diskette drive Module • PC Cards 4. Power-on the computer. 5. Determine if the problem has changed. 6. If the problem does not recur, reconnect...
eMachines D720/D520 Series Service Guide - Page 142
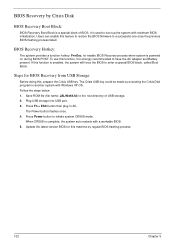
... with Windows XP OS. Follow the steps below: 1. Save ROM file (file name: JAL90x64.fd) to the root directory of USB storage. 2. Plug USB storage into USB port. 3. Press Fn + ESC button then plug in AC.
The Power button flashes once. 4. Press Power button to initiate system CRISIS mode.
When CRISIS is complete, the system auto restarts with a workable BIOS. 5. Update the latest version BIOS...
eMachines D720/D520 Series Service Guide - Page 171
.... Acer's Website offers you convenient and valuable support resources whenever you need them. In the Technical Information section you can download information on all of Acer's Notebook, Desktop and Server models including:
• Service guides for all models • User's manuals • Training materials • Bios updates • Software utilities • Spare parts lists • TABs...
eMachines Notebook User Guide (All Series) - Page 10
...power management:
• Activate display's Sleep mode within 15 minutes of user inactivity. • Activate computer's Sleep mode within 30 minutes of user inactivity. • Wake the computer from Sleep mode by pushing power button. • More power management settings can be done through Windows
power... shoulders • install the external display, keyboard and mouse properly and within...
eMachines Notebook User Guide (All Series) - Page 15
... your AC adapter
xiii
Taking care of your battery pack
xiv
Cleaning and servicing
xiv
Touchpad
1
Touchpad basics (with two-click buttons)
1
Using the keyboard
2
Lock keys and embedded numeric keypad
2
Windows keys
3
Hotkeys
4
Special keys
5
Frequently asked questions
6
Battery pack
9
Battery pack characteristics
9
Maximizing the battery's life
9
Installing and removing...
eMachines Notebook User Guide (All Series) - Page 16
...-in network feature
19
Universal Serial Bus (USB)
19
Installing memory
20
BIOS utility
21
Boot sequence
21
Enable disk-to-disk recovery
21
Password
21
Using software
22
Playing DVD movies
22
Power management
23
eMachines Recovery Management
24
Burn backup discs
25
Restore
26
Restore Windows Vista from backup discs
27
Troubleshooting
30
Troubleshooting tips
30
Error...
eMachines Notebook User Guide (All Series) - Page 45
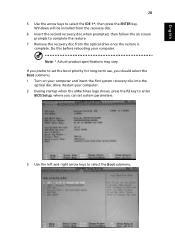
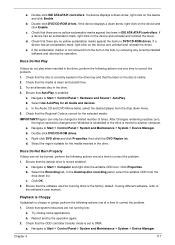
... long-term use, you should select the Boot submenu. 1 Turn on your computer and insert the first system recovery disc into the
optical disc drive. Restart your computer. 2 During startup when the eMachines logo shows, press the F2 key to enter
BIOS Setup, where you can set system parameters.
3 Use the left and right arrow keys to select the...
eMachines Notebook User Guide (All Series) - Page 46
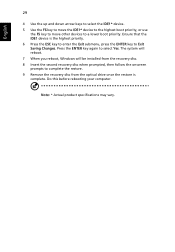
... select Yes. The system will reboot. 7 When you reboot, Windows will be installed from the recovery disc. 8 Insert the second recovery disc when prompted, then follow the onscreen prompts to complete the restore. 9 Remove the recovery disc from the optical drive once the restore is complete. Do this before rebooting your computer.
Note: * Actual product specifications may vary.