Acer Altos G530 driver and firmware
Drivers and firmware downloads for this Acer Computers item

Related Acer Altos G530 Manual Pages
Download the free PDF manual for Acer Altos G530 and other Acer manuals at ManualOwl.com
Altos G530 User's Guide - Page 7
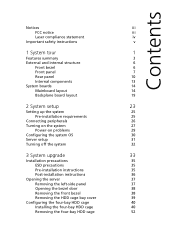
... board layout
19
2 System setup
23
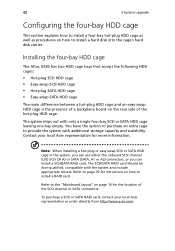
Setting up the system
25
Pre-installation requirements
25
Connecting peripherals
26
Turning on the system
27
Power-on problems
29
Configuring the system OS
30
Server setup
31
Turning off the system
32
3 System upgrade
33
Installation precautions
35
ESD precautions
35
Pre-installation instructions
35
Post-installation instructions...
Altos G530 User's Guide - Page 8

... power supply module 75
4 BIOS setup
77
BIOS setup
79
Entering BIOS setup
80
Main
82
Advanced
84
Processor Configuration
85
IDE Configuration
88
Floppy Configuration
95
Super I/O Configuration
96
USB Configuration
97
PCI Configuration
99
Memory Configuration
101
Boot
103
Boot Settings Configuration
104
Boot Device Priority
106
Hard Disk Drives
107
Removable Drives...
Altos G530 User's Guide - Page 15

... Rage® XL chipset with 8MB SDRAM
I/O ports • Front panel
• Two USB 2.0 ports • Rear panel
• PS/2 keyboard and mouse port • Two USB 2.0 ports • VGA/monitor port • Serial port • Two LAN ports (RJ-45)
Operating system and software • Microsoft® Windows® Server 2003, X64 edition • Microsoft Windows Server 2003 • Microsoft...
Altos G530 User's Guide - Page 40
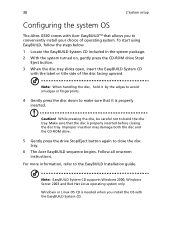
.... Improper insertion may damage both the disc and the CD-ROM drive.
5 Gently press the drive Stop/Eject button again to close the disc tray.
6 The Acer EasyBUILD sequence begins. Follow all onscreen instructions.
For more information, refer to the EasyBUILD Installation guide.
Note: EasyBUILD System CD supports Windows 2000, Windows Server 2003 and Red Hat Linux operating system only...
Altos G530 User's Guide - Page 44

This chapter discusses the precautionary measures and installation procedures you need to know when upgrading the system.
Altos G530 User's Guide - Page 46
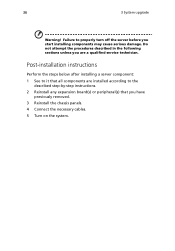
... you are a qualified service technician.
Post-installation instructions
Perform the steps below after installing a server component: 1 See to it that all components are installed according to the
described step-by-step instructions. 2 Reinstall any expansion board(s) or peripheral(s) that you have
previously removed. 3 Reinstall the chassis panels. 4 Connect the necessary cables. 5 Turn on the...
Altos G530 User's Guide - Page 50
... SCSI CH A) or SATA (SATA_A1 or A2) connectors, or you can install a SCSI/SATA RAID card. The SCSI/SATA RAID card should be Acer-qualified, compatible with the system and include appropriate drivers. Refer to page 70 for intructions on how to install a RAID card.
Refer to the "Mainboard layout" on page 14 for the location of the SCSI channel or SATA connectors.
To purchase a SCSI or SATA RAID card...
Altos G530 User's Guide - Page 52
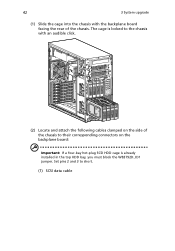
... the chassis with an audible click.
(2) Locate and attach the following cables clamped on the side of the chassis to their corresponding connectors on the backplane board:
Important: If a four-bay hot-plug SCSI HDD cage is already installed in the top HDD bay, you must block the W83792D_ID1 jumper. Set pins 2 and 3 to short...
Altos G530 User's Guide - Page 54

... the empty HDD bay,
then detach the cover. 4 Install the easy-swap cage.
(1) Slide the cage into the chassis. The cage is locked to the chassis with an audible click.
(2) Locate and attach the following cables to their corresponding connectors on the SCSI hard drive and SCSI RAID card. For instructions on how to install a SCSI RAID card see page 70.
(1) SCSI data cable
Altos G530 User's Guide - Page 56

46
3 System upgrade
To install the hot-plug SATA HDD cage:
1 Observe the ESD precautions and pre-installation instructions described on page 35.
2 Remove the HDD cage bay cover. See page 39.
3 Remove the screw that secure the cover of the empty HDD bay, then detach the cover.
Altos G530 User's Guide - Page 58
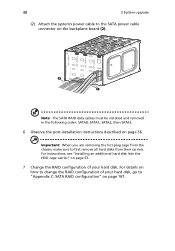
... system's power cable to the SATA power cable connector on the backplane board (2).
Note: The SATA RAID data cables must be installed and removed in the following order: SATA0, SATA1, SATA2, then SATA3.
6 Observe the post-installation instructions described on page 36.
Important: When you are removing the hot-plug cage from the chassis, make sure to first remove all hard disks from...
Altos G530 User's Guide - Page 60

50
3 System upgrade
(1) Slide the cage into the chassis. The cage is locked to the chassis with an audible click.
(2) Locate and attach the power (1) and SATA (2) cables to their corresponding connectors on the hard drives and SATA RAID card.
5 Observe the post-installation instructions described on page 36.
Altos G530 User's Guide - Page 62

52
3 System upgrade
Removing the four-bay HDD cage
1 Observe the ESD precautions and pre-installation instructions described on page 35.
2 Disconnect the data and power cables from the backplane board. 3 Move the release slider all the way up to eject the hot-plug or easy
swap HDD cage (1). 4 Remove the cage from the HDD bay (2).
5 ...
Altos G530 User's Guide - Page 64
54
3 System upgrade
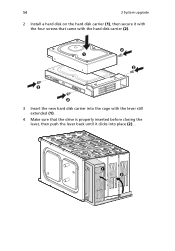
2 Install a hard disk on the hard disk carrier (1), then secure it with the four screws that came with the hard disk carrier (2).
3 Insert the new hard disk carrier into the cage with the lever still extended (1).
4 Make sure that the drive is properly inserted before closing the lever, then push the lever back until it clicks into place (2). .
Altos G530 User's Guide - Page 66

56
3 System upgrade
4 Install a new 5.25-inch drive into the drive bay (1), then push the lever in the direction of the lock icon (2).
5 Connect the power and IDE cables to the new drive. 6 Observe the post-installation instructions described on page 36.
Altos G530 User's Guide - Page 68
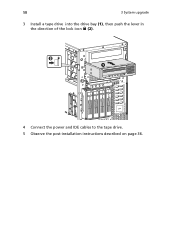
58
3 System upgrade
3 Install a tape drive into the drive bay (1), then push the lever in the direction of the lock icon (2).
4 Connect the power and IDE cables to the tape drive. 5 Observe the post-installation instructions described on page 36.
Altos G530 User's Guide - Page 69

59
Upgrading the processor
This section includes instructions for installing and removing a processor and heat sink fan (HSF) assembly.
Installing the CPU
The mainboard has two 604-pin processor socket that support Intel Xeon processors. The system ships out with only a single Intel Xeon processor installed leaving one CPU socket empty. You have the option to purchase an extra CPU for the system.
...
Altos G530 User's Guide - Page 70

60
3 System upgrade
6 Press the retainer lever down to lock the CPU in place (2).
Installing the HSF assembly
1 Apply thermal grease. Apply approximately 0.1ml of the thermal grease compound on it's top side.
2 Install the heat sink fan assembly
Altos G530 User's Guide - Page 140

... the network drivers. • Try another port or hub on the switch.
Network activity indicator does not light. Do the following: • Make sure the correct network drivers are loaded on the system. • Network might be idle. Try accessing the server.
Server hangs when the drivers are loaded. • Change the PCI interrrupt settings.
External device connected to a USB connector...
Altos G530 User's Guide - Page 156

... the network.
System requirements
ASM requires TCP/IP connectivity between the ASM Agent and the ASM Console.
ASM Agent
• Intel Pentium 4 (800 MHz), Intel Xeon (800 MHz), AMD Opteron (1000 MHz) or higher processor
• 512 MB of RAM • SCSI/SATA hard drive with at least 100 MB free hard disk space • Microsoft Windows 2003...