Acer Altos R300 driver and firmware
Drivers and firmware downloads for this Acer Computers item

Related Acer Altos R300 Manual Pages
Download the free PDF manual for Acer Altos R300 and other Acer manuals at ManualOwl.com
Acer Altos R300 User's Guide - Page 3

...
the receiver is connected • Consult the dealer or an experienced radio/television technician for help
Notice: Shield cables All connections to other computing devices must be made using shielded cables to maintain compliance with FCC regulations.
Notice: Peripheral devices Only peripherals (input/output devices, terminals, printers, etc.) certified to comply with the Class B limits may be...
Acer Altos R300 User's Guide - Page 6

...cause overheating and damage to system components. • Temperature limits
The operating temperature of the system, when installed in the rack, must not go below 10°C (50°F) or rise above 35°C ...by the handles on the power supplies. • System covers
The system cover is an integral part of this product. If you need to open your system to install new components, always remember ...
Acer Altos R300 User's Guide - Page 7

...or heat register, or in a built-in installation unless proper ventilation is provided.
6 This product should be operated from the type of power indicated on the marking label. If you are.... Refer all servicing to qualified service personnel.
11 Unplug this product from the wall outlet and refer servicing to qualified service personnel under the following conditions:
a When the power cord or plug...
Acer Altos R300 User's Guide - Page 12
...disk drive
41
Installing SCSI hard disks
45
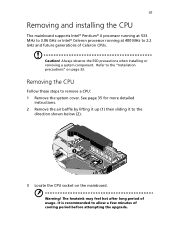
Removing and installing the CPU
47
Removing the CPU
47
Installing the CPU
48
Removing and installing memory modules
50
Removing a DDR DIMM
50
Installing a DDR DIMM
51
4 BIOS Setup utility
53
BIOS Setup utility
55
Entering Setup
56
System Summary
58
Product Information
60
Devices and I/O Ports
61
Console Redirection
63
Serial...
Acer Altos R300 User's Guide - Page 17
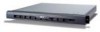
.../100 MHz PCI-X bus slots and four DIMM slots that allow memory installation up to a maximum capacity of 4 GB.
For connectivity, the mainboard provides two USB (Universal Serial Bus) connectors, PS/2 interfaces for both mouse and keyboard, one UART serial port, one monitor port and two LAN ports.
For media storage, Altos R300 supports one slim-type CD-ROM drive, one slim-type floppy disk drive and...
Acer Altos R300 User's Guide - Page 48

34
3 Upgrading your system
Post-installation instructions
Observe the following after installing a system component: 1 See to it that all components are installed according to the
described step-by-step instructions. 2 Replace any expansion board(s) or peripheral(s) that you have
previously removed. 3 Connect the necessary cables. 4 Replace the system cover. 5 Turn on the system.
Acer Altos R300 User's Guide - Page 56

42
3 Upgrading your system
To remove the hard disk drive under the floppy disk drive:
a Disconnect the diskette drive (1), hard disk (2) and power cable (3) connected to the floppy drive and hard disk.
Note: To remove the floppy drive cable, use your fingers or a flat screw driver to gently lift the cable retainer on the connector (a) then lift the cable up as shown inset on the figure below...
Acer Altos R300 User's Guide - Page 58
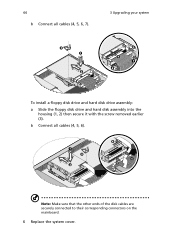
44 b Connect all cables (4, 5, 6, 7).
3 Upgrading your system
To install a floppy disk drive and hard disk drive assembly:
a Slide the floppy disk drive and hard disk assembly into the housing (1, 2) then secure it with the screw removed earlier (3).
b Connect all cables (4, 5, 6).
Note: Make sure that the other ends of the disk cables are securely connected to their corresponding connectors on...
Acer Altos R300 User's Guide - Page 61
47
Removing and installing the CPU
The mainboard supports Intel® Pentium® 4 processor running at 533 MHz to 3.06 GHz or Intel® Celeron processor running at 400 MHz to 2.2 GHz and future generations of Celeron CPUs.
Caution! Always observe the ESD precautions when installing or removing a system component. Refer to the "Installation precautions" on page 33...
Acer Altos R300 User's Guide - Page 62
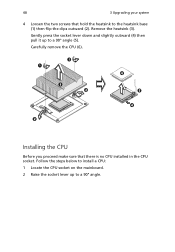
48
3 Upgrading your system
4 Loosen the two screws that hold the heatsink to the heatsink base (1) then flip the clips outward (2). Remove the heatsink (3).
Gently press the socket lever down and slightly outward (4) then pull it up to a 90° angle (5).
Carefully remove the CPU (6).
Installing the CPU
Before you proceed make sure that there...
Acer Altos R300 User's Guide - Page 64
...Upgrading your system
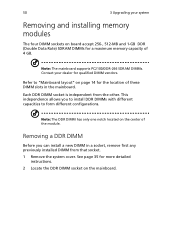
Removing and installing memory modules
The four DIMM sockets on board accept 256-, 512-MB and 1-GB DDR (Double Data Rate) SDRAM DIMMs for a maximum memory capacity of 4 GB.
Note: The mainboard supports ...module.
Removing a DDR DIMM
Before you can install a new DIMM in a socket, remove first any previously installed DIMM from that socket. 1 Remove the system cover. See page...
Acer Altos R300 User's Guide - Page 66
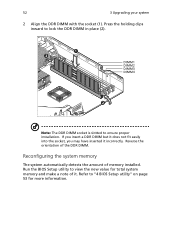
...Upgrading your system
2 Align the DDR DIMM with the socket (1). Press the holding clips inward to lock the DDR DIMM in place (2).
Note: The DDR DIMM socket is slotted to ensure proper installation... memory
The system automatically detects the amount of memory installed. Run the BIOS Setup utility to view the new value for total system memory and make a note of it. Refer to "4 BIOS Setup utility...
Acer Altos R300 User's Guide - Page 83
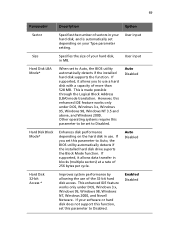
... 3.x, Windows 95, Windows 98, Windows NT 3.5 and above, and Windows 2000. Other operating systems require this parameter to be set to Disabled.
Auto Disabled
Hard Disk Block Mode*
Enhances disk performance depending on the hard disk in use. If you set this parameter to Auto, the BIOS utility automatically detects if the installed hard disk drive suports the Block Mode function. If supported, it...
Acer Altos R300 User's Guide - Page 84

... BIOS Setup utility
Parameter Advanced PIO Mode *
DMA Transfer Mode *
Description
Option
When set to Auto, the BIOS utility automatically detects if the installed hard disk supports the function. If supported, it allows for faster data recovery and read/write timing that reduces hard disk activity time. This results in better hard disk performance. To disregard this feature, change the setting...
Acer Altos R300 User's Guide - Page 99

... all RAMDAC data has been updated. This allows the display of multiple images on the screen.
Note: Some VGA cards require specific settings for this feature. Check your VGA card documentation before setting this parameter.
Disabled Enabled
When this parameter is set to Yes, BIOS
No
initializes only PnP boot devices such as
Yes
SCSI cards.
When set to No, BIOS initializes all PnP
boot...
Acer Altos R300 User's Guide - Page 101
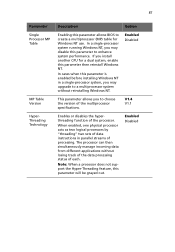
... single-processor system, you may upgrade to a multiprocessor system without reinstalling Windows NT.
Enabled Disabled
This parameter allows you to choose the version of the multiprocessor specifications.
V1.4 V1.1
Enables or disables the hyperthreading function of the processor.
When enabled, one physical processor acts as two logical processors by "threading" two sets of data instructions in...
Acer Altos R300 User's Guide - Page 112
This appendix shows you how to install the ASM software package.
Acer Altos R300 User's Guide - Page 113
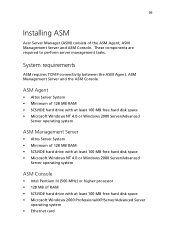
... MB free hard disk space • Microsoft Windows NT 4.0 or Windows 2000 Server/Advanced
Server operating system
ASM Console
• Intel Pentium III (500 MHz) or higher processor • 128 MB of RAM • SCSI/IDE hard drive with at least 100 MB free hard disk space • Microsoft Windows 2000 Professional/XP/Server/Advanced Server
operating system • Ethernet card
Acer Altos R300 User's Guide - Page 114
...'s manual.
To launch the program, on the Windows taskbar click on the Start button, point to Programs, select Acer Server Management Suite then click ASM Agent.
Installing ASM Management Server
To install ASM Management Server: 1 Log in to the managed server using the Administrator account. 2 Insert the EasyBUILDTM Management CD into the server's CD-ROM
drive. The installation...
Acer Altos R300 User's Guide - Page 115
...'s manual.
To launch the program, on the Windows taskbar click on the Start button, point to Programs, select Acer Server Management Suite then click ASM Management Server.
Installing ASM Console
To install ASM Console: 1 Log in to the target Windows-based PC using the Administrator
account. 2 Insert the EasyBUILDTM Management CD into the system's
CD-ROM drive. The installation...