LG LSXS26366D driver and firmware
Related LG LSXS26366D Manual Pages
Download the free PDF manual for LG LSXS26366D and other LG manuals at ManualOwl.com
Owners Manual - Page 2
... 15 - Water Pressure 15 - What You Will Need 17 - Water Line Installation Instructions 18 Turning On the Power 19 Leveling and Door Alignment 19 - Leveling 19 - Door Alignment
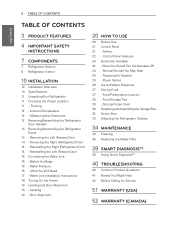
20 HOW TO USE
20 Before Use 21 Control Panel 21 - Airflow 22 - Control Panel Features 24 Automatic Icemaker 24 - When You Should Turn the...
Owners Manual - Page 4
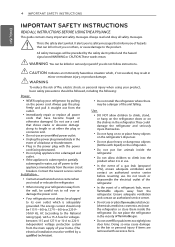
4 IMPORTANT SAFETY INSTRUCTIONS
ENGLISH
IMPORTANT SAFETY INSTRUCTIONS
READ ALL INSTRUCTIONS BEFORE USINGTHE APPLIANCE.
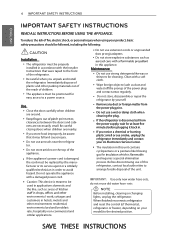
This guide contains many important...partially
submerged in water, cut o power to the
appliance immediately from the main circuit
breakers. Contact the nearest service center
Installation
Contactan authorized service center when you install or relocate the refrigerator.
When ...
Owners Manual - Page 6
... your LG Electronics Service Center.
The insulation in this unit contains cyclopentane or a pentane like blowing
and requires a special elimination process. Before discontinuing use of this refrigerator, contact local authorities to arrange forsafe disposal of the unit.
IMPORTANT : Use only new water hose-sets, do not reuse old water hose -sets
NOTE
Before installing, cleaning...
Owners Manual - Page 10
ENGLISH
10 INSTALLATION
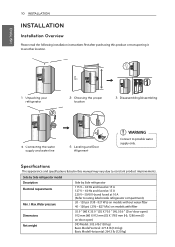
INSTALLATION
Installation Overview
Please read the following installation instr to another location.
fter purchasing this product or transporting it
1 Unpacking your refrigerator
2 Choosing the proper location
3 Disassembling/Assembling
4 Connecting the water supply and ...
Owners Manual - Page 11
...install the refrigerator. Failure to do so
can result in back or other injury.
Your refrigerator is heavy. When moving
the refrigerator for cleaning or service..., the model and serial number label
INSTALLATION 11
Choosing the Proper...installed in the shipping position. Please reinstall shelves according to your individual storage needs.
WARNING
To reduce the risk of electric shock, do not
install...
Owners Manual - Page 12
ENGLISH
12 INSTALLATION
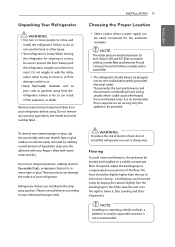
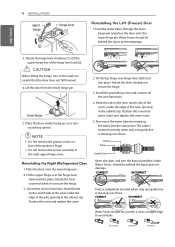
Ambient Temperature
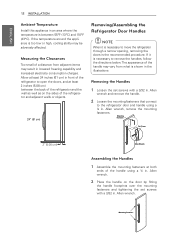
Install this appliance in an area where the temperature is between 55°F (...fasteners that connect
to the refrigerator door and handle using a ¼ in. Allen wrench, remove the mounting fasteners.
Mounting Fasteners
Set Screw
2"(5.08 cm)
Allen Wrench
Assembling the Handles
1 Assemble the mounting fasteners at both
ends of the handle using a ¼...
Owners Manual - Page 13
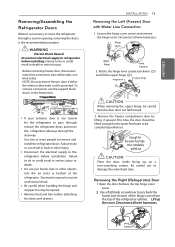
... procedure.
WARNING
Electric Shock Hazard Disconnect electrical supply to refrigerator before installing. Failure to do so could result in death or serious injury....Support Block
2
120 mm
3
If your entrance door is too narrow for the refrigerator to pass through, remove the refrigerator doors and move the refrigerator sideways through the doorway. Use two or more people to remove and install...
Owners Manual - Page 14
...top hinge over hinge lever latch and into place. Rotate the lever clockwise to secure the hinge.
3. Install the grounding screw and connect all the wire harnesses.
4. Hook the tab on the door switch side of... water tubes by inserting the tubes into the connectors. The tube is inserted correctly when only one guide line is showing out of two.
Collet Tube
Insert Line
Open the door and turn the hose ...
Owners Manual - Page 15
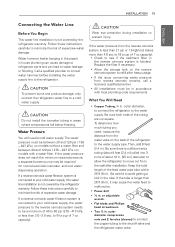
...supply, this water line installation is not covered by the refrigerator warranty. Follow these instructions carefully to minimize the... is blocked. Replace the filter if necessary.
y Allow the storage tank on the reverse osmosis system to refill after heavy usage... than 26 ft (8 m), it may cause the water feed to malfunction.
y Power drill. y ½ in. or adjustable
wrench. y Flat blade and Phillips
...
Owners Manual - Page 16
ENGLISH
16 INSTALLATION
y If your existing copper water line has a flared fitting at the end, you will need an adapter (available at plumbing supply stores) to ...be used.
WARNING
Electrical Shock Hazard: When using any electrical device (such as a power drill) during installation, be sure the device is battery powered, double insulated or grounded in a manner that will prevent the hazard of...
Owners Manual - Page 17
...Installation Instructions
WARNING
When using any electrical device (such as a power drill) during installation, be sure the device is battery powered, double insulated or grounded in a manner that will prevent the hazard of electric shock.
Install...NDA tubing #49595 or #49599) or Cross Link Polyethylene (PEX) tubing.
INSTALLATION 17
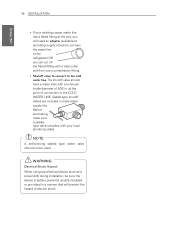
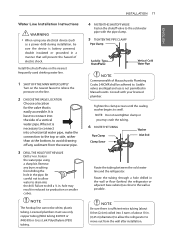
4 FASTEN THE SHUTOFF VALVE
Fasten the shuto valve to the cold ...
Owners Manual - Page 18
ENGLISH
18 INSTALLATION
7 CONNECT THE TUBING TO THE VALVE
Place the compression nut and ferrule (sleeve) for copper tubing onto ...the tubing.
9 CONNECT THE TUBING TO THE
REFRIGERATOR
NOTE: Before making the connection to the refrigerator, be sure that the refrigerator power cord is not plugged into the wall outlet.
a. Remove the plastic flexible cap from the water valve.
CAUTION
Check to see if...
Owners Manual - Page 19
ENGLISH
INSTALLATION 19
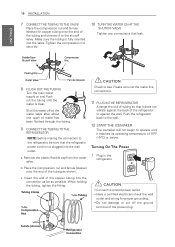
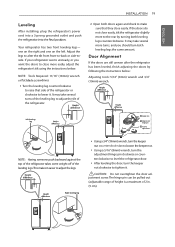
Leveling
After installing, plug the refrigerator's power cord into a 3-prong grounded outlet and push
Your ...amount.
Door Alignment
If the doors are still uneven after the refrigerator has been leveled, nish adjusting the doors by following the instructions below:
Adjusting tools: 5/16" (8mm) wrench and 3/4" (19mm) wrench.
Height di erence
Height di erence
CHANGE FILTER...
Owners Manual - Page 24
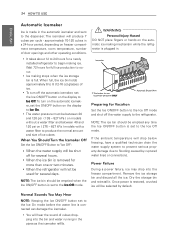
...installed refrigerator to begin making ice. Wait 72 hours for full ice production to occur.
y Ice making stops when the ice storage bin is full. When full, the ice bin holds approximately 6 to 8 (12-16 oz) glasses of ice.
y To turn off the automatic icemaker, set the Ice ON/OFF button on the display... for use by service personnel ONLY
Automatic Shutoff Arm
Preparing for Vacation
Set the Ice ON/OFF...
Owners Manual - Page 30
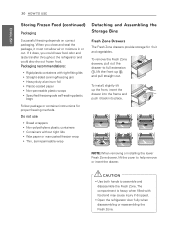
...y Non-permeable plastic wraps y Specified freezer-grade self-sealing plastic
bags
Follow package or container instructions for proper freezing methods.
Do not use
y Bread wrappers y Non-polyethylene plastic containers y ...storage for fruit and vegetables.
To remove the Fresh Zone drawers, pull out the drawer to full extension ቢ, lift the front up ባ, and pull straight out.
To install...
Owners Manual - Page 34
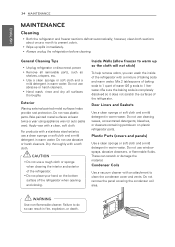
...spills immediately. y Always unplug the refrigeration before cleaning.
General Cleaning Tips
y Unplug refrigerator or disconnect power. y Remove all removable parts, such as
shelves, crispers, etc. y Use a clean sponge or...clean sponge or soft cloth and a mild detergent in warm water. Do not use window sprays, abrasive cleansers, or flammable fluids. These can scratch or damage the material.
...
Owners Manual - Page 37
... follow Use Instructions before installation and use of this system. Installation and use MUST comply with all state and local plumbing codes. Do not install if water ... ow prevention device is installed on a water system, a device for controlling pressure due to thermal expansion must be installed. Ensure all tubing and ttings are secure and free of leaks.
Manufactured for LG Electronics by ...
Owners Manual - Page 40
40 TROUBLESHOOTING
ENGLISH
TROUBLESHOOTING
Common Product Questions
How do I unclog the ice dispenser chute? Eliminate the frost of...When the water dispenser output
decreases. • When the ice cubes are smaller than
normal.
If your refrigerator was recently installed, dispense 2.5 gallons of water (flush for approximately 5 minutes) to remove trapped air and contaminants from the system....
Owners Manual - Page 42
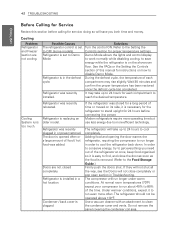
...installed.
Solutions Turn the control ON. Refer to the Setting the Controls section for proper temperature settings. Demo Mode allows the lights and control display to work normally while disabling cooling, to save energy while the refrigerator is on the showroom floor. See the FAQs or the Setting the Controls section of this manual for instructions...to the Food Storage Guide.) Firmly push ...
Owners Manual - Page 43
...as cool as other items in the refrigerator.
Possible Causes Refrigerator was recently installed. The air vents are blocked. Cold air circulates from the freezer to the...added to either compartment.
Doors not closed correctly.
Temperature control is not set correctly.
Defrost cycle has recently completed.
Incorrect temperature control settings.
The Cheese & Butter and Condiment bins will be slightly...