ASRock 939SLI-eSATA2 driver and firmware

Related ASRock 939SLI-eSATA2 Manual Pages
Download the free PDF manual for ASRock 939SLI-eSATA2 and other ASRock manuals at ManualOwl.com
User Manual - Page 3
... (Future CPU Port, PCI and PCIE Slots 16 2.5 Dual Graphics Feature 18 2.6 SLITM Operation Guide 19 2.7 Jumpers Setup 22 2.8 Onboard Headers and Connectors 22 2.9 eSATAII Interface Introduction 27 2.10 SATAII Hard Disk Setup Guide 30 2.11 Serial ATA (SATA) / Serial ATAII (SATAII) Hard Disks
Installation 31 2.12 Hot Plug and Hot Swap Functions for SATA / SATAII HDDs and
eSATAII Devices 32...
User Manual - Page 4
3.3.8 USB Configuration 48 3.4 Hardware Health Event Monitoring Screen 48 3.5 Boot Screen 49
3.5.1 Boot Settings Configuration 49 3.6 Security Screen 50 3.7 Exit Screen 51
4 . Software Support 52
4.1 Install Operating System 52 4.2 Support CD Information 52
4.2.1 Running Support CD 52 4.2.2 Drivers Menu 52 4.2.3 Utilities Menu 52 4.2.4 Contact Information 52
APPENDIX: AMD's Cool 'n' ...
User Manual - Page 5
...939SLI-eSATA2 Motherboard (ATX Form Factor: 12.0-in x 9.6-in, 30.5 cm x 24.4 cm)
1 x ASRock 939SLI-eSATA2 Quick Installation Guide 1 x ASRock 939SLI-eSATA2 Support CD 1 x Ultra ATA 66/100/133 IDE Ribbon Cable (80-conductor) 1 x 3.5-in Floppy Drive Ribbon Cable 4 x Serial ATA (SATA) Data Cables (Optional) 2 x Serial ATA (SATA) HDD Power Cables (Optional) 1 x ASRock eSATAII I/O Shield 1 x ASRock SLI...
User Manual - Page 6
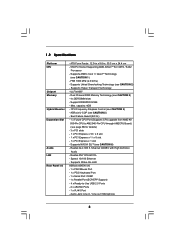
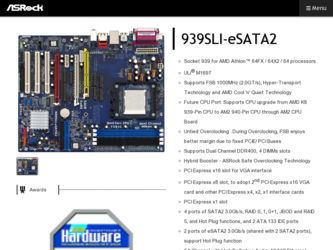
... Channel DDR Memory Technology (see CAUTION 3) - 4 x DDR DIMM slots - Support DDR400/333/266 - Max. capacity: 4GB - CPU Frequency Stepless Control (see CAUTION 4) - ASRock U-COP (see CAUTION 5) - Boot Failure Guard (B.F.G.) - 1 x Future CPU Port (Supports CPU upgrade from AMD K8 939-Pin CPU to AM2 940-Pin CPU through AM2CPU Board)
(see page 16 for details) - 3 x PCI slots - 1 x PCI Express x 16...
User Manual - Page 7
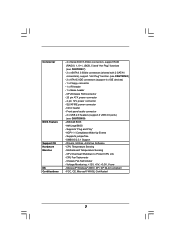
...power connector - SLI/XFIRE power connector - CD in header - Front panel audio connector - 2 x USB 2.0 headers (support 4 USB 2.0 ports)
(see CAUTION 9) - 2Mb AMI BIOS - AMI Legal BIOS - Supports "Plug and Play" - ACPI 1.1 Compliance Wake Up Events - Supports jumperfree - SMBIOS 2.3.1 Support - Drivers, Utilities, AntiVirus Software - CPU Temperature Sensing - Motherboard Temperature Sensing - CPU...
User Manual - Page 8
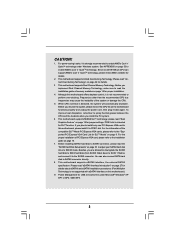
... compatible SLITM Mode PCI Express VGA cards, please refer to the "Supported PCI Express VGA Card List for SLITM Mode" on page 9. For the proper installation of PCI Express VGA card, please refer to the installation guide on page 16.
7. Before installing SATAII hard disk to SATAII connector, please read the "SATAII Hard Disk Setup Guide" on page 30 to adjust your SATAII hard disk drive to SATAII...
User Manual - Page 9
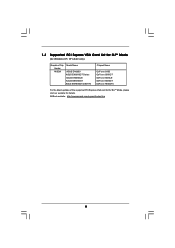
... Windows XP / XP 64-bit only)
Graphics Chip Vendor NVIDIA
Model Name
ASUS EN6600 ASUS EN6600GT Series ASUS EN6800LE ASUS EN6800GT ASUS EN7800GTX/2DHTV
Chipset Name
GeForce 6600 GeForce 6600GT GeForce 6800LE GeForce 6800GT GeForce 7800GTX
For the latest updates of the supported PCI Express VGA card list for SLITM Mode, please visit our website for details. ASRock...
User Manual - Page 16
...
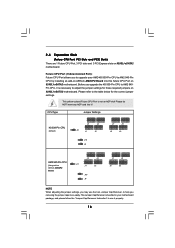
(Future CPU Port, PCI Slots and PCIE Slots) There are 1 Future CPU Port, 3 PCI slots and 3 PCI Express slots on 939SLI-eSATA2 motherboard.
Future CPU Port (Yellow-Colored Port): Future CPU Port allows you to upgrade your AMD K8 939-Pin CPU to AM2 940-Pin CPU by installing an add-on ASRock AM2CPU Board into this future CPU Port on 939SLI-eSATA2 motherboard. Before you upgrade the K8 939-Pin CPU to...
User Manual - Page 19
... your graphics card driver supports the NVIDIA SLITM technology. Download the latest driver from the NVIDIA website (www. nvidia.com).
3. Make sure that your power supply unit (PSU) can provide at least the minimum power required by your system.
9
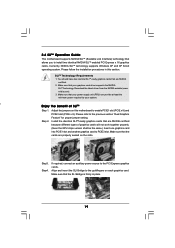
Enjoy the benefit of SLITM
Step 1. Step 2.
Adjust the jumpers on this motherboard to enable PCIE1 slot (PCIE x 8) and PCIE3...
User Manual - Page 20
.... Step6.
Connect a VGA cable or a DVI-I cable to the monitor connector and the DVI connector of the graphics card that is inserted to PCIE1 slot. Connect a 4-pin ATX power cable to SLI/XFIRE power connector.
Step7. Step8.
Power on your computer and boot into OS. Install the "SLI Enabled" driver of our support CD to your system. Then, reboot your system. Install the graphics card drivers to your...
User Manual - Page 25
... to connect them for AC'97 audio panel.
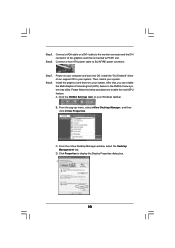
D. Enter BIOS Setup Utility. Enter Advanced Settings, and then select
Chipset Configuration. Set the Front Panel Control option from
[Auto] to [Enabled].
E. Enter Windows system. Click the icon on the lower right hand
taskbar to enter Realtek HD Audio Manager. Click "Audio I/O", select
"Connector Settings"
, choose "Disable front panel jack
detection...
User Manual - Page 30
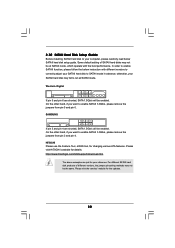
... Hard Disk Setup Guide
Before installing SATAII hard disk to your computer, please carefully read below SATAII hard disk setup guide. Some default setting of SATAII hard disks may not be at SATAII mode, which operate with the best performance. In order to enable SATAII function, please follow the below instruction with different vendors to correctly adjust your SATAII hard disk to SATAII...
User Manual - Page 32
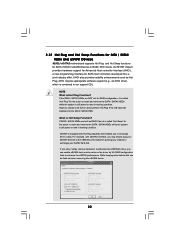
2.12 Hot Plug and Hot Swap Functions for SATA / SATAII HDDs and eSATAII Devices
939SLI-eSATA2 motherboard supports Hot Plug and Hot Swap functions for SATA / SATAII / eSATAII Devices in RAID / AHCI mode. ULi M1697 chipset provides hardware support for Advanced Host controller Interface (AHCI), a new programming interface for SATA host controllers developed thru a joint industry effort. AHCI also ...
User Manual - Page 33
... RAID functions, you need to make a SATA / SATAII driver diskette before you start the OS installation.
STEP 1: Insert the ASRock Support CD into your optical drive to boot your system. (Do NOT insert any floppy diskette into the floppy drive at this moment!)
STEP 2: During POST at the beginning of system boot-up, press key, and then a window for boot devices...
User Manual - Page 34

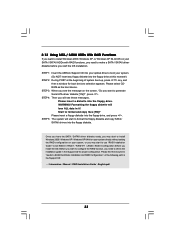
... BIOS setup to set the option from [RAID] to [AHCI]. 2. Make a SATA / SATAII driver diskette by following the proper steps of section 2.13
on page 33. 3. Start Windows 2000, windows XP, or Windows XP 64-bit OS installation.
2.15 Untied Overclocking Technology
This motherboard supports Untied Overclocking Technology, which means during overclocking, FSB enjoys better margin due to fixed PCI / PCIE...
User Manual - Page 35
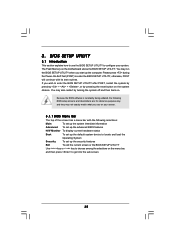
...BIOS SETUP UTILITY to configure your system. The Flash Memory on the motherboard stores the BIOS SETUP UTILITY. You may run the BIOS SETUP UTILITY when you start up the computer. Please press during the Power-On-Self-Test (POST) to enter the BIOS SETUP...and then back on.
Because the BIOS software is constantly being updated, the following BIOS setup screens and descriptions are for reference ...
User Manual - Page 37
...-Pin (AM2) CPU by installing an add-on ASRock AM2CPU Board into future CPU Port on this motherboard
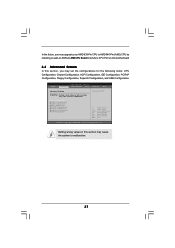
3.3 Advanced Screen
In this section, you may set the configurations for the following items: CPU Configuration, Chipset Configuration, ACPI Configuration, IDE Configuration, PCIPnP Configuration, Floppy Configuration, SuperIO Configuration, and USB Configuration.
Main
BIOS SETUP UTILITY Advanced...
User Manual - Page 44
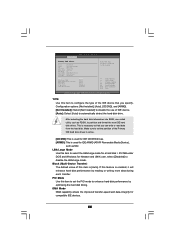
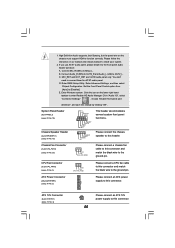
... item to configure the type of the IDE device that you specify. Configuration options: [Not Installed], [Auto], [CD/DVD], and [ARMD]. [Not Installed]: Select [Not Installed] to disable the use of IDE device. [Auto]: Select [Auto] to automatically detect the hard disk drive.
After selecting the hard disk information into BIOS, use a disk utility, such as FDISK, to partition and...
User Manual - Page 52
... BIN folder in the Support CD to display the menus.
4.2.2 Drivers Menu
The Drivers Menu shows the available devices drivers including ASRock Express GbL PCI Express LAN card driver if the system detects the installed devices. Please install the necessary drivers to activate the devices.
4.2.3 Utilities Menu
The Utilities Menu shows the applications software that the motherboard supports. Click on...
User Manual - Page 53
... feature, please make sure to install "AMD Processor Driver" from the "Support CD" first. If you are using Windows 2000 / XP/ XP 64-bit operating system, please follow the instruction below to enable AMD's Cool 'n' QuietTM technology:
1. From the Windows 2000 / XP/ XP 64-bit operating system, click the Start button. Select Settings, then Control Panel.
2. Switch to Classic...