ASRock J3060M driver and firmware

Related ASRock J3060M Manual Pages
Download the free PDF manual for ASRock J3060M and other ASRock manuals at ManualOwl.com
User Manual - Page 4
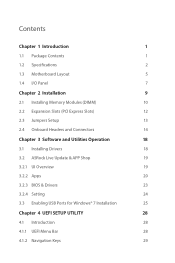
...Installation
9
2.1 Installing Memory Modules (DIMM)
10
2.2 Expansion Slots (PCI Express Slots)
12
2.3 Jumpers Setup
13
2.4 Onboard Headers and Connectors
14
Chapter 3 Software and Utilities Operation
18
3.1 Installing Drivers
18
3.2 ASRock Live Update & APP Shop
19
3.2.1 UI Overview
19
3.2.2 Apps
20
3.2.3 BIOS & Drivers
23
3.2.4 Setting
24
3.3 Enabling USB Ports for Windows...
User Manual - Page 6
.... You may find the latest VGA cards and CPU support list on ASRock's website as well. ASRock website http://www.asrock.com.
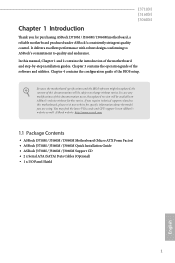
1.1 Package Contents
• ASRock J3710M / J3160M / J3060M Motherboard (Micro ATX Form Factor) • ASRock J3710M / J3160M / J3060M Quick Installation Guide • ASRock J3710M / J3160M / J3060M Support CD • 2 x Serial ATA (SATA) Data Cables (Optional) •...
User Manual - Page 7
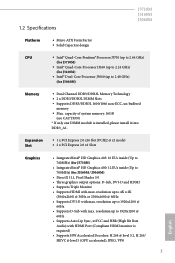
...: D-Sub, DVI-D and HDMI • Supports Triple Monitor • Supports HDMI with max. resolution up to 4K x 2K
(3840x2160) @ 30Hz or 2560x1600 @ 60Hz • Supports DVI-D with max. resolution up to 1920x1200 @
60Hz • Supports D-Sub with max. resolution up to 1920x1200 @
60Hz • Supports Auto Lip Sync, xvYCC and HBR (High Bit Rate
Audio) with HDMI Port (Compliant HDMI monitor is...
User Manual - Page 8
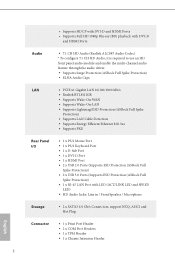
... • Supports LAN Cable Detection • Supports Energy Efficient Ethernet 802.3az • Supports PXE
Rear Panel I/O
• 1 x PS/2 Mouse Port • 1 x PS/2 Keyboard Port • 1 x D-Sub Port • 1 x DVI-D Port • 1 x HDMI Port • 2 x USB 2.0 Ports (Supports ESD Protection (ASRock Full
Spike Protection)) • 2 x USB 3.0 Ports (Supports ESD Protection (ASRock Full...
User Manual - Page 9
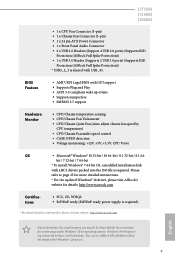
...-bit
* To install Windows® 7 64-bit OS, a modified installation disk
with xHCI drivers packed into the ISO file is required. Please
refer to page 25 for more detailed instructions.
* For the updated Windows® 10 driver, please visit ASRock's
website for details: http://www.asrock.com
Certifications
• FCC, CE, WHQL • ErP/EuP ready (ErP/EuP ready power supply is...
User Manual - Page 13
J3710M J3160M J3060M
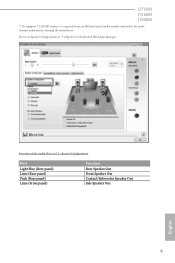
** To configure 7.1 CH HD Audio, it is required to use an HD front panel audio module and enable the multichannel audio feature through the audio driver.
Please set Speaker Configuration to "7.1 Speaker"in the Realtek HD Audio Manager.
Function of the Audio Ports in 7.1-channel Configuration:
Port
Light Blue (Rear panel) Lime (Rear panel) Pink (Rear panel) Lime (Front...
User Manual - Page 14
... ATX form factor motherboard. Before you install the motherboard, study the configuration of your chassis to ensure that the motherboard fits into it.
Pre-installation Precautions
Take note of the following precautions before you install motherboard components or change any motherboard settings. • Make sure to unplug the power cord before installing or removing the motherboard.
Failure to do...
User Manual - Page 23
Chapter 3 Software and Utilities Operation
3.1 Installing Drivers
The Support CD that comes with the motherboard contains necessary drivers and useful utilities that enhance the motherboard's features.
Running The Support CD
To begin using the support CD, insert the CD into your CD-ROM drive. The CD automatically displays the Main Menu if "AUTORUN" is enabled in your computer. If the Main Menu ...
User Manual - Page 24
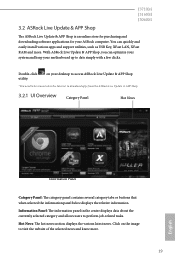
3.2 ASRock Live Update & APP Shop
J3710M J3160M J3060M
The ASRock Live Update & APP Shop is an online store for purchasing and downloading software applications for your ASRock computer. You can quickly and easily install various apps and support utilities, such as USB Key, XFast LAN, XFast RAM and more. With ASRock Live Update & APP Shop, you can optimize your system and keep your motherboard ...
User Manual - Page 25
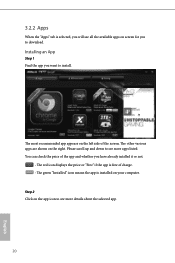
...is selected, you will see all the available apps on screen for you to download.
Installing an App
Step 1 Find the app you want to install.
The most recommended app appears on the left side of the screen. The... it or not.
- The red icon displays the price or "Free" if the app is free of charge. - The green "Installed" icon means the app is installed on your computer. Step 2 Click on the app icon to...
User Manual - Page 26
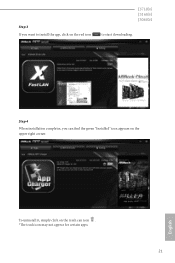
Step 3 If you want to install the app, click on the red icon
J3710M J3160M J3060M
to start downloading.
Step 4
When installation completes, you can find the green "Installed" icon appears on the upper right corner.
English
To uninstall it, simply click on the trash can icon . *The trash icon may not appear for certain apps.
21
User Manual - Page 27
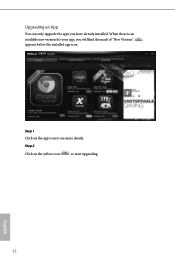
Upgrading an App
You can only upgrade the apps you have already installed. When there is an available new version for your app, you will find the mark of "New Version" appears below the installed app icon.
Step 1 Click on the app icon to see more details.
Step 2
Click on the yellow icon
to start upgrading.
English
22
User Manual - Page 28
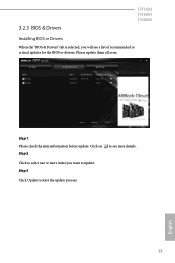
3.2.3 BIOS & Drivers
J3710M J3160M J3060M
Installing BIOS or Drivers
When the "BIOS & Drivers" tab is selected, you will see a list of recommended or critical updates for the BIOS or drivers. Please update them all soon.
Step 1 Please check the item information before update. Click on Step 2
to see more details.
Click to select one or more items you want to update. Step 3
Click Update to ...
User Manual - Page 29
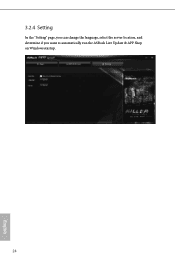
3.2.4 Setting
In the "Setting" page, you can change the language, select the server location, and determine if you want to automatically run the ASRock Live Update & APP Shop on Windows startup.
24
English
User Manual - Page 30
...
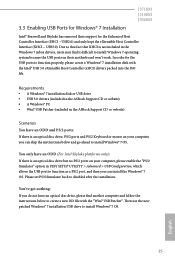
• A Windows® 7 installation disk or USB drive • USB 3.0 drivers (included in the ASRock Support CD or website) • A Windows® PC • Win7 USB Patcher (included in the ASRock Support CD or website)
Scenarios You have an ODD and PS/2 ports:
If there is an optical disc drive, PS/2 ports and PS/2 Keyboard or mouse on your computer, you can skip the instructions below and...
User Manual - Page 31
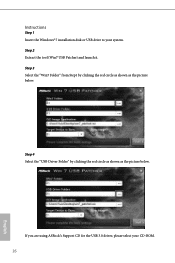
... the Windows® 7 installation disk or USB drive to your system. Step 2 Extract the tool (Win7 USB Patcher) and launch it. Step 3 Select the "Win7 Folder" from Step1 by clicking the red circle as shown as the picture below.
Step 4 Select the "USB Driver Folder" by clicking the red circle as shown as the picture below.
If you are using ASRock's Support...
User Manual - Page 32

... Device to Burn". If not, the patched ISO image will be exported to the destination selected in Step5. Then Press "Start" to proceed. Step 7 Now you are able to install Windows® 7 on Braswell or Skylake with the new burned CD. Or please use the patched ISO image to make an OS USB drive to install...
User Manual - Page 33
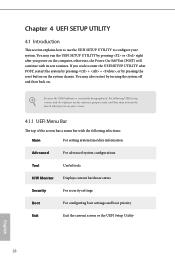
...the UEFI SETUP UTILITY by pressing or right after you power on the computer, otherwise, the Power-On-Self-Test (POST) will continue with its test routines. If you wish to enter the UEFI SETUP UTILITY ...by turning the system off and then back on.
Because the UEFI software is constantly being updated, the following UEFI setup screens and descriptions are for reference purpose only, and they may not...
User Manual - Page 48
...
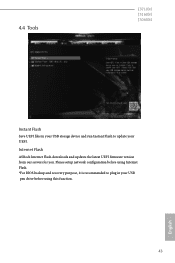
J3710M J3160M J3060M
Instant Flash
Save UEFI files in your USB storage device and run Instant Flash to update your UEFI.
Internet Flash
ASRock Internet Flash downloads and updates the latest UEFI firmware version from our servers for you. Please setup network configuration before using Internet Flash. *For BIOS backup and recovery purpose, it is recommended to plug in your USB pen drive before...
User Manual - Page 49
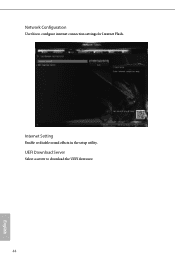
Network Configuration
Use this to configure internet connection settings for Internet Flash.
Internet Setting
Enable or disable sound effects in the setup utility.
UEFI Download Server
Select a server to download the UEFI firmware.
44
English