ASRock N7AD-SLI driver and firmware
Related ASRock N7AD-SLI Manual Pages
Download the free PDF manual for ASRock N7AD-SLI and other ASRock manuals at ManualOwl.com
User Manual - Page 3
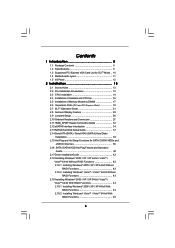
...13 SATAII Hard Disk Setup Guide 37 2.14 Serial ATA (SATA) / Serial ATAII (SATAII) Hard Disks
Installation 38 2.15 Hot Plug and Hot Swap Functions for SATA / SATAII HDDs and
eSATAII Devices 39 2.16 SATA / SATAII HDD Hot Plug Feature and Operation
Guide 40 2.17 Driver Installation Guide 42 2.18 Installing Windows® 2000 / XP / XP 64-bit / VistaTM /
VistaTM 64-bit Without RAID Functions 42...
User Manual - Page 4
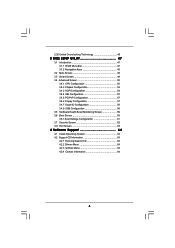
... Floppy Configuration 57 3.4.7 Super IO Configuration 58 3.4.8 USB Configuration 58 3.5 Hardware Health Event Monitoring Screen 59 3.6 Boot Screen 60 3.6.1 Boot Settings Configuration 61 3.7 Security Screen 62 3.8 Exit Screen 63
4 Software Support 64
4.1 Install Operating System 64 4.2 Support CD Information 64
4.2.1 Running Support CD 64 4.2.2 Drivers Menu 64 4.2.3 Utilities Menu...
User Manual - Page 5

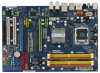
...x ASRock N7AD-SLI Motherboard (ATX Form Factor: 12.0-in x 8.2-in, 30.5 cm x 20.8 cm)
1 x ASRock SLI_Bridge_2S Card 1 x ASRock SLI/XFire Switch Card 1 x ASRock N7AD-SLI Quick Installation Guide 1 x ASRock N7AD-SLI Support CD 1 x Ultra ATA 66/100/133 IDE Ribbon Cable (80-conductor) 1 x 3.5-in Floppy Drive Ribbon Cable 2 x Serial ATA (SATA) Data Cables (Optional) 1 x Serial ATA (SATA) HDD Power Cable...
User Manual - Page 9

.... USB/WiFi header can be used to support 2 USB 2.0 ports. It can also be used to support WiFi+AP function with ASRock WiFi-802.11g or WiFi802.11n module, an easy-to-use wireless local area network (WLAN) adapter. It allows you to create a wireless environment and enjoy the convenience of wireless network connectivity. Please visit our website for the availability of ASRock WiFi-802.11g or WiFi...
User Manual - Page 21
... graphics card driver supports the NVIDIA® SLITM
technology. Download the latest driver from the NVIDIA® website (www.nvidia.com). 3. Make sure that your power supply unit (PSU) can provide at least the minimum power required by your system.
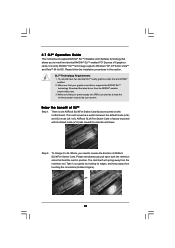
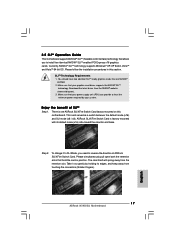
Enjoy the benefit of SLITM
Step 1. There is one ASRock SLI/XFire Switch Card factory-mounted on this motherboard. This card served...
User Manual - Page 23
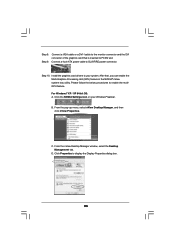
Step 8. Step 9.
Connect a VGA cable or a DVI-I cable to the monitor connector and the DVI connector of the graphics card that is inserted to PCIE2 slot. Connect a 4-pin ATX power cable to SLI/XFIRE power connector.
Step 10. Install the graphics card drivers to your system. After that, you can enable the Multi-Graphics Processing Unit (GPU) feature in the NVIDIA® nView system...
User Manual - Page 37
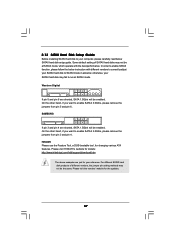
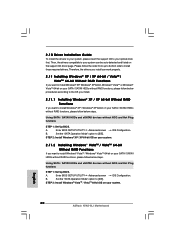
... Hard Disk Setup Guide
Before installing SATAII hard disk to your computer, please carefully read below SATAII hard disk setup guide. Some default setting of SATAII hard disks may not be at SATAII mode, which operate with the best performance. In order to enable SATAII function, please follow the below instruction with different vendors to correctly adjust your SATAII hard disk to SATAII...
User Manual - Page 42
...1: Set Up BIOS.
A.
Enter BIOS SETUP UTILITY Advanced screen
IDE Configuration.
B.
Set the "SATA Operation Mode" option to [IDE].
STEP 2: Make a SATA / SATAII driver diskette.
A.
Insert the ASRock Support CD into your optical drive to boot your system.
B.
During POST at the beginning of system boot-up, press key, and
then a window for boot devices selection appears. Please select CD-ROM...
User Manual - Page 43
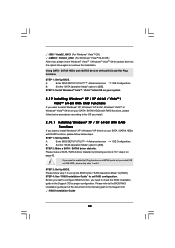
... Set Up BIOS.
A.
Enter BIOS SETUP UTILITY Advanced screen
IDE Configuration.
B.
Set the "SATA Operation Mode" option to [AHCI].
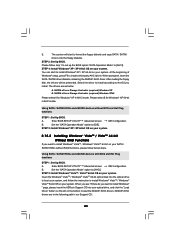
STEP 2: Install Windows® VistaTM / VistaTM 64-bit OS on your system.
Insert the Windows® VistaTM / Windows® VistaTM 64-bit optical disk into the optical drive
to boot your system, and follow the instruction to install Windows® VistaTM / Windows...
User Manual - Page 44
..., please insert Windows® VistaTM / Windows® VistaTM 64-bit optical disk into the optical drive again to continue the installation.
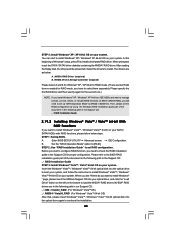
Using SATA / SATAII HDDs and eSATAII devices without NCQ and Hot Plug functions
STEP 1: Set Up BIOS.
A.
Enter BIOS SETUP UTILITY Advanced screen
IDE Configuration.
B.
Set the "SATA Operation Mode" option to [IDE].
STEP 2: Install Windows® VistaTM...
User Manual - Page 45
... to the BIOS RAID installation guide part of the document in the following path in the Support CD: .. \ RAID Installation Guide STEP 3: Install Windows® VistaTM / VistaTM 64-bit OS on your system. Insert the Windows® VistaTM / Windows® VistaTM 64-bit optical disk into the optical drive to boot your system, and follow the instruction to install Windows® VistaTM / Windows®...
User Manual - Page 47
...and then back on.
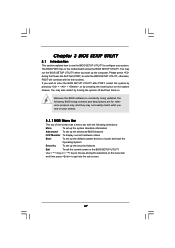
Because the BIOS software is constantly being updated, the following BIOS setup screens and descriptions are for reference...set up the advanced BIOS features
H/W Monitor To display current hardware status
Boot
To set up the default system device to locate and load the
Operating System
Security
To set up the security features
Exit
To exit the current screen or the BIOS SETUP...
User Manual - Page 51
... actual value of this motherboard.
Enhance Halt State All processors support the Halt State (C1). The C1 state is supported through the native processor instructions HLT and MWAIT and requires no hardware support from the chipset. In the C1 power state, the processor maintains the context of the system caches.
Intel (R) Virtualization tech. When this option is set to [Enabled], a VMM...
User Manual - Page 64
...-ROM drive. The CD automatically displays the Main Menu if "AUTORUN" is enabled in your computer. If the Main Menu did not appear automatically, locate and double click on the file "ASSETUP.EXE" from the BIN folder in the Support CD to display the menus. 4.2.2 Drivers Menu The Drivers Menu shows the available devices drivers if the system detects installed devices. Please install...
Quick Installation Guide - Page 4
...ASRock SLI_Bridge_2S Card 1 x ASRock SLI/XFire Switch Card 1 x ASRock N7AD-SLI Quick Installation Guide 1 x ASRock N7AD-SLI Support CD 1 x Ultra ATA 66/100/133 IDE Ribbon Cable (80-conductor) 1 x 3.5-in Floppy Drive Ribbon Cable 2 x Serial ATA (SATA) Data Cables (Optional) 1 x Serial ATA (SATA) HDD Power Cable (Optional) 1 x "ASRock 1394_SPDIF I/O" I/O Shield
4 ASRock N7AD-SLI Motherboard
English
Quick Installation Guide - Page 8
.... USB/WiFi header can be used to support 2 USB 2.0 ports. It can also be used to support WiFi+AP function with ASRock WiFi-802.11g or WiFi802.11n module, an easy-to-use wireless local area network (WLAN) adapter. It allows you to create a wireless environment and enjoy the convenience of wireless network connectivity. Please visit our website for the availability of ASRock WiFi-802.11g or WiFi...
Quick Installation Guide - Page 17
... graphics card driver supports the NVIDIA® SLITM
technology. Download the latest driver from the NVIDIA® website (www.nvidia.com). 3. Make sure that your power supply unit (PSU) can provide at least the minimum power required by your system.
Enjoy the benefit of SLITM
Step 1. There is one ASRock SLI/XFire Switch Card factory-mounted on this motherboard. This card served...
Quick Installation Guide - Page 19
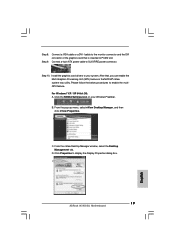
... the multiGPU feature.
For Windows® XP / XP 64-bit OS: A. Click the NVIDIA Settings icon on your Windows® taskbar.
B. From the pop-up menu, select nView Desktop Manager, and then click nView Properties.
C. From the nView Desktop Manager window, select the Desktop Management tab.
D. Click Properties to display the Display Properties dialog box.
English
19 ASRock N7AD-SLI Motherboard
Quick Installation Guide - Page 30
... your SATA / SATAII HDDs without RAID functions, please follow below steps.
Using SATA / SATAII HDDs and eSATAII devices without NCQ and Hot Plug functions
STEP 1: Set Up BIOS.
A.
Enter BIOS SETUP UTILITY Advanced screen
IDE Configuration.
B.
Set the "SATA Operation Mode" option to [IDE].
STEP 2: Install Windows® VistaTM / VistaTM 64-bit OS on your system.
English
30 ASRock N7AD-SLI...
Quick Installation Guide - Page 31
... BIOS setup to set the selection from [Auto] to [CPU, PCIE, Async.]. Therefore, CPU FSB is untied during overclocking, but PCI / PCIE buses are in the fixed mode so that FSB can operate under a more stable overclocking environment.
Please refer to the warning on page 7 for the possible overclocking risk before you apply Untied Overclocking Technology.
English
31 ASRock N7AD-SLI Motherboard