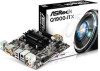
ASRock Q1900-ITX driver and firmware
Related ASRock Q1900-ITX Manual Pages
Download the free PDF manual for ASRock Q1900-ITX and other ASRock manuals at ManualOwl.com
User Manual - Page 3
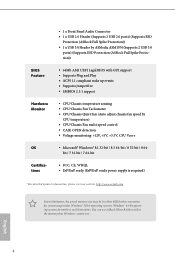
...Specifications
2
1.3 Motherboard Layout
5
1.4 I/O Panel
7
Chapter 2 Installation
9
2.1 Installing Memory Modules (SO-DIMM)
10
2.2 Expansion Slots (PCI Express Slots)
12
2.3 Jumpers Setup
13
2.4 Onboard Headers and Connectors
14
Chapter 3 Software and Utilities Operation
18
3.1 Installing Drivers
18
3.2 A-Tuning
19
3.3 Intel® Smart Connect Technology
21
3.4 ASRock Cloud...
User Manual - Page 5
... the latest VGA cards and CPU support list on ASRock's website as well. ASRock website http://www.asrock.com.
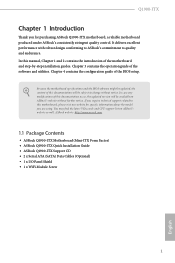
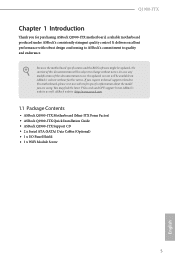
1.1 Package Contents
• ASRock Q1900-ITX Motherboard (Mini-ITX Form Factor) • ASRock Q1900-ITX Quick Installation Guide • ASRock Q1900-ITX Support CD • 2 x Serial ATA (SATA) Data Cables (Optional) • 1 x I/O Panel Shield • 1 x WiFi Module Screw
1
English
User Manual - Page 8
...
OS Certifications
• 1 x Front Panel Audio Connector • 1 x USB 2.0 Header (Supports 2 USB 2.0 ports) (Supports ESD
Protection (ASRock Full Spike Protection)) • 1 x USB 3.0 Header by ASMedia ASM1074 (Supports 2 USB 3.0
ports) (Supports ESD Protection (ASRock Full Spike Protection))
• 64Mb AMI UEFI Legal BIOS with GUI support • Supports Plug and Play • ACPI...
User Manual - Page 13
Q1900-ITX
Chapter 2 Installation
This is a Mini-ITX form factor motherboard. Before you install the motherboard, study the configuration of your chassis to ensure that the motherboard fits into it.
Pre-installation Precautions
Take note of the following precautions before you install motherboard components or change any motherboard settings. • Make sure to unplug the power cord before ...
User Manual - Page 14
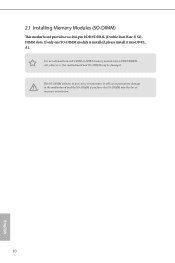
...-pin DDR3/DDR3L (Double Data Rate 3) SODIMM slots. If only one SO-DIMM module is installed, please install it into DDR3_ A1.
It is not allowed to install a DDR or DDR2 memory module into a DDR3/DDR3L slot; otherwise, this motherboard and SO-DIMM may be damaged. The SO-DIMM only fits in one correct orientation...
User Manual - Page 22
Chapter 3 Software and Utilities Operation
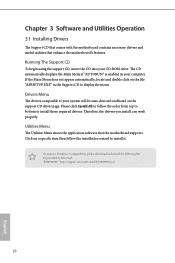
3.1 Installing Drivers
The Support CD that comes with the motherboard contains necessary drivers and useful utilities that enhance the motherboard's features.
Running The Support CD
To begin using the support CD, insert the CD into your CD-ROM drive. The CD automatically displays the Main Menu if "AUTORUN" is enabled in your computer. If the Main Menu ...
User Manual - Page 23
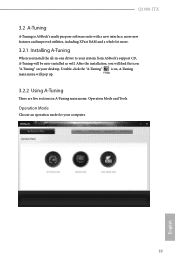
Q1900-ITX
3.2 A-Tuning
A-Tuning is ASRock's multi purpose software suite with a new interface, more new features and improved utilities, including XFast RAM and a whole lot more.
3.2.1 Installing A-Tuning
When you install the all-in-one driver to your system from ASRock's support CD, A-Tuning will be auto-installed as well. After the installation, you will find the icon "A-Tuning" on your desktop....
User Manual - Page 25
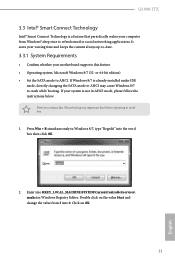
... your computer from Windows® sleep state to refresh email or social networking applications. It saves your waiting time and keeps the content always up-to-date.
3.3.1 System Requirements
• Confirm whether your motherboard supports this feature. • Operating system: Microsoft Windows 8/7 (32- or 64-bit edition) • Set the SATA mode to AHCI. If Windows 8/7 is already installed...
User Manual - Page 26
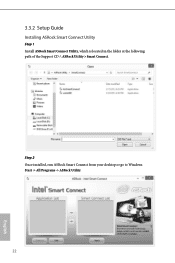
3.3.2 Setup Guide
Installing ASRock Smart Connect Utility
Step 1 Install ASRock Smart Connect Utility, which is located in the folder at the following path of the Support CD: \ ASRock Utility > Smart Connect.
Step 2 Once installed, run ASRock Smart Connect from your desktop or go to Windows Start -> All Programs -> ASRock Utility.
22
English
User Manual - Page 28
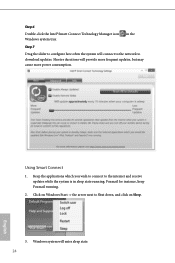
... will connect to the network to download updates. Shorter durations will provide more frequent updates, but may cause more power consumption.
Using Smart Connect
1. Keep the applications which you wish to connect to the internet and receive updates while the system is in sleep state running. Foxmail for instance, keep Foxmail running.
2. Click on Windows Start -> the arrow...
User Manual - Page 32
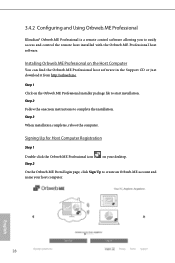
... access and control the remote host installed with the Orbweb.ME Professional host software.
Installing Orbweb.ME Professional on the Host Computer
You can find the Orbweb.ME Professional host software in the Support CD or just download it from http://orbweb.me.
Step 1 Click on the Orbweb.ME Professional installer package file to start installation. Step 2 Follow the onscreen instructions to...
User Manual - Page 34
... be installed to use the Remote Desktop and Xplorer functions.
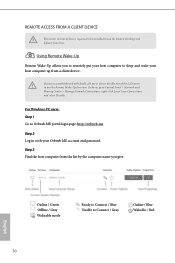
Using Remote Wake-Up
Remote Wake-Up allows you to remotely put your host computer to sleep and wake your host computer up from a client device.
If you use a motherboard with dual LAN ports, please disable one of the LAN ports to use the Remote Wake-Up function. To do so, go to Control Panel > Network and...
User Manual - Page 35
... computer in order to bring power option icon back to online.
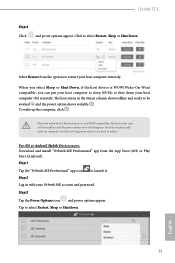
For iOS or Android Mobile Devices users: Download and install "Orbweb.ME Professional" app from the App Store (iOS) or Play Store (Android). Step 1 Tap the "Orbweb.ME Professional" app icon to launch it. Step 2 Log in with your Orbweb.ME account and password. Step 3 Tap the Power Options icon and power...
User Manual - Page 37
... iOS or Android Mobile Devices users: Download and install "Orbweb.ME Professional" app from the App Store (iOS) or Play Store (Android). Step 1 Tap the "Orbweb.ME Professional" app icon to launch it. Step 2 Log in with your Orbweb.ME account and password. Step 3 Tap the host computer name that you want to access under the Remote Desktop section.
Step 4 Enter the Windows password...
User Manual - Page 39
Q1900-ITX
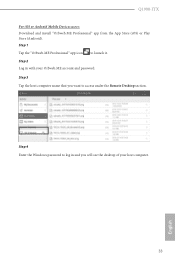
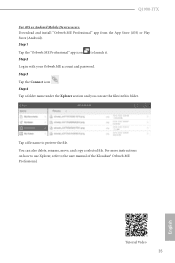
For iOS or Android Mobile Devices users: Download and install "Orbweb.ME Professional" app from the App Store (iOS) or Play Store (Android).
Step 1
Tap the "Orbweb.ME Professional" app icon Step 2
to launch it.
Log in with your Orbweb.ME account and password.
Step 3
Tap the Connect icon . Step 4 Tap a folder name under the Xplorer section and you can...
User Manual - Page 40
... brings back the familiar Start Menu along with added customizations for greater efficiency.
3.5.1 Installing Start8
Install Start8, which is located in the folder at the following path of the Support CD: \ ASRock Utility > Start8.
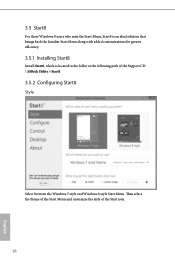
3.5.2 Configuring Start8
Style
Select between the Windows 7 style and Windows 8 style Start Menu. Then select the theme of the Start Menu and...
User Manual - Page 43

Q1900-ITX
Chapter 4 UEFI SETUP UTILITY
4.1 Introduction
This section explains how to use the UEFI SETUP UTILITY to configure your system. You may run the UEFI SETUP UTILITY by pressing or right after you power on the computer, otherwise, the Power-On-Self-Test (POST) will continue with its test routines. If you wish to enter the UEFI SETUP UTILITY...
User Manual - Page 59
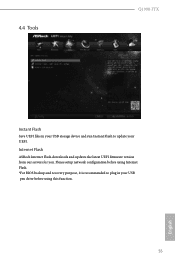
4.4 Tools
Q1900-ITX
Instant Flash
Save UEFI files in your USB storage device and run Instant Flash to update your UEFI.
Internet Flash
ASRock Internet Flash downloads and updates the latest UEFI firmware version from our servers for you. Please setup network configuration before using Internet Flash. *For BIOS backup and recovery purpose, it is recommended to plug in your USB pen drive before ...
User Manual - Page 60
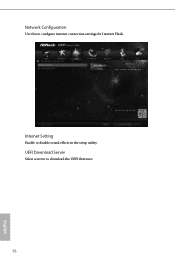
Network Configuration
Use this to configure internet connection settings for Internet Flash.
Internet Setting
Enable or disable sound effects in the setup utility.
UEFI Download Server
Select a server to download the UEFI firmware.
56
English
Quick Installation Guide - Page 7
... the latest VGA cards and CPU support list on ASRock's website as well. ASRock website http://www.asrock.com.
1.1 Package Contents
• ASRock Q1900-ITX Motherboard (Mini-ITX Form Factor) • ASRock Q1900-ITX Quick Installation Guide • ASRock Q1900-ITX Support CD • 2 x Serial ATA (SATA) Data Cables (Optional) • 1 x I/O Panel Shield • 1 x WiFi Module Screw
5
English