ASRock X300TM-ITX driver and firmware
Related ASRock X300TM-ITX Manual Pages
Download the free PDF manual for ASRock X300TM-ITX and other ASRock manuals at ManualOwl.com
User Manual - Page 4
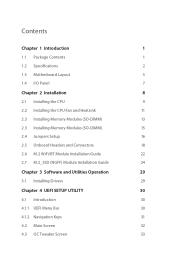
... CPU
9
2.2 Installing the CPU Fan and Heatsink
11
2.3 Installing Memory Modules (SO-DIMM)
13
2.3 Installing Memory Modules (SO-DIMM)
15
2.4 Jumpers Setup
16
2.5 Onboard Headers and Connectors
18
2.6 M.2 WiFi/BT Module Installation Guide
22
2.7 M.2_SSD (NGFF) Module Installation Guide
24
Chapter 3 Software and Utilities Operation
29
3.1 Installing Drivers
29
Chapter 4 UEFI SETUP...
User Manual - Page 5

4.4 Advanced Screen
36
4.4.1 CPU Configuration
37
4.4.2 Onboard Devices Configuration
38
4.4.3 Storage Configuration
40
4.4.4 ACPI Configuration
41
4.4.5 LVDS Control
42
4.4.6 Trusted Computing
43
4.4.7 AMD Firmware Version
44
4.5 Tools
45
4.6 Hardware Health Event Monitoring Screen
46
4.7 Security Screen
47
4.8 Boot Screen
48
4.9 Exit Screen
50
User Manual - Page 6

...and the BIOS software might be updated, the content of this documentation will be subject to change without notice.
1.1 Package Contents
• X300TM-ITX Motherboard (Thin Mini-ITX Form Factor) • X300TM-ITX Quick Installation Guide (Optional) • 1 x Thin-Mini ITX I/O Shield (Optional) • 1 x Mini ITX I/O Shield (Optional) • 1 x Serial ATA (SATA) Data Cable (Optional) •...
User Manual - Page 7

...
* Actual support may vary by CPU • DirectX 12, Pixel Shader 5.0 • Shared memory default 2GB. Max Shared memory supports
up to 16GB. * The Max shared memory 16GB requires 32GB system memory installed. • Three graphics output options: 2 x HDMI, 1 x LVDS ports • Supports 2 x HDMI 2.1 with max. resolution up to 4K@
60Hz HDMI x 1 port (Rear) HDMI x 1 port (Internal)
2
English
User Manual - Page 9
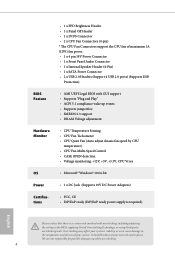
...) * The CPU Fan Connectors support the CPU fan of maximum 1A (12W) fan power. • 1 x 4 pin 19V Power Connector • 1 x Front Panel Audio Connector • 1 x Internal Speaker Header (4-Pin) • 1 x SATA Power Connector • 2 x USB 2.0 Headers (Support 4 USB 2.0 ports) (Supports ESD
Protection)
BIOS Feature
• AMI UEFI Legal BIOS with GUI support • Supports "Plug and...
User Manual - Page 13

... Mini-ITX form factor motherboard. Before you install the motherboard, study the configuration of your chassis to ensure that the motherboard fits into it.
Pre-installation Precautions
Take note of the following precautions before you install motherboard components or change any motherboard settings. • Make sure to unplug the power cord before installing or removing the motherboard.
Failure...
User Manual - Page 14

2.1 Installing the CPU
Unplug all power cables before installing the CPU.
1
X300TM-ITX
2
English
9
User Manual - Page 16

X300TM-ITX
2.2 Installing the CPU Fan and Heatsink
After you install the CPU into this motherboard, it is necessary to install a larger heatsink and cooling fan to dissipate heat. You also need to spray thermal grease between the CPU and the heatsink to improve heat dissipation. Make sure that the CPU and the heatsink are securely fastened and in good contact...
User Manual - Page 18

X300TM-ITX
2.3 Installing Memory Modules (SO-DIMM)
This motherboard provides two 260-pin DDR4 (Double Data Rate 4) SO-DIMM slots.
It is not allowed to install a DDR, DDR2 or DDR3 memory module into a DDR4 slot; otherwise, this motherboard and SO-DIMM may be damaged.
DDR4 SO-DIMM Maximum Frequency Support
Ryzen Series APUs (Renoir):
UDIMM Memory Slot
A1
B1
SR
-
-
SR...
User Manual - Page 20

X300TM-ITX
2.3 Installing Memory Modules (SO-DIMM)
This motherboard provides two 260-pin DDR4 (Double Data Rate 4) SO-DIMM slots.
It is not allowed to install a DDR, DDR2 or DDR3 memory module into a DDR4 slot; otherwise, this motherboard and SO-DIMM may be damaged.
The SO-DIMM only fits in one correct orientation. It will cause permanent damage to...
User Manual - Page 21

... reset the system parameters to default setup, please turn off the computer and unplug the power cord from the power supply. After waiting for 15 seconds, use a jumper cap to short pin2 and pin3 on CLRMOS1 for 5 seconds. However, please do not clear the CMOS right after you update the BIOS. If you need to clear...
User Manual - Page 25

... Sensing, but the panel wire on the chassis must support HDA to function correctly. Please follow the instructions in our manual and chassis manual to install your system.
2. If you use an AC'97 audio panel, please install it to the front panel audio header by the steps below: A. Connect Mic_IN (MIC) to MIC2_L. B. Connect Audio_R (RIN) to...
User Manual - Page 27

... M.2, also known as the Next Generation Form Factor (NGFF), is a small size and versatile card edge connector that aims to replace mPCIe and mSATA. The M.2 Socket (Key E) supports type 2230 WiFi/BT module.
Installing the WiFi/BT module
Step 1
Prepare a type 2230 WiFi/BT module and the screw.
PCB Length: 3cm Module Type: Type2230
Step 2 Find...
User Manual - Page 29

... the Next Generation Form Factor (NGFF), is a small size and versatile card edge connector that aims to replace mPCIe and mSATA. The Ultra M.2 Socket supports M Key type 2260/2280 M.2 SATA3 6.0 Gb/s module and M.2 PCI Express module up to Gen3 x4 (32 Gb/s).
Installing the M.2_SSD (NGFF) Module
Step 1 Prepare a M.2_SSD (NGFF) module and the...
User Manual - Page 34

X300TM-ITX
Chapter 3 Software and Utilities Operation
3.1 Installing Drivers
The Support CD that comes with the motherboard contains necessary drivers and useful utilities that enhance the motherboard's features.
Running The Support CD
To begin using the support CD, insert the CD into your CD-ROM drive. The CD automatically displays the Main Menu if "AUTORUN" is enabled in your computer. If the ...
User Manual - Page 35

...UEFI software is constantly being updated, the following UEFI setup ...setting system time/date information
OC Tweaker
For overclocking configurations
Advanced
For advanced system configurations
Tool
Useful tools
H/W Monitor
Displays current hardware status
Boot
For configuring boot settings and boot priority
Security
For security settings
Exit
Exit the current screen or the UEFI Setup...
User Manual - Page 38

... Tweaker screen, you can set up overclocking features.
X300TM-ITX
Because the UEFI software is constantly being updated, the following UEFI setup screens and descriptions are for reference purpose only, and they may not exactly match what you see on your screen.
CPU Configuration CPU Frequency and Voltage(VID) Change
If this item is set to [Manual], the multiplier and...
User Manual - Page 39

... this to select CPU Vcore Voltage. The default value is [Auto].
VDDCR SOC Voltage (Offset)
Use this to select VDDCR_SOC Voltage. The default value is [Auto].
DRAM Voltage
Use this to select DRAM Voltage. The default value is [Auto].
Manually Control Adapter Power
Use this to Manually Control Adapter Power.
XFR Enhancement Precision Boost Overdrive
This option set to [Auto...
User Manual - Page 41

... CPU Configuration, Onboard Devices Configuration, Storage Configuration, ACPI Configuration, LVDS Control, Trusted Computing and AMD Firmware Version.
Setting wrong values in this section may cause the system to malfunction.
UEFI Configuration Full HD UEFI
When [Auto] is selected, the resolution will be set to 1920 x 1080 if the monitor supports Full HD resolution. If the monitor does not support...
User Manual - Page 43
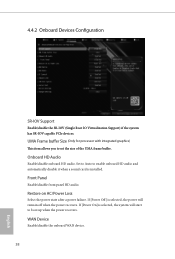
... Root IO Virtualization Support) if the system has SR-IOV capable PCIe devices.
UMA Frame buffer Size (Only for processor with integrated graphics)
This item allows you to set the size of the UMA frame buffer.
Onboard HD Audio
Enable/disable onboard HD audio. Set to Auto to enable onboard HD audio and automatically disable it when a sound card is installed.
Front...