Acer F7200 driver and firmware

Related Acer F7200 Manual Pages
Download the free PDF manual for Acer F7200 and other Acer manuals at ManualOwl.com
User Manual - Page 2

..., including all photographs, illustrations and software, is protected under international copyright laws, with all rights reserved. Neither this manual, nor any of the material contained...HDMI, the HDMI Logo, and High-Definition Multimedia Interface are trademarks or registered trademarks of HDMI Licensing LLC in the United States and other countries.
All other product names used in this manual...
User Manual - Page 4

Projector Installation Notice
Place the projector in a horizontal position Do not tilt the projector to the left or right, otherwise light source life could ... projector is running, and the air intake and exhaust vents are unobstructed.
All enclosures should pass a certified thermal evaluation to ensure that the projector does not recycle exhaust air, as this may cause the device ...
User Manual - Page 5
... for achieving optimal display effect. The AUDIO IN connector should be connected to the AUDIO IN port and CANNOT be connected to AUDIO OUT or other ports like BNC, RCA; otherwise, it will lead to mute output and even DAMAGE the port. Install the projector above 200cm to avoid damage. The power cord and signal cable should be...
User Manual - Page 6

...; Unplug the power cord before cleaning. See Cleaning the Projector on page 53. Allow the lamp to cool for about one hour. Regulatory Warnings Before installing and using the projector, read the regulatory notices in the Regulatory Compliance on page 65. Important Recycle Instructions:
Lamp(s) inside this product contain mercury. This product may contain...
User Manual - Page 7
...; Supports resolutions up to WUXGA at 16.7 million colors to deliver crisp, clear images. Flexible setup allows for front, rear projections. Line-of-vision projections remain square, with advanced keystone correction for angled
projections. Input source automatically detected.
About this Manual
This manual is intended for end users and describes how to install...
User Manual - Page 8
... Bottom view...6 REMOTE CONTROL PARTS ...7 REMOTE CONTROL OPERATING RANGE...9 PROJECTOR AND REMOTE CONTROL BUTTONS...9
SETUP AND OPERATION...10
INSERTING THE REMOTE CONTROL BATTERIES ...10 INSTALLING OR REMOVING THE OPTIONAL LENS ...11
Removing the Existing Lens From the Projector 11 Installing the New Lens ...12 STARTING AND SHUTTING DOWN THE PROJECTOR...13 SETTING AN ACCESS PASSWORD (SECURITY...
User Manual - Page 15

Bottom view
ITEM 1. 2.
LABEL
Tilt adjustor Ceiling support holes
DESCRIPTION
SEE PAGE
Rotate adjuster lever to adjust angle position.
15
Contact your dealer for information on mounting the projector on a ceiling
Note: When installing, ensure that you use only UL Listed ceiling mounts. For ceiling installations, use approved mounting hardware and M4 screws with a maximum...
User Manual - Page 20
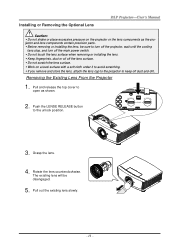
... not shake or place excessive pressure on the projector or the lens components as the projector and lens components contain precision parts. Before removing or installing the lens, be sure to turn off the projector, wait until the cooling
fans stop, and turn off the main power switch. Do not touch the lens...
User Manual - Page 21

Installing the New Lens
1. Align the notches and correctly position the electrical contact pad as shown in the picture.
Note: Pin of Electrical contact pins should be in the direction as shown in the picture.
2. Rotate the lens clockwise until you feel it click into place.
Electrical contact pins
- 12 -
User Manual - Page 24
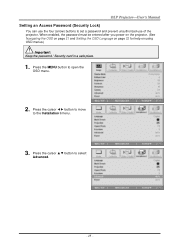
... you power on the projector. (See Navigating the OSD on page 21 and Setting the OSD Language on page 22 for help on using OSD menus.)
Important: Keep the password / Security card in a safe place.
1. Press the MENU button to open the OSD menu.
2. Press the cursor ◄► button to move to the Installation I menu...
User Manual - Page 31

Setting the OSD Language
Set the OSD language to your preference before continuing. 1. Press the MENU button. Press the cursor ◄► button to navigate to Installation I.
2. Press the cursor ▲▼ button until Language is highlighted.
3. Press the cursor ◄► button until the language you want is highlighted. 4. Press the MENU button twice to close the OSD.
- 22 -
User Manual - Page 33

MAIN MENU SUB MENU
Installation I Language
Blank Screen Projection Aspect Ratio Keystone Advanced
Reset
Security Lock Keypad Lock Digital Zoom Presentation Timer
Timer Timer Period Timer Reset
SETTINGS
English, Français, Deutsch, Español, Português Italiano, Norsk, Svenska, Nederlands Suomi Türkçe Português do Brasil Việt, Dansk ...
User Manual - Page 34

MAIN MENU SUB MENU
SETTINGS
Installation II
Auto Source Auto Power Off (min.) Auto Power On Fan Speed Lamp Mode Advanced
Reset All Status
OSD Menu Setting Menu Position
Lamp Hour Reset Low Power Mode Test Pattern 3D
Translucent Menu Menu Display
3D 3D Sync Invert 3D Format
Network Remote Setting
Network State DHCP IP Address Subnet Mask Gateway DNS Apply User1 User2...
User Manual - Page 42

...button to move to the Installation I menu. Press the cursor ▲▼ button to move up and down in the Installation I menu. Press ◄► to change values for settings.
ITEM
Language Blank Screen ...the video aspect ratio. Press the cursor ◄► button to adjust the display keystone. Press (Enter) / ► to the Advanced menu. See Advanced Feature on page 34. Press (Enter...
User Manual - Page 43

...; to move to the Installation I menu. Press ▲▼ to move to the Advanced menu and then press (Enter) or ►. Press ▲▼ to move up and down in the Advanced menu. Press ◄► to change values for setting.
ITEM
DESCRIPTION
Security Lock Keypad Lock Digital Zoom
Presentation Timer
Press the...
User Manual - Page 44

... to move to the Installation II menu. Press the cursor ▲▼ button to move up and down in the Installation II menu.
ITEM
Auto Source Auto Power Off (min.) Auto Power On
Fan Speed
Lamp ...lamp when no signal.
Press the cursor ◄► button to enable or disable automatic power On when AC power is supplied.
Press the cursor ◄► button to toggle between Normal and High fan...
User Manual - Page 45

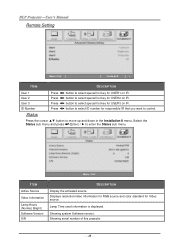
... on Network.
Press (Enter) / ► to enter the Remote Setting menu. See page 48 for more information on Remote Setting.
Note: About "On By Lan", RJ45 will support to be waked up in this mode(Under 2W) but scalar won't.
Note: To enjoy the 3D function, first enable the Play Movie in 3D setting found in your DVD device...
User Manual - Page 55

... 23 ("Enter" key pressed) (ttt.xxx.yyy.zzz: IP-Address of the projector) If Telnet-Connection ready, and user can have RS232 command input, then "Enter" key pressed, the RS232 command will be workable.
How to have TELNET enabled in Windows VISTA / 7 / 8
By default installation for Windows VISTA / 7 / 8, "TELNET" function is not included. But end...
User Manual - Page 57
... you want to control.
Status
Press the cursor ▲▼ button to move up and down in the Installation II menu. Select the Status sub menu and press (Enter) / ► to enter the Status sub menu.
ITEM
Active Source
Video Information
Lamp Hours (Normal, Bright) Software Version S/N
DESCRIPTION
Display the activated source. Displays resolution/video information for...
User Manual - Page 65

...; ON Flash ON
In the event of an error, please disconnect the AC power cord and wait for one (1) minute before restarting the projector. If any other situation didn't listed in the chart above, please contact your service center.
Image Problems
Problem: No image appears on the screen 1. Verify the settings on your notebook or desktop PC...