Acer INTPJ-STK1 driver and firmware
Drivers and firmware downloads for this Acer Computers item
Related Acer INTPJ-STK1 Manual Pages
Download the free PDF manual for Acer INTPJ-STK1 and other Acer manuals at ManualOwl.com
User Manual - Page 2
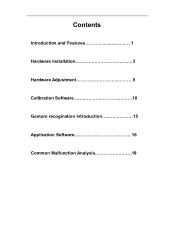
Contents
Introduction and Features 1 Hardware Installation 3 Hardware Adjustment 5 Calibration Software 10 Gesture recogination Introduction 15 Application Software 16 Common Malfunction Analysis 19
User Manual - Page 3
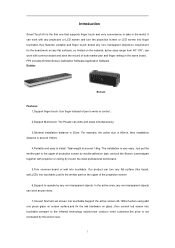
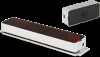
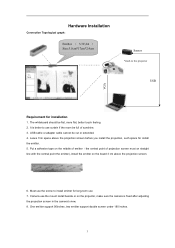
...''; can work with common board and save the record of both marker pen and finger writing in the same board. FP3 includes:Emitter,Sensor,Calibration Software,Application Software Emitter
Sensor
Features 1,Support finger touch: Use finger instead of pen to write or control;
2,Support Multi-touch: Ten People can write and erase simultaneously;
3,Shortest installation distance is 35cm: For...
User Manual - Page 4
... Size
Automatic(5s) / Manual (25/36 points)
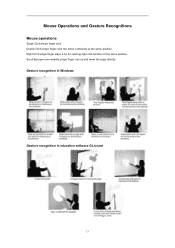
Gesture Recognition In Education Software:Write with single finger,Erase with palm, Two fingers for move,Two fingers away for zooming out and zooming in,Stay 2s with palm for opening spotlight,Double slap with palm for backing to desktop. In Windows:Max,Min windows,Zoom in or...
User Manual - Page 5
... ( 3.3V,2A ) Size:3.5cm*17cm*2.4cm
Sensor
Attach to the projector
USB
VGA
Requirement for installation
1. The whiteboard should be flat, more flat, better touch feeling. 2. It is better to use curtain if the room be full of sunshine. 3. USB cable or adapter cable cannot be cut or extended. 4. Leave 7cm space above the projection screen...
User Manual - Page 6
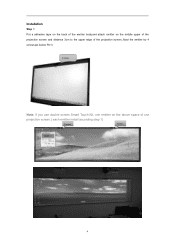
Installation
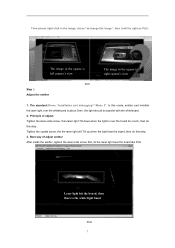
Step 1: Put a adhesive tape on the back of the emitter body,and attach emitter on the middle upper of the projection screen and distance 3cm ...(as below Pic1)
Emitter
Note: if you use double screen Smart Touch Kit, one emitter on the above space of one
projection screen.( each emitter install according step 1)
Emitter
Emitter
4
User Manual - Page 7
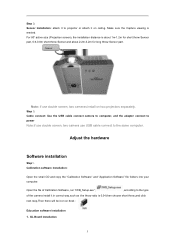
... screen, two cameras install on two projectors separately.
Step 3. Cable connect: Use the USB cable connect camera to computer, and the adapter connect to power
Note:if use double screen, two camera use USB cable connect to the same computer.
Adjust the hardware
Software installation
Step1. Calibration software installation:
Open the small CD and copy the "Calibration Software" and "Application...
User Manual - Page 8
... be a icon of GLboard
on the desktop.
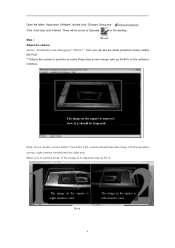
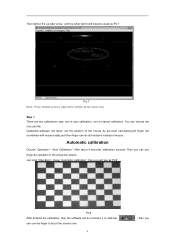
Step 2. Adjust the camera Chose "Installation and debugging"-"Mode 1", then you can see the whole projection screen clearly (As Pic3). ***Adjust the camera's position to make Projection screen image take up 60-80% of the software interface.
The image in the square is camera's view, it is should be...
User Manual - Page 9
...:
The image in the square is left camera's view
The image in the square is right camera's view
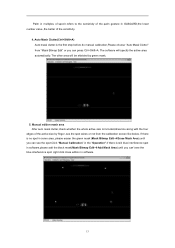
Pic5 Step 3. Adjust the emitter
1. The standard:Chose "Installation and debugging"-"Mode 2". In this mode, ...the board, then do this step. 3. Best way of adjust emitter After install the emitter, tighten the down side screw first, let the laser light heat the board like Pic6
Laser light hit the board,...
User Manual - Page 10
...
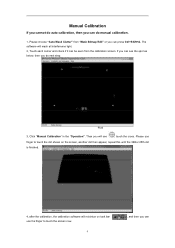
Step 4. There are two calibrations way: one is auto calibration, one is manual calibration. You can choose the one you like. Calibration:software will figure out the position of the mouse by accurate calculating,and finger will ... you will see as Pic8:
Pic8 After finished the calibration, then the software will be minimize it on task bar can use the finger to touch the screen now.
8
, then you
User Manual - Page 11
... you cannot do auto calibration, then you can do manual calibration.
1, Please choose "Auto Mask Clutter" from "Mask Bitmap Edit" or you can press Ctrl+Shift+A. The software will mask all interference light. 2, Touch each corner and check if it can be seen from the calibration screen. If you can see the...
User Manual - Page 12
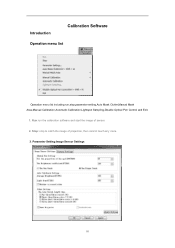
... menu list
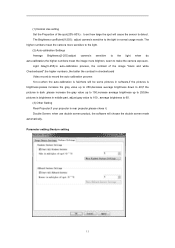
Operation menu list including run,stop,parameter setting,Auto Mask Clutter,Manual Mask Area,Manual Calibration,Automatic Calibration,Lightspot Sampling,Disable Optical Pen Control and Exit.
1. Run:run the calibration software and start the image of sensor. 2. Stop: stop to catch the image of projection, then cannot touch any more. 3. Parameter Setting:Image Sensor Settings
10
User Manual - Page 13
... to make the camera exposure. Light Gray(0-255):in auto-calibration process, the contrast of the image "black and white Checkerboard".the higher numbers ,the better the contrast in checkerboard Video record:to record the auto calibration process Notes:when the auto-calibration is fail,there will be some pictures in software,if the...
User Manual - Page 14
...refers to the sensitivity of the palm gesture in windows,the lower number value ,the better of the sensitivity is. More windows gestures setting
General:users can chose to use or not ... setting finger gestures recognition for the software you are using,users can run and stop any one gesture recognition according to the requirements. this function is mainly able to support the third-party software to...
User Manual - Page 15
..., please eraser the green mask (Mask Bitmap Edit-Erase Mask Area).until you can see the spot.Click "Manual Calibration" in the "Operation".if there is still blue interference spot in software,please add the black mask(Mask Bitmap Edit-Add Mask Area).until you can't see the blue interference...
User Manual - Page 16
... now.
Installation and debugging
1. Tuning Webcam Image Mode:choose "tuning webcam image mode",chose this mode before calibration, then you can see the screen more clearly and then adjust the position of camera.
The requirement for webcam:adjust the camera's position to make Projection screen image take up 60-80% of the software interface...
User Manual - Page 17
... opening right click function at the same position. Scroll Bar:open one website,single finger can up and down the page directly.
Gesture recognition in Windows
Gesture recognition in education software GL board
15
User Manual - Page 18
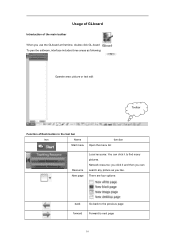
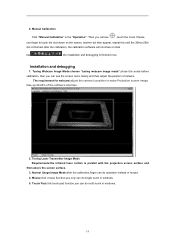
...the GLboard at first time, double click GL-board To pen the software, interface includes three areas as following:
Operate ...area: picture or text edit
Toolbar
Function of Each button in the tool bar
iron
Name
Start menu
function Open the menu list
Resource New page
Local recourse: You can click it to find many pictures. Network...
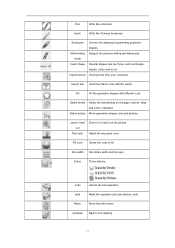
User Manual - Page 19
....
Multi-writing Support ten persons writing simultaneously mode
Insert shape Several shapes can be chose, such as triangle, square ,circle and so on
Import picture Insert picture from your computer
Import text Insert...the picture Adjust the any pens color
Fill color Chose the color to fill
Pen width Set stroke width and line type.
Erase
Three options:
undo
Cancel the last operation
redo
...
User Manual - Page 20
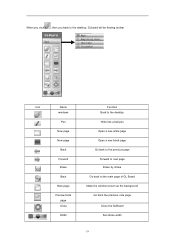
When you click
, then you back to the desktop, GLboard will be floating toolbar
Icon
Name
windows
Function Back to the desktop
Pen
Write like a ball pen
New page
Open a new white page... stroke
Back
Go back to the main page of GL Board
Note page
Make the window screen as the background
Preview Note page Close
Go back the previous note page Close the GLBoard
Width
Set stroke width
18
User Manual - Page 23

... Open software,error shows"is not valid Usb Key for hand touch whiteboard" (1) First check whether the usb cable connect well (2) Pls confirm whether the usb cable is cutted or lengthened (3) Pls confirm whether the system exits recovery card,pls add the calibration procedure in recovery
card. (4) Whether the system use solid state disk,if so,pls contact technician. (5) Change another one usb port...