Acer U5313W driver and firmware

Related Acer U5313W Manual Pages
Download the free PDF manual for Acer U5313W and other Acer manuals at ManualOwl.com
User Manual - Page 2
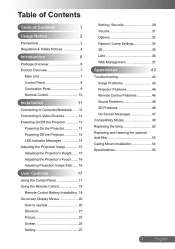
...Safety Notices 4
Introduction
6
Package Overview 6
Product Overview 7
Main Unit 7
Control Panel 8
Connection Ports 9
Remote Control 10
Installation
11
Connecting to Computer/Notebook........11
Connecting to Video Sources 12
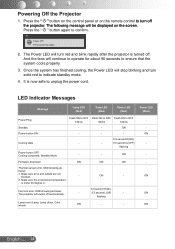
Powering On/Off the Projector 13
Powering On the Projector 13
Powering off the projector 14
LED Indicator Messages 14
Adjusting the Projected Image...
User Manual - Page 5
... a circuit different from that to
which the receiver is connected. • Consult the dealer or an experienced radio/television technician for
help.
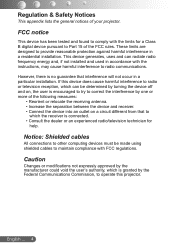
Notice: Shielded cables
All connections to other computing devices must be made using shielded cables to maintain compliance with FCC regulations.
Caution
Changes or modifications not expressly approved by the manufacturer could void...
User Manual - Page 11
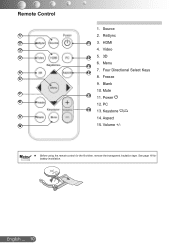
Remote Control
1 2 3 4
5 6
7 8
9 10
1. Source
2. ReSync
11 3. HDMI 4. Video
12 5. 3D 6. Menu
13
7. Four Directional Select Keys
14
8. Freeze
9. Blank
10. Mute 13 11. Power
12. PC 15 13. Keystone /
14. Aspect
15. Volume +/-
Noottee
TS
Before using the remote control for the first time, remove the transparent insulation tape. See page 18 for battery installation.
CR2302V5OL
English ... 10
User Manual - Page 12
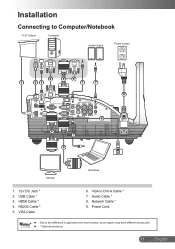
Installation
Connecting to Computer/Notebook
+12V Output
Computer
Audio Output
Power socket
4
5
6
1
23
7
7
9
8
5 7
5
Monitor
Notebook
1. 12V DC Jack * 2. USB Cable * 3. HDMI Cable * 4. RS232 Cable * 5. VGA Cable
6. VGA to DVI-A Cable * 7. Audio Cable * 8. Network Cable * 9. Power Cord
Noottee
Due to the difference in applications for each country, some regions may have ...
User Manual - Page 15
...
Lamp LED (Red)
Temp LED (Red)
Power LED (Red)
Power Plug
Flash ON to OFF Flash ON to OFF Flash ON to OFF
100ms
100ms
100ms
Standby
-
-
ON
Power button ON Cooling state
-
-
-
0.5 second H(ON),
-
-
0.5 second L(OFF)
flashing
Power button OFF: Cooling completed; Standby Mode
-
-
ON
Firmware download
ON
ON
ON
Thermal sensor error, OSD showing as
below:
1. Make sure...
User Manual - Page 19
...15
9
10
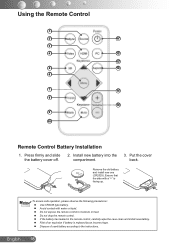
Remote Control Battery Installation
1. Press firmly and slide the battery cover off.
2. Install new battery into the compartment.
3. Put the cover back.
TS TS
Remove the old battery
CR2302V5OL
and install new one (... the remote control to moisture or heat. Do not drop the remote control. If the battery has leaked in the remote control, carefully wipe the case clean and install new...
User Manual - Page 22
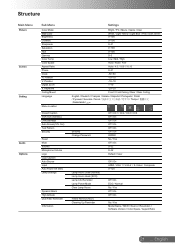
... / CC1 / CC2 / CC3 / CC4 Off / On Off / On Off / On Off / On Off / On 000000 No / Yes Off / On 0~32 0~32 Default / User
Off / On HDMI / VGA 1 / VGA 2 / S-Video / Composite 0~120
Off / On ECO / Normal No / Yes Off / On Off / On
No / Yes Model Name / SNID / Source / Resolution / Software Version / Color Space / Aspect Ratio
21 ... English
User Manual - Page 34
... the
internal temperature.
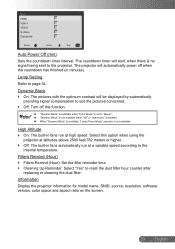
Filters Remind (Hour) `` Filters Remind (Hour): Set the filter reminder time `` Cleaning Up Reminder: Select "Yes" to reset the dust filter hour counter after
replacing or cleaning the dust filter.
Information
Display the projector information for model name, SNID, source, resolution, software version, color space and aspect ratio on the screen.
33 ... English
User Manual - Page 44
... on.
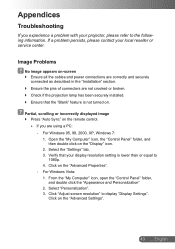
Partial, scrolling or incorrectly displayed image `` Press "Auto Sync" on the remote control.
yy If you are using a PC: -- For Windows 95, 98, 2000, XP, Windows 7: 111 Open the "My Computer" icon, the "Control Panel" folder, and then double click on the "Display" icon. 222 Select the "Settings" tab. 333 Verify that your display resolution setting is lower than or equal...
User Manual - Page 45
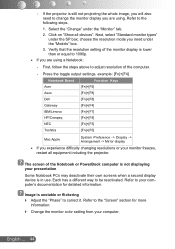
...]+[F3] [Fn]+[F5]
Mac Apple
System Preference -> Display -> Arrangement -> Mirror display
yy If you experience difficulty changing resolutions or your monitor freezes, restart all equipment including the projector.
The screen of the Notebook or PowerBook computer is not displaying your presentation
Some Notebook PCs may deactivate their own screens when a second display device is in use. Each...
User Manual - Page 54
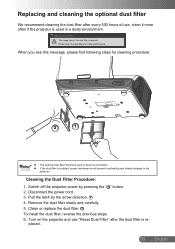
... dust filter should be used in dusty environments.
If the dust filter is installed, proper maintenance will prevent overheating and related damage to the projector.
Cleaning the Dust Filter Procedure:
1. Switch off the projector power by pressing the " " button. 2. Disconnect the power cord. 3. Pull the latch by the arrow direction. 1 4. Remove the dust filter slowly...
User Manual - Page 55
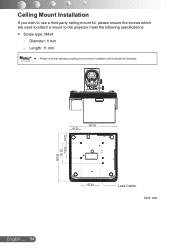
... mount kit, please ensure the screws which are used to attach a mount to the projector meet the following specifications:
yy Screw type: M4x4
-- Diameter: 4 mm
-- Length: 11 mm
Noottee
Please note that damage resulting from incorrect installation will invalidate the warranty.
357.00 85.50
367.00 151.30 112.50 74...