Acer XF251Q driver and firmware

Related Acer XF251Q Manual Pages
Download the free PDF manual for Acer XF251Q and other Acer manuals at ManualOwl.com
User Manual - Page 4
...power from the equipment, be sure to unplug the power cord from the electrical outlet.
Safe listening
To protect your hearing, follow these instructions.
• Gradually increase the volume until you can hear it clearly and comfortably
and without distortion.
• After setting...in installation unless ...devices.
Using electrical power
• This product should be operated from the type of power...
User Manual - Page 9

...reflections by: • placing your display in such a way that the side faces the window or
any light source
• ...display's top front edge
• Avoid adjusting your display to an awkward viewing angle. • Avoid looking at bright light sources, such as open windows, for extended
periods of time.
Developing good work habits
Develop the following work habits to make your computer...
User Manual - Page 10
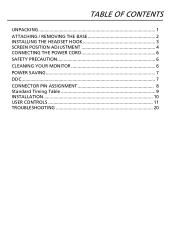
TABLE OF CONTENTS
UNPACKING 1 ATTACHING / REMOVING THE BASE 2 INSTALLING THE HEADSET HOOK 3 SCREEN POSITION ADJUSTMENT 4 CONNECTING THE POWER CORD 6 SAFETY PRECAUTION 6 CLEANING YOUR MONITOR 6 POWER SAVING 7 DDC...7 CONNECTOR PIN ASSIGNMENT 8 Standard Timing Table 9 INSTALLATION 10 USER CONTROLS 11 TROUBLESHOOTING 20
User Manual - Page 12
... screen.
1.
2.
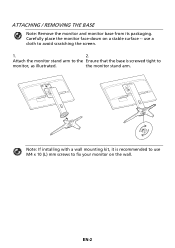
Attach the monitor stand arm to the Ensure that the base is screwed tight to
monitor, as illustrated.
the monitor stand arm.
Note: If installing with a wall mounting kit, it is recommended to use M4 x 10 (L) mm screws to fix your monitor on the wall.
EN-2
User Manual - Page 13

INSTALLING THE HEADSET HOOK
1. Install the headset hook onto the top of the monitor stand arm, as illustrated.
2. Ensure that the headset hook is snapped into place on monitor stand arm.
EN-3
User Manual - Page 16
...set should have the appropriate safety approvals for the country in which the equipment will be installed.
SAFETY PRECAUTION
Avoid placing the monitor, or any other heavy object, on the power cord to avoid damage to the cable...ANY AMMONIA OR ALCOHOL-BASED CLEANERS ON
THE LCD DISPLAY SCREEN OR CASE. Acer will not be liable for damage resulting from use of any ammonia or
alcohol-...
User Manual - Page 17
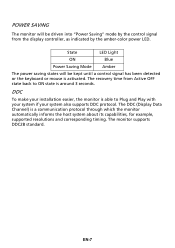
... display controller, as indicated by the amber-color power LED.
State
LED Light
ON
Blue
Power Saving Mode
Amber
The power saving states will be kept until a control signal has been detected or the keyboard or mouse is activated. The recovery time from Active OFF state back to ON state is around 3 seconds.
DDC
To make your installation...
User Manual - Page 19
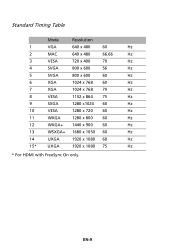
Standard Timing Table
Mode
Resolution
1
VGA
640 x 480
60
Hz
2
MAC
640 x 480
66.66
Hz
3
VESA
720 x 400
70
Hz
4
SVGA
800 x 600
56
Hz
5
SVGA
800 x 600
60
Hz
6
XGA
1024 x 768 60
Hz
7
...
12
WXGA+ 1440 x 900 60
Hz
13
WSXGA+ 1680 x 1050 60
Hz
14
UXGA
1920 x 1080 60
Hz
15*
UXGA
1920 x 1080 75
Hz
* For HDMI with FreeSync On only.
EN-9
User Manual - Page 20
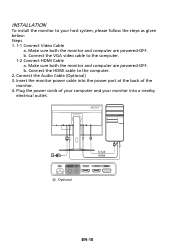
... given below: Steps 1. 1-1 Connect Video Cable
a. Make sure both the monitor and computer are powered-OFF. b. Connect the VGA video cable to the computer. 1-2 Connect HDMI Cable a. Make sure both the monitor and computer are powered-OFF. b. Connect the HDMI cable to the computer. 2. Connect the Audio Cable (Optional) 3. Insert the monitor power cable into the power port at the back of the monitor...
User Manual - Page 26
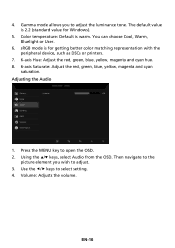
... adjust the luminance tone. The default value is 2.2 (standard value for Windows).
5. Color temperature: Default is warm. You can choose Cool, Warm, Bluelight or User.
6. sRGB mode is for getting better color matching representation with the peripheral device, such as DSCs or printers.
7. 6-axis Hue: Adjust the red, green, blue, yellow, magenta and...
User Manual - Page 28
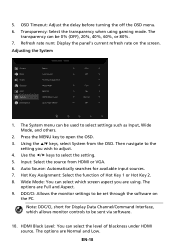
...navigate to the
setting you wish to adjust. 4. Use the / keys to select the setting. 5. Input: Select the source from HDMI or VGA. 6. Auto ...settings to be set through the software on
the PC. Note: DDC/CI, short for Display Data Channel/Command Interface, which allows monitor controls to be sent via software.
10. HDMI Black Level: You can select the level of blackness under HDMI...