Asus RS160-E2 driver and firmware


Related Asus RS160-E2 Manual Pages
Download the free PDF manual for Asus RS160-E2 and other Asus manuals at ManualOwl.com
RS160-E2 - Page 4
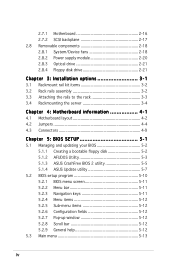
...20 2.8.3 Optical drive 2-21 2.8.4 Floppy disk drive 2-21
Chapter 3: Installation options 3-1 3.1 Rackmount rail kit items 3-2 3.2 Rack rails assembly 3-2 3.3 Attaching the rails to the rack 3-3 3.4 Rackmounting the server 3-4
Chapter 4: Motherboard information 4-1 4.1 Motherboard layout 4-2 4.2 Jumpers 4-4 4.3 Connectors 4-9
Chapter 5: BIOS SETUP 5-1 5.1 Managing and updating your BIOS...
RS160-E2 - Page 5

... 6: Driver Installation 6-1 6.1 RAID configurations 6-2
6.1.1 RAID definitions 6-2 6.1.2 Adaptec SCSI(TM) Utility 6-3 6.2 RAID driver installation 6-24 6.2.1 Creating a RAID driver disk 6-24 6.2.2 Installing the RAID controller driver 6-26 6.3 LAN driver installation 6-31 6.3.1 Windows 2000/2003 Server 6-31 6.3.2 Install Broadcom NetXtreme Software 6-32 6.4 VGA driver installation 6-43...
RS160-E2 - Page 9
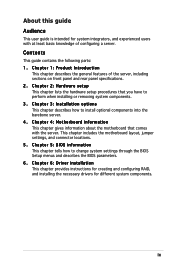
... chapter includes the motherboard layout, jumper settings, and connector locations. 5. Chapter 5: BIOS information This chapter tells how to change system settings through the BIOS Setup menus and describes the BIOS parameters. 6. Chapter 6: Driver installation This chapter provides instructions for creating and configuring RAID, and installing the necessary drivers for different system components...
RS160-E2 - Page 10
... Instructions that you MUST follow to complete a task. N O T E : Tips and information to aid in completing a task.
References
Refer to the following sources for additional information, and for product and software updates. 1. ASUS NCL-DSR1 motherboard user guide
This manual contains detailed information about the ASUS NCL-DSR1 motherboard. 2. ASUS Server Web-based Management (ASWM) user guide This...
RS160-E2 - Page 12
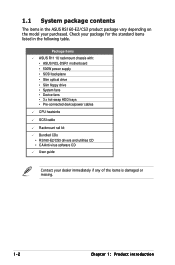
...; ASUS NCL-DSR1 motherboard • 500W power supply • SCSI backplane • Slim optical drive • Slim floppy drive • System fans • Device fans • 3 x hot-swap HDD trays • Pre-connected device/power cables CPU heatsinks
SCSI cable
Rackmount rail kit Bundled CDs • RS160-E2/CS3 drivers and utilities CD • CA Anti-virus software CD User guide
Contact...
RS160-E2 - Page 31
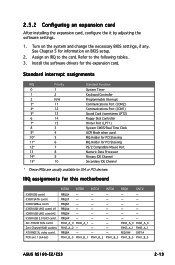
... PS/2 Compatible Mouse Port Numeric Data Processor Primary IDE Channel Secondary IDE Channel
* These IRQs are usually available for ISA or PCI devices.
IRQ assignments for this motherboard
ICH5R IDE contrl. ICH5R SATA contrl. ICH5R SMBus contrl. ICH5R USB UHCI contrl. #1 ICH5R USB UHCI contrl.#2 ICH5R USB 2.0 EHCI contrl. AIC-7902W SCSI contrl. Zero-Channel RAID sockets ATI RAGE XL video...
RS160-E2 - Page 32
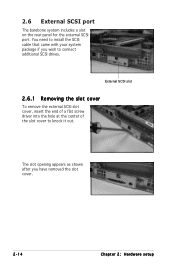
... a slot on the rear panel for the external SCSI port. You need to install the SCSI cable that came with your system package if you wish to connect additional SCSI drives.
External SCSI slot
2.6.1 Removing the slot cover
To remove the external SCSI slot cover, insert the end of a flat screw driver into the hole at the center of the...
RS160-E2 - Page 54
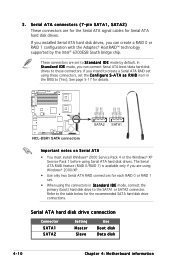
... BIOS to [Yes]. See page 5-17 for details.
®
NCL-DSR1
GND RSATA_RXP2 RSATA_RXN2 GND RSATA_TXN2 RSATA_TXP2 GND GND RSATA_RXP1 RSATA_RXN1 GND RSATA_TXN1 RSATA_TXP1 GND
SATA2 SATA1
NCL-DSR1 SATA connectors
Important notes on Serial ATA
• You must install Windows® 2000 Service Pack 4 or the Windows® XP Service Pack 1 before using Serial ATA hard disk drives. The Serial ATA RAID...
RS160-E2 - Page 64
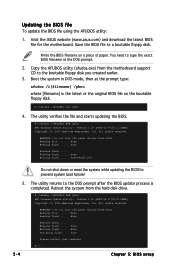
... the DOS prompt after the BIOS update process is completed. Reboot the system from the hard disk drive.
A:\>afudos /iNCLDSR1.ROM /pbnc AMI Firmware Update Utility - Version 1.19 (ASUS V2.07(03.11.24BB)) Copyright (C) 2002 American Megatrends, Inc. All rights reserved.
WARNING!! Do not turn off power during flash BIOS Reading file ....... done Reading flash ...... done
Advance Check ...... Erasing...
RS160-E2 - Page 67
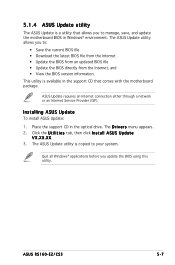
... Service Provider (ISP).
Installing ASUS Update To install ASUS Update:
1. Place the support CD in the optical drive. The D r i v e r s menu appears. 2. Click the U t i l i t i e s tab, then click I n s t a l l A S U S U p d a t e
V X . X X . X X. 3. The ASUS Update utility is copied to your system.
Quit all Windows® applications before you update the BIOS using this utility.
ASUS RS160-E2...
RS160-E2 - Page 69
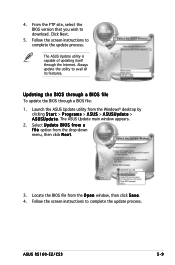
...174; desktop by clicking S t a r t > P r o g r a m s > A S U S > A S U S U p d a t e > A S U S U p d a t e. The ASUS Update main window appears.
2. Select U p d a t e B I O S f r o m a f i l e option from the drop-down menu, then click N e x t.
3. Locate the BIOS file from the O p e n window, then click S a v e. 4. Follow the screen instructions to complete the update process.
ASUS RS160-E2/CS3...
RS160-E2 - Page 70
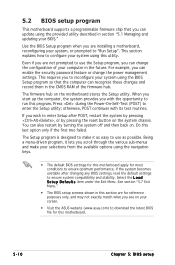
... can enable the security password feature or change the power management settings. This requires you to reconfigure your system using the BIOS Setup program so that the computer can recognize these changes and record them in the CMOS RAM of the firmware hub.
The firmware hub on the motherboard stores the Setup utility. When you start up the computer, the system provides you...
RS160-E2 - Page 100
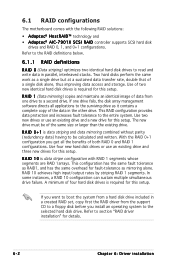
... drive failure. A minimum of four hard disk drives is required for this setup.
If you want to boot the system from a hard disk drive included in a created RAID set, copy first the RAID driver from the support CD to a floppy disk before you install an operating system to the selected hard disk drive. Refer to section "RAID driver installation" for details.
6-2
Chapter 6: Driver installation
RS160-E2 - Page 122
... hard disk drive or bootable array. This part provides instructions on how to install the RAID controller drivers during OS installation.
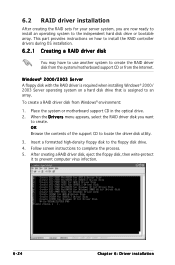
6.2.1 Creating a RAID driver disk
You may have to use another system to create the RAID driver disk from the system/motherboard support CD or from the Internet.
Windows® 2000/2003 Server A floppy disk with the RAID driver is required when installing Windows...
RS160-E2 - Page 124
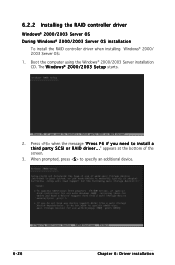
6.2.2 Installing the RAID controller driver
Windows® 2000/2003 Server OS D u r i n g W i n d o w s® 2 0 0 0 / 2 0 0 3 S e r v e r O S i n s t a l l a t i o n
To install the RAID controller driver when installing Windows® 2000/ 2003 Server OS: 1. Boot the computer using the Windows® 2000/2003 Server installation CD. The W i n d o w s® 2 0 0 0 / 2 0 0 3 S e t u p starts.
2. ...
RS160-E2 - Page 125
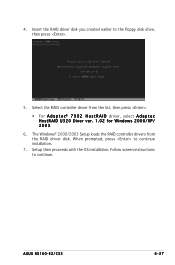
...; For A d a p t e c® 7 9 0 2 H o s t R A I D driver, select A d a p t e c HostRAID U320 Diver ver. 1.02 for Windows 2000/XP/ 2 0 0 3.
6. The Windows® 2000/2003 Setup loads the RAID controller drivers from the RAID driver disk. When prompted, press to continue installation.
7. Setup then proceeds with the OS installation. Follow screen instructions to continue.
ASUS RS160-E2/CS3
6-27
RS160-E2 - Page 129

... installation
This section provides instructions on how to install the Broadcom® Gigabit LAN controller drivers.
6.3.1 Windows® 2000/2003 Server
To install the Broadcom® Gigabit LAN controller driver on a Windows® 2000/2003 Server OS :
1. Restart the computer, then log on with A d m i n i s t r a t o r privileges. 2. Insert the motherboard/system support CD to the optical drive...
RS160-E2 - Page 130
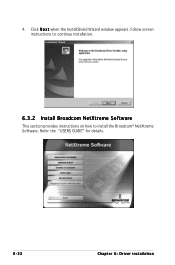
4. Click N e x t when the InstallShield Wizard window appears. Follow screen instructions to continue installation.
6.3.2 Install Broadcom NetXtreme Software
This section provides instructions on how to install the Broadcom® NetXtreme Software. Refer the "USERS GUIDE" for details.
6-32
Chapter 6: Driver installation
RS160-E2 - Page 131
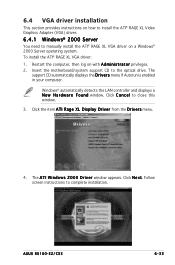
... Adapter (VGA) driver.
6.4.1 Windows® 2000 Server
You need to manually install the ATI® RAGE XL VGA driver on a Windows® 2000 Server operating system. To install the ATI® RAGE XL VGA driver: 1. Restart the computer, then log on with A d m i n i s t r a t o r privileges. 2. Insert the motherboard/system support CD to the optical drive. The
support CD automatically displays...
RS160-E2 - Page 132
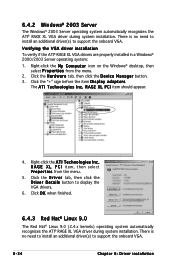
.... There is no need to install an additional driver(s) to support the onboard VGA.
Verifying the VGA driver installation To verify if the ATI® RAGE XL VGA drivers are properly installed in a Windows® 2000/2003 Server operating system:
1. Right-click the M y C o m p u t e r icon on the Windows® desktop, then select P r o p e r t i e s from the menu.
2. Click the H a r d w a r e tab...