Asus T2-PE1 driver and firmware

Related Asus T2-PE1 Manual Pages
Download the free PDF manual for Asus T2-PE1 and other Asus manuals at ManualOwl.com
T2-PE1 English User Manual E2151 - Page 4

... 3: Starting up
3.1 Installing an operating system 3-2 3.2 Powering up 3-2 3.3 Support CD information 3-2
3.3.1 Running the support CD 3-3 3.3.2 Drivers menu 3-3 3.3.3 Utilities menu 3-4 3.3.4 ASUS contact information 3-5 3.3.5 Other information 3-6 3.4 Software information 3-7 3.4.1 ASUS Instant Music 3-7 3.4.2 ASUS Update 3-9 3.4.3 ASUS PC Probe II 3-11
Chapter 4: Motherboard Info...
T2-PE1 English User Manual E2151 - Page 8

... you power up the system and install drivers and utilities from the support CD. 4 . Chapter 4: Motherboard information This chapter gives information about the motherboard that comes with the system. This chapter includes the motherboard layout, jumper settings, and connector locations. 5. Chapter 5: BIOS information This chapter tells how to change system settings through the BIOS Setup menus...
T2-PE1 English User Manual E2151 - Page 9

...T A N T : Instructions that you MUST follow to complete a task. N O T E : Tips and additional information to aid in completing a task.
Where to find more information
Refer to the following sources for additional information and for product and software updates. 1. ASUS Websites
The ASUS websites worldwide provide updated information on ASUS hardware and software products. Refer to the ASUS contact...
T2-PE1 English User Manual E2151 - Page 20
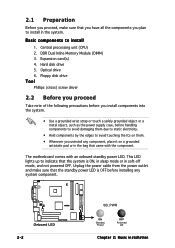
... unit (CPU) 2. DDR Dual Inline Memory Module (DIMM) 3. Expansion card(s) 4. Hard disk drive 5. Optical drive 6. Floppy disk drive
Tool
Phillips (cross) screw driver
2.2 Before you proceed
Take note of the following precautions before you install components into the system.
• Use a grounded wrist strap or touch a safely grounded object or a metal object, such as the power supply case...
T2-PE1 English User Manual E2151 - Page 25

..., do not remove the PnP cap unless you are installing a CPU.
3. Lift the load lever in the direction of the arrow to a 135º angle.
Retention tab A B Load lever
3
4. Lift the load plate with your thumb and forefinger to a 100º angle (A), then push the PnP cap from the load plate window to remove (B).
PnP cap Load plate
B A
ASUS T2-PE1
2-7
T2-PE1 English User Manual E2151 - Page 33

... USB controller 2
-- -- -- shared -- -- -- --
Onboard LAN
-- shared
Onboard Audio
-- shared
Onboard 1394
-- -- -- -- shared -- -- --
When using a PCI card on shared slots, ensure that the drivers support "Share IRQ" or that the cards do not need IRQ assignments; otherwise, conflicts will arise between the two PCI groups, making the system unstable and the card inoperable.
ASUS T2-PE1...
T2-PE1 English User Manual E2151 - Page 38

2.10 Installing a hard disk drive (HDD)
The system supports one Ultra ATA/133 IDE or one Serial ATA hard disk drive.
To install an IDE hard disk drive:
1. Locate the HDD tray lock screw on the other side of the chassis.
2. Remove the lock screw with a Philips screw driver. Keep the screw for later use.
1
2
3. Slide the HDD tray outward until the tray slots...
T2-PE1 English User Manual E2151 - Page 45

Chapter 3
This chapter helps you power up the system and install drivers and utilities from the support CD.
ASUS T2-PE1
Starting up
T2-PE1 English User Manual E2151 - Page 46
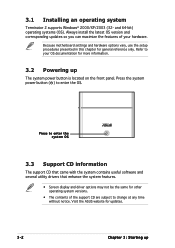
... 2 supports Windows® 2000/XP/2003 (32- and 64-bit) operating systems (OS). Always install the latest OS version and corresponding updates so you can maximize the features of your hardware.
Because motherboard settings and hardware options vary, use the setup procedures presented in this chapter for general reference only. Refer to your OS documentation for more information.
3.2 Powering...
T2-PE1 English User Manual E2151 - Page 47

... available device drivers if the system detects installed devices. Install the necessary drivers to activate the devices.
ATI Chipset Driver
Installs the ATI Chipset driver.
Realtek ALC655 Audio Driver
Installs the Realtek® ALC655 audio driver.
Agere Gigabit Ethernet Driver
Installs the Agere Gigabit Ethernet driver.
USB 2.0 Driver
Click this item to install the USB 2.0 driver.
ASUS T2-PE1...
T2-PE1 English User Manual E2151 - Page 48
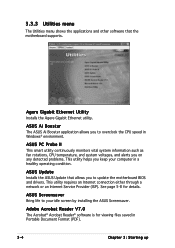
... keep your computer in a healthy operating condition.
ASUS Update
Installs the ASUS Update that allows you to update the motherboard BIOS and drivers. This utility requires an Internet connection either through a network or an Internet Service Provider (ISP). See page 5-8 for details.
ASUS Screensaver
Bring life to your idle screen by installing the ASUS Screensaver.
Adobe Acrobat Reader V7.0
The...
T2-PE1 English User Manual E2151 - Page 49

...® improves the multimedia featuers of your computer so you can enjoy watching TV and movies, capturing videos, or playing games on your computer.
Anti-virus Utility
The anti-virus application scans, identifies, and removes computer viruses. View the online help for detailed information.
3.3.4 ASUS contact information
The Contact tab displays the ASUS contact information.
ASUS T2-PE1
3-5
T2-PE1 English User Manual E2151 - Page 51

... wizards that will conveniently guide you through the installation. View the online help or readme file that came with the software for more information.
3.4.1 ASUS Instant Music
The motherboard is equipped with a BIOS-based audio playback feature called I n s t a n t M u s i c. The onboard audio AC'97 CODEC supports this feature, which requires an optical drive (CD-ROM, DVD-ROM, or CD-RW).
•...
T2-PE1 English User Manual E2151 - Page 53
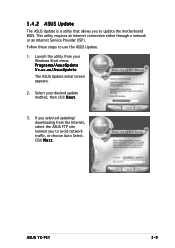
... steps to use the ASUS Update.
1. Launch the utility from your Windows Start menu: Programs/AsusUpdate Vx.xx.xx/AsusUpdate The ASUS Update initial screen appears.
2. Select your desired update method, then click N e x t.
3. If you selected updating/ downloading from the Internet, select the ASUS FTP site nearest you to avoid network traffic, or choose Auto Select. Click N e x t.
ASUS T2-PE1
3-9
T2-PE1 English User Manual E2151 - Page 54

4. From the FTP site, select the BIOS version that you wish to download. Click N e x t.
5. The BIOS ROM information is displayed. Click Flash to update the BIOS.
If you selected the option to update the BIOS from a file, a window pops up prompting you to locate the file. Select the file, click Save, then follow the screen instructions to complete the update process.
3-10
Chapter 3: Starting up
T2-PE1 English User Manual E2151 - Page 55
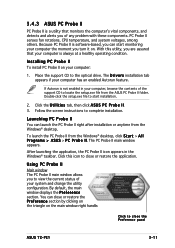
... a healthy operating condition.
Installing PC Probe II
To install PC Probe II on your computer:
1. Place the support CD to the optical drive. The D r i v e r s installation tab appears if your computer has an enabled Autorun feature.
If Autorun is not enabled in your computer, browse the contents of the support CD to locate the setup.exe file from the ASUS PC Probe II...
T2-PE1 English User Manual E2151 - Page 75

... or the original BIOS file on the bootable floppy disk.
A:\>afudos /iP54RT.ROM
4. The utility reads the file and starts updating the BIOS.
A:\>afudos /iP54RT.ROM AMI Firmware Update Utility - Version 1.19(ASUS V2.07(03.11.24BB)) Copyright (C) 2003 American Megatrends, Inc. All rights reserved.
WARNING!! Do not turn off power during flash BIOS Reading file ..... done Reading flash .... done Search...
T2-PE1 English User Manual E2151 - Page 78
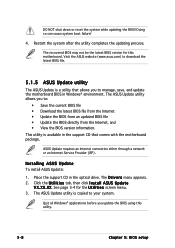
... a network or an Internet Service Provider (ISP).
Installing ASUS Update
To install ASUS Update:
1. Place the support CD in the optical drive. The D r i v e r s menu appears. 2. Click the U t i l i t i e s tab, then click I n s t a l l A S U S U p d a t e
V X . X X . X X. See page 3-4 for the U t i l i t i e s screen menu. 3. The ASUS Update utility is copied to your system.
Quit all Windows®...
T2-PE1 English User Manual E2151 - Page 80

... the BIOS version that you wish to download. Click Next.
5. Follow the screen instructions to complete the update process.
The ASUS Update utility is capable of updating itself through the Internet. Always update the utility to avail all its features.
Updating the BIOS through a BIOS file
To update the BIOS through a BIOS file:
1. Launch the ASUS Update utility from the Windows® desktop by...
T2-PE1 English User Manual E2151 - Page 81

... can enable the security password feature or change the power management settings. This requires you to reconfigure your system using the BIOS Setup program so that the computer can recognize these changes and record them in the CMOS RAM of the firmware hub.
The firmware hub on the motherboard stores the Setup utility. When you start up the computer, the system provides you...