Asus T4-P5G43 driver and firmware

Related Asus T4-P5G43 Manual Pages
Download the free PDF manual for Asus T4-P5G43 and other Asus manuals at ManualOwl.com
User Manual - Page 4
... Software information 3-7 ASUS Express Gate 3-7
Chapter 4: Motherboard info 4.1 Introduction 4-2 4.2 Motherboard layout 4-2 4.3 Jumpers 4-3 4.4 Connectors 4-5
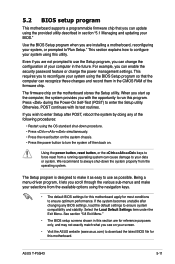
Chapter 5: BIOS setup 5.1 Managing and updating your BIOS 5-2
5.1.1 Creating a bootable floppy disk 5-2 5.1.2 ASUS EZ Flash 2 utility 5-3 5.1.3 AFUDOS utility 5-4 5.1.4 ASUS CrashFree BIOS 3 utility 5-6 5.1.5 ASUS Update utility...
User Manual - Page 5
...menu 5-28 5.6.1 Boot Device Priority 5-28 5.6.2 Boot Settings Configuration 5-29 5.6.3 Security 5-30
5.7 Tools menu 5-32 5.7.1 ASUS EZ Flash 2 5-32 5.7.2 Express Gate 5-33 5.7.3 LED Poster Configuration 5-34
5.8 Exit menu 5-35 Appendix A.1 Power supply specifications A-2 A.2 Dubug code table A-2 A.3 Using the Remote Control (optional A-3 A.4 Integrating AHCI driver to Windows® XP...
User Manual - Page 8
.... This chapter includes the motherboard layout, jumper settings, and connector locations. 5. Chapter 5: BIOS information This chapter tells how to change system settings through the BIOS Setup menus and describes the BIOS parameters. 6. Appendix The Appendix includes the power supply unit specification, remote control for this system, as well as the integrating Windows® XP installation.
viii
User Manual - Page 13
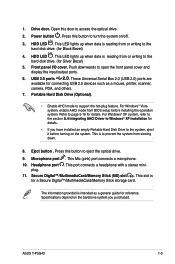
...cover and display the input/output ports.
6. USB 2.0 ports 2.0. These Universal Serial Bus 2.0 (USB 2.0) ports are
available for connecting USB 2.0 devices such as a mouse, printer, scanner, camera, PDA, and others. 7. Portable Hard Disk Drive (Optional).
• Enable AHCI mode to support the hot-plug feature. For Windows® Vista system, enable AHCI mode from BIOS setup before installing the...
User Manual - Page 15
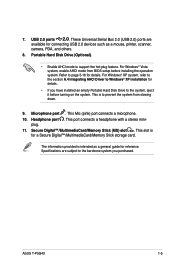
7. USB 2.0 ports 2.0. These Universal Serial Bus 2.0 (USB 2.0) ports are
available for connecting USB 2.0 devices such as a mouse, printer, scanner, camera, PDA, and others. 8. Portable Hard Disk Drive (Optional).
• Enable AHCI mode to support the hot-plug feature. For Windows® Vista system, enable AHCI mode from BIOS setup before installing the operation system. Refer to page 5-16 for ...
User Manual - Page 40

... motherboard settings and hardware options vary, use the setup procedures presented in this chapter for general reference only. Refer to your OS documentation for more information.
3.2 Powering up
The system power button is located on the front panel. Press the system power button ( ) to enter the OS.
Press to enter the system OS
T3-P5G43
T4-P5G43
In Windows®...
User Manual - Page 41
... operating system versions.
• The contents of the support CD are subject to change at any time without notice. Visit the ASUS website for updates.
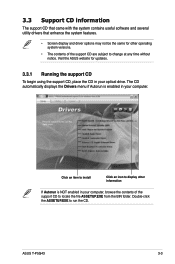
3.3.1 Running the support CD
To begin using the support CD, place the CD in your optical drive. The CD automatically displays the Drivers menu if Autorun is enabled in your computer.
Click an item to install
Click...
User Manual - Page 42
...devices.
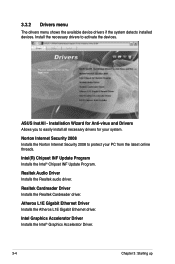
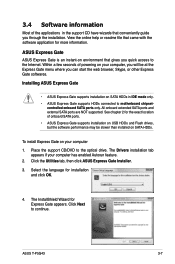
ASUS InstAll - Installation Wizard for Anti-virus and Drivers Allows you to easily install all necessary drivers for your system.
Norton Internet Security 2008 Installs the Norton Internet Security 2008 to protect your PC from the latest online threads.
Intel(R) Chipset INF Update Program Installs the Intel® Chipset INF Update Program.
Realtek Audio Driver Installs the Realtek audio...
User Manual - Page 43
...Express Gate Installer Installs the ASUS Express Gate.
ITECIR Vista Driver Installs the ITECIR Vista driver.
The ITECIR Vista Driver item appears only in some models with IR feature*. (*optional).
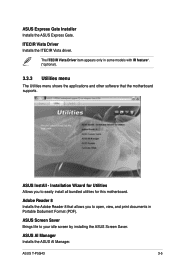
3.3.3 Utilities menu
The Utilities menu shows the applications and other software that the motherboard supports.
ASUS InstAll - Installation Wizard for Utilities Allows you to easily install all bundled...
User Manual - Page 44
ASUS Update Installs the ASUS Update that allows you to update the motherboard BIOS and drivers. This utility requires an Internet connection either through a network or an Internet Service Provider (ISP). See page 5-8 for details.
FarStone Utility Installs the FarStone Utility.
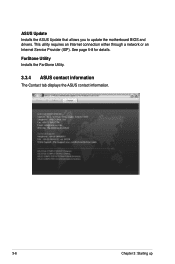
3.3.4 ASUS contact information
The Contact tab displays the ASUS contact information.
3-6
Chapter 3: Starting up
User Manual - Page 45
...; ASUS Express Gate supports HDDs connected to motherboard chipset-
controlled onboard SATA ports only. All onboard extended SATA ports and external SATA ports are NOT supported. See chapter 2 for the exact location of onboard SATA ports. • ASUS Express Gate supports installation on USB HDDs and Flash drives, but the software performance may be slower than installed on SATA HDDs.
To install...
User Manual - Page 49
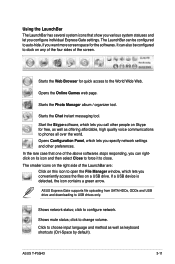
...: Click on this icon to open the File Manager window, which lets you conveniently access the files on a USB drive. If a USB device is detected, the icon contains a green arrow.
ASUS Express Gate supports file uploading from SATA HDDs, ODDs and USB drive and downloading to USB drives only.
Shows network status; click to configure network.
Shows mute status; click to change volume. Click to...
User Manual - Page 53
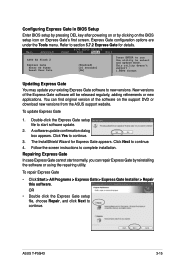
...on the support DVD or download new versions from the ASUS support website.
To update Express Gate
1. Double-click the Express Gate setup file to start software update.
2. A software update confirmation dialog box appears. Click Yes to continue.
3. The InstallShield Wizard for Express Gate appears. Click Next to continue. 4. Follow the screen instructions to complete installation.
Repairing Express...
User Manual - Page 67
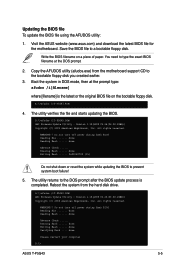
...] is the latest or the original BIOS file on the bootable floppy disk.
A:\>afudos /iT-P5G43.ROM
4. The utility verifies the file and starts updating the BIOS.
A:\>afudos /iT-P5G43.ROM AMI Firmware Update Utility - Version 1.19(ASUS V2.26(06.08.28BB)) Copyright (C) 2003 American Megatrends, Inc. All rights reserved.
WARNING!! Do not turn off power during flash BIOS Reading file ....... done Reading...
User Manual - Page 70
...with the motherboard package.
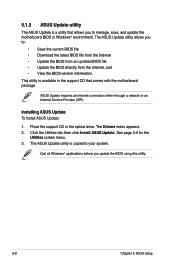
ASUS Update requires an Internet connection either through a network or an Internet Service Provider (ISP).
Installing ASUS Update To install ASUS Update:
1. Place the support CD in the optical drive. The Drivers menu appears. 2. Click the Utilities tab, then click Install ASUS Update. See page 3-5 for the
Utilities screen menu. 3. The ASUS Update utility is copied to...
User Manual - Page 72
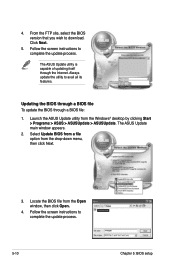
... Windows® desktop by clicking Start > Programs > ASUS > ASUSUpdate > ASUSUpdate. The ASUS Update main window appears.
2. Select Update BIOS from a file option from the drop‑down menu, then click Next.
3. Locate the BIOS file from the Open window, then click Open.
4. Follow the screen instructions to complete the update process.
T-P5G43 T-P5G43.ROM
T-P5G43
5-10
Chapter 5: BIOS setup
User Manual - Page 73
... can enable the security password feature or change the power management settings. This requires you to reconfigure your system using the BIOS Setup program so that the computer can recognize these changes and record them in the CMOS RAM of the firmware chip.
The firmware chip on the motherboard stores the Setup utility. When you start up the computer, the system provides you...
User Manual - Page 95
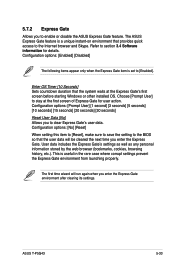
... to the Internet browser and Skype. Refer to section 3.4 Software information for details. Configuration options: [Enabled] [Disabled]
The following items appear only when the Express Gate item is set to [Enabled].
Enter OS Timer [10 Seconds] Sets countdown duration that the system waits at the Express Gate's first screen before starting Windows or other installed OS...
User Manual - Page 103
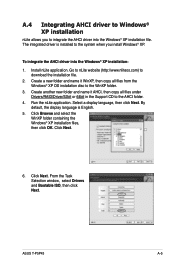
....com) to
download the installation file. 2. Create a new folder and name it WinXP, then copy all files from the
Windows® XP OS installation disc to the WinXP folder. 3. Create another new folder and name it AHCI, then copy all files under
Drivers/RAID/Driver/32bit or 64bit in the Support CD to the AHCI folder. 4. Run the nLite application. Select a display language, then...
User Manual - Page 104
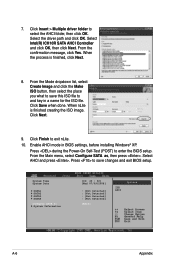
... the AHCI folder, then click OK. Select the driver path and click OK. Select Intel(R) ICH10R SATA AHCI Controller and click OK, then click Next. From the ...BIOS settings, before installing Windows® XP.
Press during the Power-On Self-Test (POST) to enter the BIOS setup. From the Main menu, select Configure SATA as, then press . Select AHCI and press . Press to save changes and exit BIOS setup...