Asus X99-E-10G WS driver and firmware
Related Asus X99-E-10G WS Manual Pages
Download the free PDF manual for Asus X99-E-10G WS and other Asus manuals at ManualOwl.com
X99-E-10G WS User Guide for English. - Page 5
... Notice 4-22
4.5 Audio configurations 4-25
Chapter 5:
RAID Support
5.1 RAID configurations 5-1
5.1.1 RAID definitions 5-1
5.1.2 Installing Serial ATA hard disks 5-2
5.1.3 Intel® Rapid Storage Technology in UEFI BIOS 5-2
5.1.4 Intel® Rapid Storage Technology Option ROM utility 5-3
5.2 Creating a RAID driver disk 5-7
5.2.1 Creating a RAID driver disk in Windows 5-7
v
X99-E-10G WS User Guide for English. - Page 8
... to perform when installing system components. 3. Chapter 3: BIOS Setup This chapter tells how to change system settings through the BIOS Setup menus. Detailed descriptions of the BIOS parameters are also provided. 4. Chapter 4: Software Support This chapter describes the contents of the support DVD that comes with the motherboard package and the software. 5. Chapter 5: RAID Support This chapter...
X99-E-10G WS User Guide for English. - Page 24

..., we recommend that you install memory modules of the same version or data code (D/C) from the same vendor. Check with the vendor to get the correct memory modules.
• ASUS exclusively provides hyper DIMM support function.
• Hyper DIMM support is subject to the physical characteristics of individual CPUs. Load the X.M.P. or D.O.C.P. settings in the BIOS for the hyper DIMM...
X99-E-10G WS User Guide for English. - Page 29
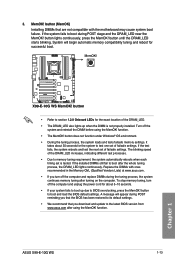
... fails to boot up due to BIOS overclocking, press the MemOK! button to boot and load the BIOS default settings. A message will appear during POST reminding you that the BIOS has been restored to its default settings.
• We recommend that you download and update to the latest BIOS version from www.asus.com after using the MemOK! function.
ASUS X99-E-10G WS
1-13
Chapter 1
X99-E-10G WS User Guide for English. - Page 37
... for future AMI error codes Recovery condition triggered by firmware (Auto recovery) Recovery condition triggered by user (Forced recovery)
Recovery process started
Recovery firmware image is found
Recovery firmware image is loaded
Reserved for future AMI progress codes
Recovery PPI is not available
Recovery capsule is not found
(continued on the next page)
Chapter 1
ASUS X99-E-10G WS
1-21
X99-E-10G WS User Guide for English. - Page 42
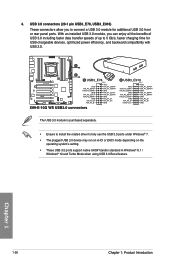
... time for USB-chargeable devices, optimized power efficiency, and backward compatibility with USB 2.0.
The USB 3.0 module is purchased separately.
• Ensure to install the related driver to fully use the USB 3.0 ports under Windows® 7. • The plugged USB 3.0 device may run on xHCI or EHCI mode depending on the
operating system's setting. • These USB 3.0 ports support native...
X99-E-10G WS User Guide for English. - Page 63

... to automatically update the BIOS. To use USB BIOS Flashback:
1. Place the bundled support DVD to the optical drive and install the USB BIOS Flashback Wizard. Follow the onscreen instructions to complete the installation.
2. Insert the USB storage device to the USB Flashback port.
• We recommend you to use a USB 2.0 storage device to save the latest BIOS version for better compatibility...
X99-E-10G WS User Guide for English. - Page 71
...8226; You have installed a new system component that requires further BIOS settings or update.
Inappropriate BIOS settings may result to instability or boot failure. We strongly recommend that you change the BIOS settings only with the help of a trained service personnel.
When downloading or updating the BIOS file, rename it as X99E10G.CAP for this motherboard.
Chapter 3
ASUS X99-E-10G WS
3-1
X99-E-10G WS User Guide for English. - Page 131
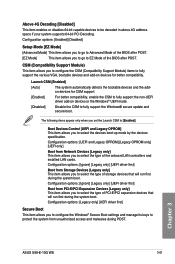
... you to select the type of PCI-E/PCI expansion devices that will run first during the system boot. Configuration options: [Legacy only] [UEFI driver first]
Secure Boot
This item allows you to configure the Windows® Secure Boot settings and manage its keys to protect the system from unauthorized access and malwares during POST.
Chapter 3
ASUS X99-E-10G WS
3-61
X99-E-10G WS User Guide for English. - Page 132
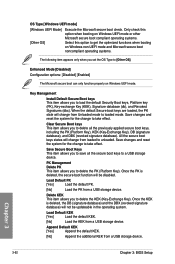
... Key). Once the KEK is deleted, the DB (signature database) and the DBX (revoked signature database) will not be updateable in the operating system.
Load Default KEK
[Yes]
Load the default KEK.
[No]
Load the KEK from a USB storage device.
Append Default KEK
[Yes]
Append the default KEK.
[No]
Append the additional KEK from a USB storage device.
Chapter 3
3-62
Chapter 3: BIOS Setup
X99-E-10G WS User Guide for English. - Page 133
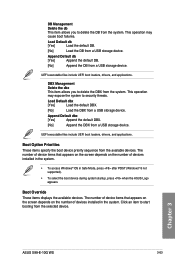
... POST (Windows® 8 not supported).
• To select the boot device during system startup, press when the ASUS Logo appears.
Boot Override
These items displays the available devices. The number of device items that appears on the screen depends on the number of devices installed in the system. Click an item to start booting from the selected device.
Chapter 3
ASUS X99-E-10G WS
3-63
X99-E-10G WS User Guide for English. - Page 139
... the BIOS file fails or gets corrupted.
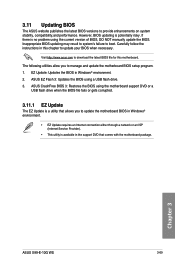
3.11.1 EZ Update
The EZ Update is a utility that allows you to update the motherboard BIOS in Windows® environment.
• EZ Update requires an Internet connection either through a network or an ISP (Internet Service Provider).
• This utility is available in the support DVD that comes with the motherboard package.
Chapter 3
ASUS X99-E-10G WS...
X99-E-10G WS User Guide for English. - Page 143
....
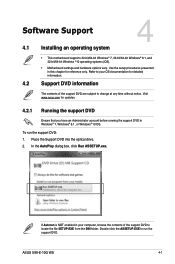
To run the support DVD: 1. Place the Support DVD into the optical drive. 2. In the AutoPlay dialog box, click Run ASSETUP.exe.
Chapter 4
If Autorun is NOT enabled in your computer, browse the contents of the support DVD to locate the file SETUP.EXE from the BIN folder. Double-click the ASSETUP.EXE to run the support DVD.
ASUS X99-E-10G WS
4-1
X99-E-10G WS User Guide for English. - Page 144
... device drivers if the system detects installed devices. Install the necessary drivers to use the devices.
Click to display the applications and other software that the motherboard supports
Contains the list of supplementary user manuals. Click an item to
open the folder of the user guide Click to display free
software for you to use Click to select
an item to install
Click to display the ASUS...
X99-E-10G WS User Guide for English. - Page 159
... will display during POST.
Launching EZ Update on your computer To launch EZ Update, click or tap on the top-right corner of the AI Suite 3 main menu, then select EZ Update.
EZ Update screen
Click to automatically update your motherboard's driver, software and firmware
Click to search and select the BIOS file
Click to select a boot logo
Click to update the BIOS
Chapter 4
ASUS X99-E-10G WS...
X99-E-10G WS User Guide for English. - Page 167
... to display the Realtek® HD Audio Manager.
Realtek® HD Audio Manager
Realtek® HD Audio Manager with DTS Studio SoundTM for Windows® 10 / Windows® 8.1 / Windows® 7
Configuration option tabs (vary with the audio devices connected)
Advanced settings
Control settings panel
Set default device button
Chapter 4
Analog and digital connector status
ASUS X99-E-10G WS...
X99-E-10G WS User Guide for English. - Page 169
... three identical hard disk drives for this setup. RAID 10 is data striping and data mirroring combined without parity (redundancy data) having to be calculated and written. With the RAID 10 configuration you get all the benefits of both RAID 0 and RAID 1 configurations. Use four new hard disk drives or use an existing drive and three new drives for this setup.
Chapter 5
ASUS X99-E-10G WS
5-1
X99-E-10G WS User Guide for English. - Page 175
...port, and then click
Browse. 3. Click the name of the device you've inserted, go to Drivers > RAID, and then select
the RAID driver for the corresponding OS version. Click OK. 4. Follow the succeeding screen instructions to complete the installation.
To set up a Windows® UEFI operating system under RAID mode, ensure to load the UEFI driver for your optical drive.
Chapter 5
ASUS X99-E-10G WS...
X99-E-10G WS User Guide for English. - Page 181
...; technology
After installing your graphics cards and the device drivers, enable the CrossFireX™ feature through the AMD Vision Engine Control Center in Windows environment.
Launching the AMD VISION Engine Control Center
To launch the AMD VISION Engine Control Center: 1. Right-click on the Windows® desktop and select AMD
VISION Engine Control Center.
Chapter 6
ASUS X99-E-10G WS
6-5
X99-E-10G WS User Guide for English. - Page 186
... card package to install the device drivers.
Ensure that your PCI Express graphics card driver supports the NVIDIA® SLI® technology. Download the latest driver from the NVIDIA website at www.nvidia.com.
6.2.6 Enabling the NVIDIA® SLI® technology
After installing your graphics cards and the device drivers, enable the SLI feature in NVIDIA® Control Panel under the Windows...