BenQ FP71e - 17" LCD Monitor driver and firmware
Drivers and firmware downloads for this BenQ item

Related BenQ FP71e Manual Pages
Download the free PDF manual for BenQ FP71e and other BenQ manuals at ManualOwl.com
User Manual - Page 2

... BenQ Corporation to notify any person of such revision or changes.
iii Please follow these safety instructions for best performance, and long life for your monitor
Power Safety
• The AC plug isolates this equipment from the AC supply. • The power supply cord serves as a power disconnect device for pluggable equipment. The socket
outlet should be installed...
User Manual - Page 3
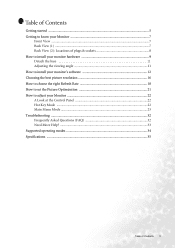
... to install your monitor's software 12 Choosing the best picture resolution 16 How to choose the right Refresh Rate 18 How to set the Picture Optimization 21 How to adjust your Monitor 22 A Look at the Control Panel 22 Hot Key Mode ...22 Main Menu Mode ...23 Troubleshooting ...32 Frequently Asked Questions (FAQ 32 Need More Help? ...33 Supported...
User Manual - Page 9
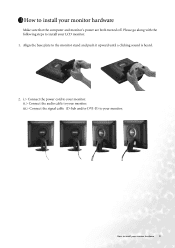
... the computer and monitor's power are both turned off. Please go along with the following steps to install your LCD monitor. 1. Align the base plate to the monitor stand and push it upward until a clicking sound is heard.
2. i.> Connect the power cord to your monitor. ii.> Connect the audio cable to your monitor. iii.> Connect the signal cable (D-Sub and/or DVI-D) to your monitor...
User Manual - Page 10
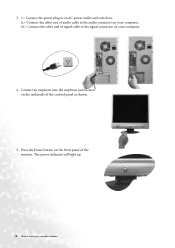
... audio connector on your computer. iii.> Connect the other end of signal cable to the signal connector on your computer.
4. Connect an earphone into the earphone jack located on the underside of the control panel as shown.
5. Press the Power button on the front panel of the monitor. The power indicator will light up.
10 How to install your monitor...
User Manual - Page 11
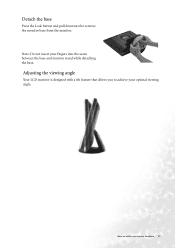
Detach the base
Press the Lock button and pull downward to remove the monitor base from the monitor. Note: Do not insert your fingers into the seam between the base and monitor stand while detaching the base.
Adjusting the viewing angle
Your LCD monitor is designed with a tilt feature that allows you to achieve your optimal viewing angle.
How to install your monitor hardware 11
User Manual - Page 12
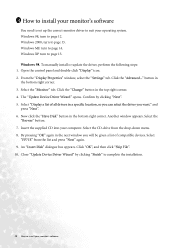
... your monitor's software
You need to set up the correct monitor driver to suit your operating system. Windows 98, turn to page 12. Windows 2000, turn to page 13. Windows ME turn to page 14. Windows XP turn to page 15. Windows 98. To manually install or update the driver, perform the following steps: 1. Open the control panel and double-click "Display" icon. 2. From the "Display Properties" window...
User Manual - Page 13

... LCD Monitor" CD-ROM into your CD-ROM Driver. 2. Click "Start" then "Settings". 3. Open the Control Panel and double click on the "Display" icon. 4. From the "Display Properties" window, select the "Settings" tab. Click the "Advanced Properties" button in the bottom right corner. 5. Select "Monitor" then click "Properties". 6. Select "Driver" tab then click "Update Driver". 7. The "Upgrade Device...
User Manual - Page 14

...
want.". 8. Click "Have disk" and then click "Browse...". 9. Insert "BenQ LCD Monitor's CD" into your CD-ROM and type d:\ (change the driver letter to
match your CD-ROM driver if it is not drive D). Enter "Drivers" folder to select the model from the list left. Click "OK". 10. Click "OK" on the "Install From Disk" window. The dialogue box "Update Device Driver Wizard" appears. Choose the...
User Manual - Page 15

... Select "Don't search. I will choose the driver to install" and then click "Next". 5. In the next window, click "Have Disk...", an "Install From Disk" window will pop up. Click "Browse". The "Locate File" window will pop up. 6. Select "FP71E". and then click "Next". 7. The new drivers are now installed to your computer. Click "Finish" to exit installation.
How to install your monitor's software 15
User Manual - Page 16
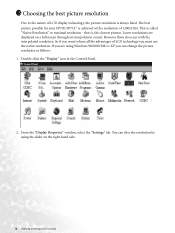
... to have all the advantages of LCD technology you must use the native resolution. If you are using Windows 98/2000/ME or XP you can change the picture resolution as follows: 1. Double-click the "Display" icon in the Control Panel.
2. From the "Display Properties" window, select the "Settings" tab. You can alter the resolution by using the slider on...
User Manual - Page 17
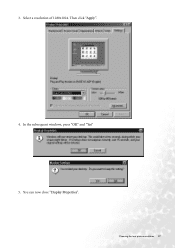
3. Select a resolution of 1280x1024. Then click "Apply".
4. In the subsequent windows, press "OK" and "Yes" 5. You can now close "Display Properties".
Choosing the best picture resolution 17
User Manual - Page 18
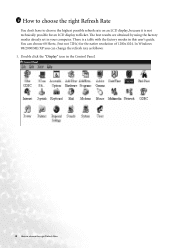
... factory modes already set in your computer. There is a table with the factory modes in this user's guide. You can choose 60 Hertz, (but not 72Hz) for the native resolution of 1280x1024. In Windows 98/2000/ME/XP you can change the refresh rate as follows: 1. Double click the "Display" icon in the Control Panel.
18 How...
User Manual - Page 19

2. From the "Display Properties" window, select the "Settings" tab. Click the "Advanced..." button in the bottom right corner.
How to choose the right Refresh Rate 19
User Manual - Page 20
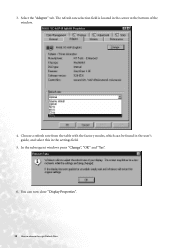
... in the center at the bottom of the window.
4. Choose a refresh rate from the table with the factory modes, which can be found in the user's guide, and select this in the settings field.
5. In the subsequent windows press "Change", "OK" and "Yes". 6. You can now close "Display Properties".
20 How to choose the right...
User Manual - Page 30
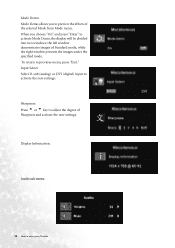
..., while the right window presents the images under the specified mode. To return to previous menu, press "Exit." Input Select: Select D-sub (analog) or DVI (digital) input to activate the new settings.
Sharpness:
Press t or u key to adjust the degree of
Sharpness and activate the new settings.
Display Information.
Audio sub menu
30 How to adjust your Monitor
User Manual - Page 34
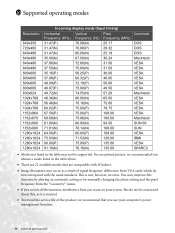
... available modes that are compatible with Windows.
• Image disruption may occur as a result of signal frequency differences from VGA cards which do not correspond with the usual standard. This is not, however, an error. You may improve this situation by altering an automatic setting or by manually changing the phase setting and the pixel frequency from...