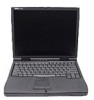
Dell Latitude CPt S driver and firmware
Related Dell Latitude CPt S Manual Pages
Download the free PDF manual for Dell Latitude CPt S and other Dell manuals at ManualOwl.com
Service Manual - Page 10
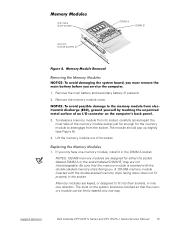
... to reduce the potential for personal injury or shock. Also disconnect any telephone or telecommunications lines from the computer.
5. Disconnect all other external cables from the computer.
6. Remove any installed PC Cards or plastic blanks from the PC Card slot.
7. Remove any installed devices in the modular device bay.
2
Dell Latitude CPt V/CPt S Series and CPx H/CPx J Series Service Manual
Service Manual - Page 16

...
Customer kit, memory
CUS, 32MB, DIMM, SDRAM
8
module, 32-MB
Customer kit, memory module, 64-MB
CUS, 64MB, DIMM, SDRAM
Customer kit, memory module, 128-MB
CUS, 128MB, DIMM, SDRAM
Customer kit, memory module, 192-MB
CUS, 192MB, DIMM, SDRAM
Customer kit, memory module, 256-MB
CUS, 256MB, DIMM, SDRAM
8
Dell Latitude CPt V/CPt S Series and CPx H/CPx J Series Service Manual
Service Manual - Page 17
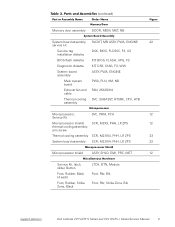
..., LP, ZPS
23
System board assembly SCR, M2.5X4, PHH, LP, ZPS
22
Microprocessor shield
ASSY, SHLD, EMI, PRC, MET
12
Service Kit, latch, slider, Button
Foot, Rubber, Black (4 each)
Foot, Rubber, Strike Zone, Black
LTCH, BTN, Module Foot, Rbr, Blk Foot, Rbr, Strike Zone, Blk
support.dell.com
Dell Latitude CPt V/CPt S Series and CPx H/CPx J Series Service Manual
9
Service Manual - Page 21
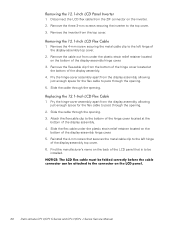
...-stacked memory chips facing down does not fit properly in the socket. Memory modules are keyed, or designed to fit into their sockets, in only one direction. The slots on the system board are notched so that the memory module can be firmly seated only one way.
support.dell.com
Dell Latitude CPt V/CPt S Series and CPx H/CPx J Series Service Manual 13
Service Manual - Page 25
... should be flush with the left and right surfaces of the palmrest.
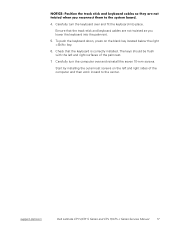
7. Carefully turn the computer over and reinstall the seven 10-mm screws.
Start by installing the outermost screws on the left and right sides of the computer and then work inward to the center.
support.dell.com
Dell Latitude CPt V/CPt S Series and CPx H/CPx J Series Service Manual
17
Service Manual - Page 31
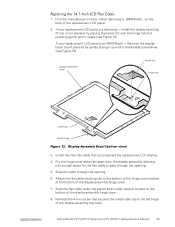
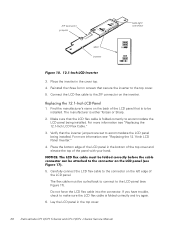
... Samsung - Install the display bezel clip ...display-assembly hinge cover.
7. Slide the flex cable under the plastic strain relief retainer located on the bottom of the display-assembly hinge cover.
8. Reinstall the 4-mm screw that secures the metal cable clip to the left hinge of the display-assembly top cover.
support.dell.com
Dell Latitude CPt V/CPt S Series and CPx H/CPx J Series Service Manual...
Service Manual - Page 34
... relief retainer located on the
bottom of the display-assembly hinge cover. 5. Reinstall the 4-mm screw that secures the metal cable clip to the left hinge
of the display-assembly top cover. 6. Find the manufacturer's name on the back of the LCD panel that is to be
installed.
26 Dell Latitude CPt V/CPt S Series and CPx H/CPx J Series Service Manual
Service Manual - Page 35
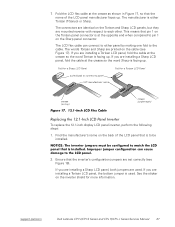
... be installed.
2. Ensure that the inverter's configuration jumpers are set correctly (see Figure 18).
If you are installing a Sharp LCD panel, both jumpers are used. If you are installing a Torisan LCD panel, the bottom jumper is used. See the sticker on the inverter shield for more information.
support.dell.com
Dell Latitude CPt V/CPt S Series and CPx H/CPx J Series Service Manual 27
Service Manual - Page 36
... curled back to connect to the LCD panel (see Figure 17). Do not force the LCD flex cable into the connector. If you have trouble, check to make sure the LCD flex cable is folded correctly and try again.
6. Lay the LCD panel in the top cover.
28 Dell Latitude CPt V/CPt S Series and CPx H/CPx J Series Service Manual
Service Manual - Page 43
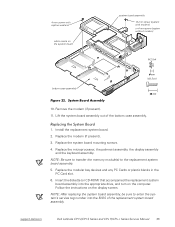
... accompanied the replacement system board assembly into the appropriate drive, and turn on the computer. Follow the instructions on the display screen.
NOTE: After replacing the system board assembly, be sure to enter the system's service tag number into the BIOS of the replacement system board assembly.
support.dell.com
Dell Latitude CPt V/CPt S Series and CPx H/CPx J Series Service Manual 35
Service Manual - Page 46

... from the bottom of the base, making certain its snap tabs are fully engaged in the module latch.
8. Ensure that the newly installed latch moves smoothly and freely when pushed and released.
9. Repeat steps 6 through 8 for the latch on the right side.
bumps (2)
wear ribs (2)
38 Dell Latitude CPt V/CPt S Series and CPx H/CPx J Series Service Manual
System Information Guide
(multilanguage: English, Japanese, Chinese-Traditional, Chinese-Simplified, Korean, Thai) - Page 5
...includes descriptions of computer features, instructions on installing and configuring drivers and utilities, information on the System Setup program, and instructions for attaching devices to the connectors on your computer's back panel. The User's Guide is located on your hard-disk drive.
You may also have one or more of the following documents:
• Documentation updates, which are sometimes...
System Information Guide
(multilanguage: English, Japanese, Chinese-Traditional, Chinese-Simplified, Korean, Thai) - Page 6
.... 3. Turn on the computer. 4. Press at the Dell BIOS splash screen to access the System Setup menu. 5. Select the following boot sequence:
• Boot First Device: Diskette Drive • Boot Second Device: CDROM / DVDROM Drive • Boot Third Device: Internal HDD 6. Insert the System Software CD into the CD-ROM drive. 7. Turn the computer off. 8. Turn the computer on. The system restarts...
System Information Guide
(multilanguage: English, Japanese, Chinese-Traditional, Chinese-Simplified, Korean, Thai) - Page 7
...complete the setup of your computer.
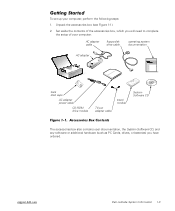
AC adapter cable
floppy-disk drive cable
operating system documentation
AC adapter
track stick caps
AC adapter power cable
CD-ROM drive module
TV-out adapter cable
travel module
System Software CD
The accessories box also contains user documentation, the System Software CD, and any software or additional hardware (such as PC Cards, drives, or batteries...
System Information Guide
(multilanguage: English, Japanese, Chinese-Traditional, Chinese-Simplified, Korean, Thai) - Page 8
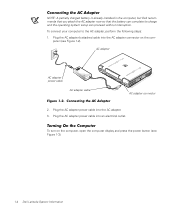
... the com-
puter (see Figure 1-2).
AC adapter
AC adapter power cable
AC adapter cable
AC adapter connector
2. Plug the AC adapter power cable into the AC adapter. 3. Plug the AC adapter power cable into an electrical outlet.
To turn on the computer, open the computer display and press the power button (see Figure 1-3).
DELL CONFIDENTIAL - Preliminary 1/25/00
1-4 Dell Latitude System Information
System Information Guide
(multilanguage: English, Japanese, Chinese-Traditional, Chinese-Simplified, Korean, Thai) - Page 10
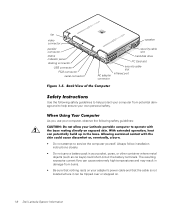
... cable slot
hard-disk drive
PC Card slot
AC adapter connector
security cable slot
infrared port
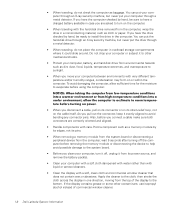
Use the following safety guidelines to help protect your computer from potential damage and to help ensure your own personal safety.
As you use your computer, observe the following safety guidelines:
• Do not attempt to service the computer yourself. Always follow installation instructions...
System Information Guide
(multilanguage: English, Japanese, Chinese-Traditional, Chinese-Simplified, Korean, Thai) - Page 12
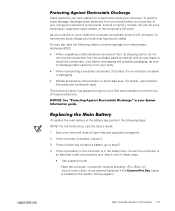
... the memory module or disconnecting the device to help avoid possible damage to the system board.
• Before you clean your computer, turn it off, unplug it from its power source, and remove the battery pack(s).
• Clean your computer with a soft cloth dampened with water rather than with liquid or aerosol cleaners.
• Clean the display...
System Information Guide
(multilanguage: English, Japanese, Chinese-Traditional, Chinese-Simplified, Korean, Thai) - Page 13
... computer is not operating properly, contact Dell Computer Corporation. (See "Getting Help" in the User's Guide for the appropriate telephone number.)
support.dell.com
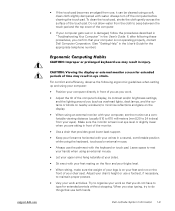
For comfort and efficiency, observe the following ergonomic guidelines when setting up and using your computer:
• Position your computer directly in front of you as you work.
• Adjust the tilt of the computer's display...
System Information Guide
(multilanguage: English, Japanese, Chinese-Traditional, Chinese-Simplified, Korean, Thai) - Page 14
.../3/98) FILE LOCATION: \\Pd-xuzhan\d\FrameMaker\Dell\sndmm003\en\999CCA00en.fm
computer positioned directly in front of user
wrists relaxed and flat
arms at desk level
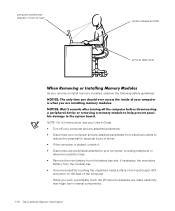
As you remove or install memory modules, observe the following safety guidelines:
NOTE: For full instructions, see your User's Guide. • Turn off your computer and any attached peripherals. • Disconnect...
System Information Guide
(multilanguage: English, Japanese, Chinese-Traditional, Chinese-Simplified, Korean, Thai) - Page 15
..., connect the computer to an electrical outlet and preserve your data in one of these ways:
• Use suspend mode Place the computer in suspend mode by pressing (or on an external keyboard if the External Hot Key option is enabled in the System Setup program).
support.dell.com
DELL CONFIDENTIAL - Preliminary 1/25/00
Dell Latitude System Information...