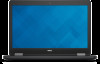
Dell Latitude E5550 driver and firmware
Related Dell Latitude E5550 Manual Pages
Download the free PDF manual for Dell Latitude E5550 and other Dell manuals at ManualOwl.com
Dell LatitudeE5550 / 5550 Owners Manual - Page 3
...the online or telephone service and support team. Damage due to servicing that is not authorized by Dell is not covered by your warranty. Read and follow the safety instructions that came with ... computer. CAUTION: Handle components and cards with care. Do not touch the components or contacts on a card. Hold a card by its edges or by its metal mounting bracket. Hold a component such as a processor ...
Dell LatitudeE5550 / 5550 Owners Manual - Page 4
... cable from your computer and then unplug the cable from the network device.
4. Disconnect all network cables from the computer. 5. Disconnect your computer and all attached devices from their electrical outlets. 6. Close the display and turn the computer upside-down on a flat work surface.
NOTE: To avoid damaging the system board, you must remove the main battery before you service the computer...
Dell LatitudeE5550 / 5550 Owners Manual - Page 5
... the battery designed for this particular Dell computer. Do not use batteries designed for other Dell computers.
1. Connect any external devices, such as a port replicator or media base, and replace any cards, such as an ExpressCard.
2. Connect any telephone or network cables to your computer.
CAUTION: To connect a network cable, first plug the cable into the network device and then plug it into...
Dell LatitudeE5550 / 5550 Owners Manual - Page 6
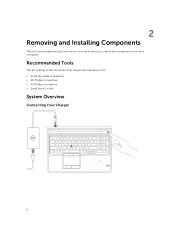
2
Removing and Installing Components
This section provides detailed information on how to remove or install the components from your computer.
Recommended Tools
The procedures in this document may require the following tools: • Small flat-blade screwdriver • #0 Phillips screwdriver • #1 Phillips screwdriver • Small plastic scribe
System Overview
Connecting Your Charger
6
Dell LatitudeE5550 / 5550 Owners Manual - Page 8
15. wireless-status light 17. hard-drive activity light 19. speakers 21. smart-card reader (optional) 23. security-cable slot 25. Service-Tag label
16. battery-status light 18. power-status light 20. touchpad 22. headset connector 24. dock connector (optional)
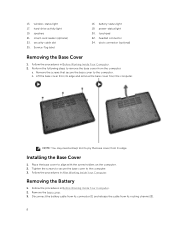
Removing the Base Cover
1. Follow the procedures in Before Working Inside Your Computer. 2. Perform the following steps to...
Dell LatitudeE5550 / 5550 Owners Manual - Page 9
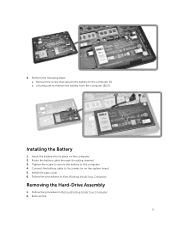
... battery into its place on the computer. 2. Route the battery cable through its routing channel. 3. Tighten the screw to secure the battery to the computer. 4. Connect the battery cable to its connector on the system board. 5. Install the base cover. 6. Follow the procedures in After Working Inside Your Computer.
Removing the Hard-Drive Assembly
1. Follow the procedure in...
Dell LatitudeE5550 / 5550 Owners Manual - Page 11
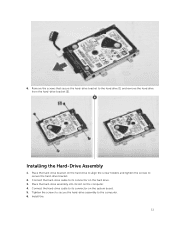
... screw holders and tighten the screws to secure the hard-drive bracket.
2. Connect the hard-drive cable to its connector on the hard drive. 3. Place the hard-drive assembly into its slot on the computer. 4. Connect the hard-drive cable to its connector on the system board. 5. Tighten the screws to secure the hard-drive assembly to the computer. 6. Install the:
11
Dell LatitudeE5550 / 5550 Owners Manual - Page 12
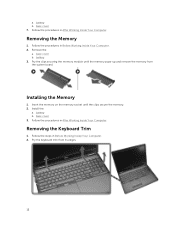
...1. Follow the procedures in Before Working Inside Your Computer. 2. Remove the:
a. base cover b. battery 3. Pry the clips securing the memory module until the memory pops-up and remove the memory from the system board.
Installing the Memory
1. Insert the memory on the memory socket until the clips secure the memory. 2. Install the:
a. battery b. base cover 3. Follow the procedures in After Working...
Dell LatitudeE5550 / 5550 Owners Manual - Page 13
... snaps in its place. 2. Follow the procedures in After Working Inside Your Computer.
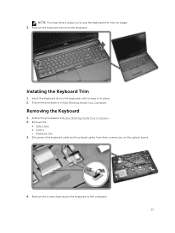
Removing the Keyboard
1. Follow the procedures in Before Working Inside Your Computer. 2. Remove the:
a. base cover b. battery c. keyboard trim 3. Disconnect the keyboard cable and touchpad cables from their connectors on the system board.
4. Remove the screws that secure the keyboard to the...
Dell LatitudeE5550 / 5550 Owners Manual - Page 14
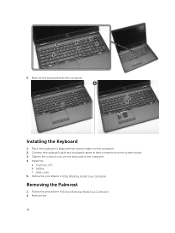
... to align with the screw holders on the computer. 2. Connect the keyboard cable and touchpad cables to their connectors on the system board. 3. Tighten the screws to secure the keyboard to the computer. 4. Install the:
a. keyboard trim b. battery c. base cover 5. Follow the procedures in After Working Inside Your Computer.
Removing the Palmrest
1. Follow the procedures in Before...
Dell LatitudeE5550 / 5550 Owners Manual - Page 16
...to release and remove the palmrest from the computer [2].
Installing the Palmrest
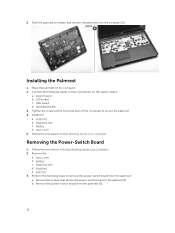
1. Place the palmrest on the computer. 2. Connect the following cables to their connectors on the system board:
a. power board b. LED board c. USH board d. touchpad board 3. Tighten the screws at the front and back of the computer to secure the palmrest. 4. Install the: a. keyboard b. keyboard trim c. battery d. base...
Dell LatitudeE5550 / 5550 Owners Manual - Page 17
... the screws to secure the power-switch board to the palmrest. 3. Install the:
a. palmrest b. keyboard c. keyboard trim d. battery e. base cover 4. Follow the procedures in After Working Inside Your Computer.
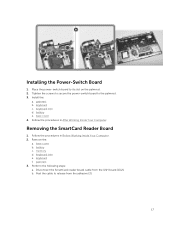
Removing the SmartCard Reader Board
1. Follow the procedures in Before Working Inside Your Computer. 2. Remove the:
a. base cover b. battery c. memory d. keyboard trim e. keyboard f. palmrest...
Dell LatitudeE5550 / 5550 Owners Manual - Page 19
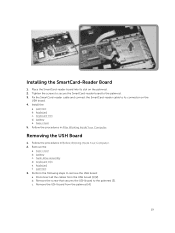
... the SmartCard-reader cable and connect the SmartCard-reader cable to its connector on the
USH board. 4. Install the:
a. palmrest b. keyboard c. keyboard trim d. battery e. base cover 5. Follow the procedures in After Working Inside Your Computer.
Removing the USH Board
1. Follow the procedures in Before Working Inside Your Computer. 2. Remove the:
a. base cover b. battery c. hard-drive assembly...
Dell LatitudeE5550 / 5550 Owners Manual - Page 20
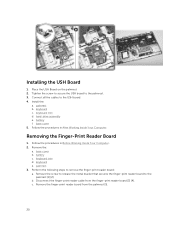
... the screw to secure the USH board to the palmrest. 3. Connect all the cables to the USH board. 4. Install the:
a. palmrest b. keyboard c. keyboard trim d. hard-drive assembly e. battery f. base cover 5. Follow the procedures in After Working Inside Your Computer.
Removing the Finger-Print Reader Board
1. Follow the procedures in Before Working Inside Your Computer. 2. Remove the:
a. base cover...
Dell LatitudeE5550 / 5550 Owners Manual - Page 21
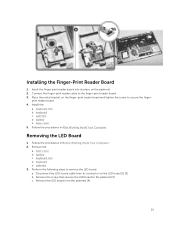
.... 2. Connect the finger-print reader cable to the finger-print reader board. 3. Place the metal bracket on the finger-print reader board and tighten the screw to secure the finger-
print reader board. 4. Install the:
a. keyboard trim b. keyboard c. palmrest d. battery e. base cover 5. Follow the procedures in After Working Inside Your Computer.
Removing the LED Board
1. Follow the procedures in...
Dell LatitudeE5550 / 5550 Owners Manual - Page 22
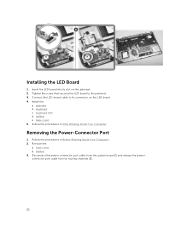
... the LED-board cable to its connector on the LED board. 4. Install the:
a. palmrest b. keyboard c. keyboard trim d. battery e. base cover 5. Follow the procedures in After Working Inside Your Computer.
Removing the Power-Connector Port
1. Follow the procedures in Before Working Inside Your Computer. 2. Remove the:
a. base cover b. battery 3. Disconnect the power-connector port cable from the...
Dell LatitudeE5550 / 5550 Owners Manual - Page 23
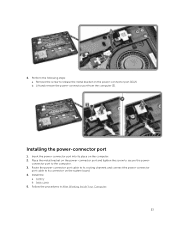
... from the computer [3].
Installing the power-connector port
1. Insert the power-connector port into its place on the computer. 2. Place the metal bracket on the power-connector port and tighten the screw to secure the power-
connector port to the computer. 3. Route the power-connector port cable to its routing channels and connect the power-connector
port cable to its connector on the system board...
Dell LatitudeE5550 / 5550 Owners Manual - Page 24
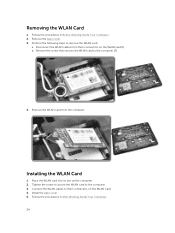
... connectors on the WLAN card [1]. b. Remove the screw that secures the WLAN card to the computer [2].
4. Remove the WLAN card from the computer.
Installing the WLAN Card
1. Place the WLAN card into its slot on the computer. 2. Tighten the screw to secure the WLAN card to the computer. 3. Connect the WLAN cables to their connectors on the WLAN Card. 4. Install the base cover. 5. Follow...
Dell LatitudeE5550 / 5550 Owners Manual - Page 60
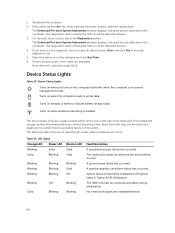
...
A possible processor failure has occurred.
The memory modules are detected but encountered an error.
A system board failure has occurred.
A possible graphics card/video failure has occurred.
System failed on hard drive initialization OR System failed in Option ROM initialization.
The USB controller encountered a problem during initialization.
No memory modules are installed/detected.
60
Dell /5550 Statement of Volatility - Page 2
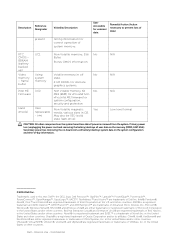
... also be SSD (solid
state flash drive).
N/A Low level format
CAUTION: All other components on the system board lose data if power is removed from the system. Primary power loss (unplugging the power cord and removing the battery) destroys all user data on the memory (DDR3, 1067 MHz). Secondary power loss (removing the on-board coin-cell battery) destroys...