Dell Inspiron X200 driver and firmware
Related Dell Inspiron X200 Manual Pages
Download the free PDF manual for Dell Inspiron X200 and other Dell manuals at ManualOwl.com
Service Manual - Page 2
... "Preparing to Work Inside the Computer" before performing the following procedure. 1. Remove the battery. 2. Remove the keyboard. 3. Remove the palm rest. 4. Remove the hinge covers. 5. Remove the display assembly. 6. Remove the keyboard tray. 7. Remove the hard drive. 8. Remove the memory module. 9. Remove the Mini PCI card, if present. 10. Remove the system board. 11. On the inside...
Service Manual - Page 4
... and then disconnect any attached devices. 7. Disconnect all other external cables from the computer. 8. Remove any installed PC Cards or plastic blanks from the PC Card slot. 9. Close the display and turn the computer upside down on a flat work surface. NOTICE: To avoid damaging the system board, you must remove the battery before you service the computer.
10. Remove the battery...
Service Manual - Page 7
Back to Contents Page
Flashing the BIOS
Dell™ X200 Service Manual
To update the basic input/output system (BIOS): 1. Go to support.dell.com. If this is your first time to use the website, complete the one-time registration. 2. Enter the service tag sequence for your computer or select the appropriate Dell™ computer. Click Go. 3. Click Downloads. 4. Select the appropriate operating ...
Service Manual - Page 18
Back to Contents Page
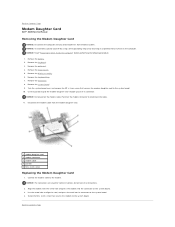
Modem Daughter Card
Dell™ X200 Service Manual
Removing the Modem Daughter Card
NOTICE: Disconnect the computer and any attached devices from electrical outlets. NOTICE: To avoid ESD, ground yourself by using a wrist grounding strap or by touching an unpainted metal surface on the computer. NOTICE: Read "Preparing to Work Inside the Computer" before performing the ...
Service Manual - Page 27
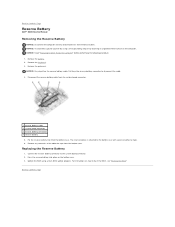
... adhesive tape. 6. Remove any remnants of the adhesive tape from the bottom case.
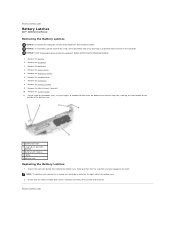
Replacing the Reserve Battery
1. Connect the reserve battery connector to the system board connector. 2. Press the reserve battery into place on the bottom case. 3. Update the BIOS using a flash BIOS update program. For instructions on how to flash the BIOS, see "Flashing the BIOS."
Back to Contents Page
Service Manual - Page 29
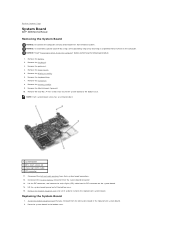
.... 5. Remove the display assembly. 6. Remove the keyboard tray. 7. Remove the hard drive. 8. Remove the memory module. 9. Remove the Mini PCI card, if present. 10. Remove the four M2 x 4-mm screws that secure the system board to the bottom case. NOTE: Each system board screw has an arrow beside it.
1 system board 2 M2 x 4-mm screws (4) 3 status light (LED) cable 4 ZIF...
Service Manual - Page 32
Back to Contents Page
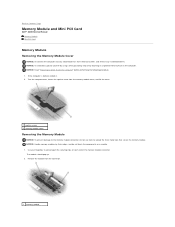
Memory Module and Mini PCI Card
Dell™ X200 Service Manual Memory Module Mini PCI Card
Memory Module Removing the Memory Module Cover
NOTICE: Disconnect the computer and any attached devices from electrical outlets, and remove any installed batteries. NOTICE: To avoid ESD, ground yourself by using a wrist grounding strap or by touching an unpainted metal surface on the ...
Service Manual - Page 33
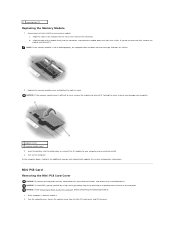
...bay, or connect the AC adapter to your computer and an electrical outlet. 4. Turn on the computer. As the computer boots, it detects the additional memory and automatically updates the system configuration information.
Mini PCI Card Removing the Mini PCI Card Cover
NOTICE: Disconnect the computer and any attached devices from electrical outlets, and remove any installed batteries. NOTICE: To avoid...