Dell PowerEdge 2450 driver and firmware

Related Dell PowerEdge 2450 Manual Pages
Download the free PDF manual for Dell PowerEdge 2450 and other Dell manuals at ManualOwl.com
SCSI Backplane
Daughter Card (.pdf) - Page 1
™
Dell™ PowerEdge™ 2450 Systems
INSTALLING A FIFTH SCSI HARD-DISK DRIVE
www.dell.com
SCSI Backplane
Daughter Card (.pdf) - Page 3
...
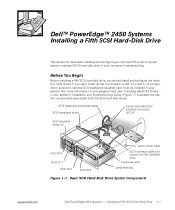
SCSI backplane board data cable
SCSI backplane board
Ultra3 (Ultra160) SCSI interface connector (SCSI1)
SCSI hard-disk drives (4)
SCSI ID 0 SCSI ID 1
SCSI ID 2
SCSI ID 3
spare power cable
SCSI interface cable connection for fifth hard-disk drive interposer card
peripheral bay
Figure 1-1. Basic SCSI Hard-Disk Drive System Components
support.dell.com
Dell PowerEdge 2450 Systems - Installing...
SCSI Backplane
Daughter Card (.pdf) - Page 4

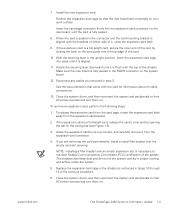
... bay, disconnect the interface and power cables from the drive. 5. Disconnect all cables connected to the interposer board on top of the peripherals bay (see Figure 1-1). These cables include the system board interface cable, cooling fan wiring harness, interposer board power cable, and control panel cable (see Figure 1-2).
1-2 Dell PowerEdge 2450 Systems - Installing a Fifth SCSI Hard-Disk Drive
SCSI Backplane
Daughter Card (.pdf) - Page 5
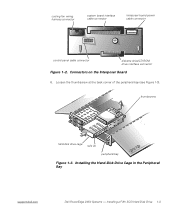
...control panel cable connector
diskette drive/CD-ROM drive interface connector
Figure 1-2. Connectors on the Interposer Board
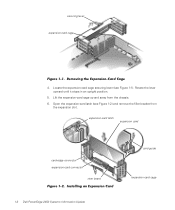
6. Loosen the thumbscrew at the back corner of the peripheral bay (see Figure 1-3).
thumbscrew
hard-disk drive cage rails (2) peripheral bay
Figure 1-3. Installing the Hard-Disk Drive Cage in the Peripheral Bay
support.dell.com
Dell PowerEdge 2450 Systems - Installing...
SCSI Backplane
Daughter Card (.pdf) - Page 6
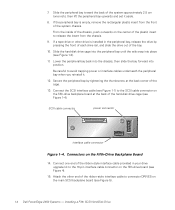
...-Drive Backplane Board 14. Connect one end of the ribbon-style interface cable provided in your drive
upgrade kit to the 10-pin interface cable connector on the fifth-drive board (see Figure 4). 15. Attach the other end of the ribbon-style interface cable to connector DRIVE5 on the main SCSI backplane board (see Figure 5).
1-4 Dell PowerEdge 2450 Systems - Installing a Fifth SCSI Hard-Disk Drive
SCSI Backplane
Daughter Card (.pdf) - Page 7
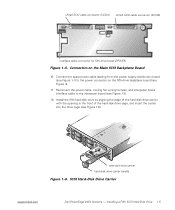
... cable to the interposer board (see Figure 1-2). 18. Install the fifth hard-disk drive by aligning the edge of the hard-disk drive carrier with the opening in the front of the hard-disk drive cage, and insert the carrier into the drive cage (see Figure 1-6).
hard-disk drive carrier hard-disk drive carrier handle
Figure 1-6. SCSI Hard-Disk Drive Carrier
support.dell.com
Dell PowerEdge 2450...
SCSI Backplane
Daughter Card (.pdf) - Page 8
...fans or cooling vents. 22. Close the system covers. 23. Reconnect the computer and peripherals to their AC power sources, and turn them on. 24. If the hard-disk drive is a new drive, run the Dell Diagnostics to test the drive. For information, see "Running the Dell Diagnostics" in your Installation and Troubleshooting Guide.
1-6 Dell PowerEdge 2450 Systems - Installing a Fifth SCSI Hard-Disk Drive
Activating the
Dell PERC 3/Si (.pdf) - Page 3
This document updates information on the following topics for your Dell PowerEdge 2450 system:
Installing and removing expansion cards Small computer system interface (SCSI) hard-disk drive support Installing an upgrade microprocessor in PowerEdge 2450 systems
To install an expansion card, perform the following steps.
1. Turn off the system, including any attached peripherals, and disconnect the ...
Activating the
Dell PERC 3/Si (.pdf) - Page 4
... lever upward until it stops in an upright position.
5. Lift the expansion-card cage up and away from the chassis.
6. Open the expansion-card latch (see Figure 1-2) and remove the filler bracket from the expansion slot.
expansion-card latch
expansion card
card-edge connector expansion-card connector
riser board
1-2 Dell PowerEdge 2450 Systems Information Update
card guide expansion-card cage
Activating the
Dell PERC 3/Si (.pdf) - Page 5
... system and aid in proper cooling and airflow inside the system.
5. Replace the expansion-card cage in the chassis as instructed in steps 10 through 12 of the previous procedure.
6. Close the system doors, and then reconnect the system and peripherals to their AC power sources and turn them on.
support.dell.com
Dell PowerEdge 2450 Systems Information Update 1-3
Activating the
Dell PERC 3/Si (.pdf) - Page 6
... set the SCSI/RAID Controller to RAID Enabled, Channel A displays RAID and Channel B displays SCSI. When you set it to SCSI Enabled, Channel A and Channel B display SCSI. When you set it to Off, Channel A and Channel B display Off. When installing the SCSI backplane daughter card as addressed in "Installing HardDisk Drives," of the Dell PowerEdge 2450 Systems Installation and Troubleshooting Guide...
Activating the
Dell PERC 3/Si (.pdf) - Page 7
... settings. Update the embedded server management (ESM) firmware. Update the basic input/output system (BIOS), if necessary. Use the resource configuration utility (RCU) diskette to save the RCU configuration settings (see your User's Guide for complete information). During the upgrade procedure, you must use a wrist-grounding strap for ESD protection.
support.dell.com
Dell PowerEdge 2450...
Activating the
Dell PERC 3/Si (.pdf) - Page 8

... make a record of the settings.
If an ESM firmware diskette is included with the upgrade kit, update your ESM firmware with the version contained on that diskette by performing the following steps. The latest version of the ESM firmware is available at http://support.dell.com.
1. Insert the ESM firmware diskette into the diskette drive.
2. Reboot the system.
3. Follow the instructions on the...
Activating the
Dell PERC 3/Si (.pdf) - Page 9
... operating at 450 MHz and faster. The latest version of the RCU is available at http://support.dell.com.
1. Turn off the system, including any attached peripherals, and disconnect the power cable from the electrical outlet.
2. Open the system cover. See your system's Installation and Troubleshooting Guide for specific instructions, if needed.
3. Remove the air blower, if present...
Activating the
Dell PERC 3/Si (.pdf) - Page 10
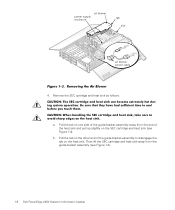
... enclosure
tab slot
air blower power cable
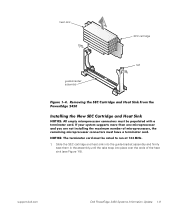
4. Remove the SEC cartridge and heat sink as follows.
a. Pull the tab on one side of the guide-bracket assembly away from the ...other end of the guide-bracket assembly to disengage the tab on the heat sink. Then lift the SEC cartridge and heat sink away from the guide-bracket assembly (see Figure 1-4).
1-8 Dell PowerEdge 2450 Systems Information Update
Activating the
Dell PERC 3/Si (.pdf) - Page 11
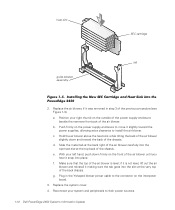
heat sink
guide-bracket assembly
SEC cartridge tab
1. Slide the SEC cartridge and heat sink into the guide-bracket assembly and firmly seat them in the assembly until the tabs snap into place over the ends of the heat sink (see Figure 1-5).
support.dell.com
Dell PowerEdge 2450 Systems Information Update 1-9
Activating the
Dell PERC 3/Si (.pdf) - Page 12
...the air blower.
b. Push firmly on the power supply enclosure to move it slightly toward the power supplies, allowing extra clearance to install the air blower.
c. Hold the air ... the Y-shaped blower power cable to the connector on the interposer board.
3. Replace the system cover.
4. Reconnect your system and peripherals to their power sources.
1-10 Dell PowerEdge 2450 Systems Information Update
Microprocessor
Upgrade Installation Guide (.pdf) - Page 3
Console Redirection
support.dell.com
Console redirection allows you to maintain a server from a remote location by redirecting keyboard input and text output through the serial port. Graphic output is not redirected. Console redirection can be used under the disk operating system (DOS) for tasks such as setting up a common basic input/output system (BIOS) configuration or setting up a redundant ...
Microprocessor
Upgrade Installation Guide (.pdf) - Page 4
... type. ANSI can display the full set of ASCII characters.
Configuring Console Redirection on the Client System
NOTE: The examples in this document assume that you have upgraded to Hilgraeve's HyperTerminal Private Edition 6.1 or later. If you are using other terminal emulation software, see the help file for that software.
Configuring the Ports
1. Click Start, point...
Microprocessor
Upgrade Installation Guide (.pdf) - Page 5
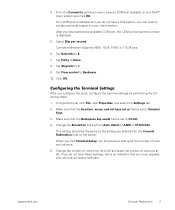
... have a Dell system, you will need to contact technical support for your client system.
After you have selected an available COM port, the COM port properties window is displayed.
5. Select Bits per second.
Console redirection supports 9600, 19.2K, 57.6K, or 115.2K bps.
6. Set Data bits to 8.
7. Set Parity to None.
8. Set Stop bits to 1.
9. Set Flow control to Hardware...