Dell Precision M4800 driver and firmware
Related Dell Precision M4800 Manual Pages
Download the free PDF manual for Dell Precision M4800 and other Dell manuals at ManualOwl.com
Setup Guide - Page 6
....
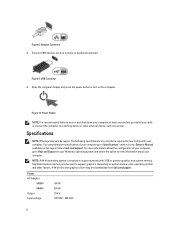
NOTE: A 64-bit operating system is required to support systems with 2 GB or greater graphics and system memory. Significant system memory may be used to support graphics, depending on system memory size, operating system, and other factors. A 64-bit discrete graphics driver may be downloaded from dell.com/support.
Power AC Adapter
M4800 M6800 Output Input voltage
180 W 240 W 19.5 V 100 VAC...
Setup Guide - Page 8
... on your product is available at www.dell.com/support/manuals © 2013 Dell Inc. Trademarks used in this text: Dell™, the DELL logo, Dell Precision™, Precision ON™,ExpressCharge™, Latitude™,...™ are trademarks of Advanced Micro Devices, Inc. Microsoft®, Windows®, MS-DOS®, Windows Vista®, the Windows Vista start button, and Office Outlook®...
Owners Manual - Page 2
... the Blu-ray Disc Association (BDA) and licensed for use on discs and players. The Bluetooth® word mark is a registered trademark and owned by the Bluetooth® SIG, Inc. and any use of such mark by Dell Inc. is under license. Wi-Fi® is a registered trademark of Wireless Ethernet Compatibility Alliance, Inc.
Owners Manual - Page 3

... Removing the Optical Drive...22 Installing the Optical Drive...23 Removing the Hard Drive...24 Installing the Hard Drive...25 Removing the Wireless Local Area Network (WLAN) Card 25 Installing the Wireless Local Area Network (WLAN) Card 25 Removing Wireless Wide Area Network (WWAN) Card (Optional 25 Installing the Wireless Wide Area Network (WWAN) Card (Optional 26 Removing the Processor Fan...
Owners Manual - Page 4
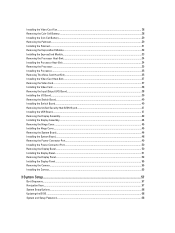
...Installing the System Board...48 Removing the Power-Connector Port...49 Installing the Power-Connector Port...50 Removing the Display Bezel...50 Installing the Display Bezel...51 Removing the Display Panel...52 Installing the Display Panel...55 Removing the Camera...55 Installing the Camera...55
3 System Setup...57
Boot Sequence...57 Navigation Keys...57 System Setup Options...58 Updating the BIOS...
Owners Manual - Page 7
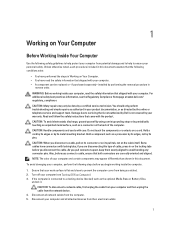
... Turn off your computer (see Turning Off Your Computer). 3. If the computer is connected to a docking device (docked) such as the optional Media Base or Battery Slice,
undock it.
CAUTION: To disconnect a network cable, first unplug the cable from your computer and then unplug the cable from the network device. 4. Disconnect all network cables from the computer. 5. Disconnect your computer and all...
Owners Manual - Page 8
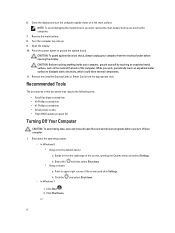
...; Flash BIOS update program CD
Turning Off Your Computer
CAUTION: To avoid losing data, save and close all open files and exit all open programs before you turn off your computer.
1. Shut down the operating system:
- In Windows 8:
* Using a touch-enabled device: a. Swipe in from the right edge of the screen, opening the Charms menu and select Settings...
Owners Manual - Page 11
2
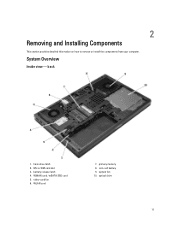
Removing and Installing Components
This section provides detailed information on how to remove or install the components from your computer.
System Overview
Inside view - back
1. hard-drive latch 2. Micro SIM card slot 3. battery release latch 4. WWAN card / mSATA SSD card 5. video-card fan 6. WLAN card
7. primary memory 8. coin-cell battery 9. system fan 10. optical drive
11
Owners Manual - Page 12
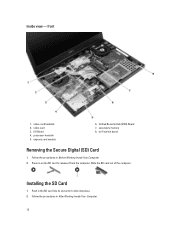
... heatsink 2. video card 3. I/O Board 4. processor heatsink 5. express card module
6. Unified Security Hub (USH) Board 7. secondary memory 8. wi-fi switch board
Removing the Secure Digital (SD) Card
1. Follow the procedures in Before Working Inside Your Computer. 2. Press in on the SD card to release it from the computer. Slide the SD card out of the computer.
Installing the SD Card
1. Push in...
Owners Manual - Page 13
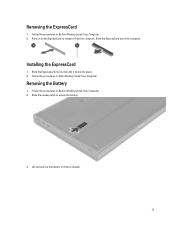
... ExpressCard to release it from the computer. Slide the ExpressCard out of the computer.
Installing the ExpressCard
1. Slide the ExpressCard into its slot until it clicks into place. 2. Follow the procedures in After Working Inside Your Computer.
Removing the Battery
1. Follow the procedures in Before Working Inside Your Computer. 2. Slide the release latch to unlock...
Owners Manual - Page 14
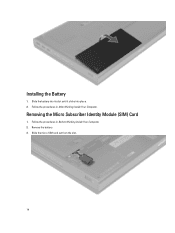
Installing the Battery
1. Slide the battery into its slot until it clicks into place. 2. Follow the procedures in After Working Inside Your Computer.
Removing the Micro Subscriber Identity Module (SIM) Card
1. Follow the procedures in Before Working Inside Your Computer. 2. Remove the battery. 3. Slide the micro SIM card out from the slot .
14
Owners Manual - Page 15
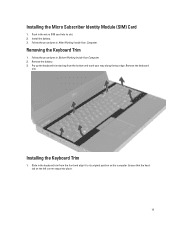
... Subscriber Identity Module (SIM) Card
1. Push in the micro SIM card into its slot. 2. Install the battery. 3. Follow the procedures in After Working Inside Your Computer.
Removing the Keyboard Trim
1. Follow the procedures in Before Working Inside Your Computer. 2. Remove the battery. 3. Pry up the keyboard trim starting from the bottom and work your way...
Owners Manual - Page 16
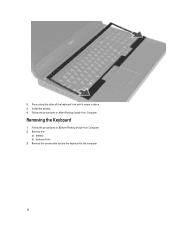
2. Press along the sides of the keyboard trim until it snaps in place. 3. Install the battery. 4. Follow the procedures in After Working Inside Your Computer.
Removing the Keyboard
1. Follow the procedures in Before Working Inside Your Computer. 2. Remove the:
a) battery b) keyboard trim 3. Remove the screws that secure the keyboard to the computer.
16
Owners Manual - Page 18
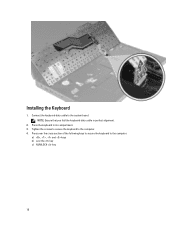
Installing the Keyboard
1. Connect the keyboard-data cable to the system board. NOTE: Ensure that you fold the keyboard-data cable in perfect alignment.
2. Press the keyboard in its compartment. 3. Tighten the screws to secure the keyboard to the computer. 4. Press over the cross section of the following keys to secure the keyboard to the computer:
a) , , and...
Owners Manual - Page 19
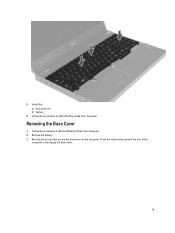
5. Install the: a) keyboard trim b) battery
6. Follow the procedures in After Working Inside Your Computer.
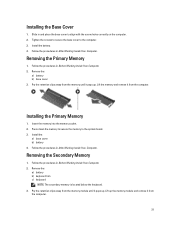
Removing the Base Cover
1. Follow the procedures in Before Working Inside Your Computer. 2. Remove the battery. 3. Remove the screws that secure the base cover to the computer. Press the rubber tabs towards the rear of the
computer to disengage the base cover.
19
Owners Manual - Page 21
... the:
a) battery b) base cover 3. Pry the retention clips away from the memory until it pops up. Lift the memory and remove it from the computer.
Installing the Primary Memory
1. Insert the memory into the memory socket. 2. Press down the memory to secure the memory to the system board. 3. Install the:
a) base cover b) battery 4. Follow the procedures in After Working Inside Your...
Owners Manual - Page 22
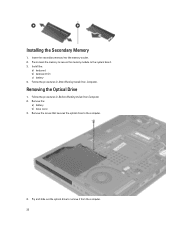
...the memory module to the system board. 3. Install the:
a) keyboard b) keyboard trim c) battery 4. Follow the procedures in After Working Inside Your Computer.
Removing the Optical Drive
1. Follow the procedures in Before Working Inside Your Computer. 2. Remove the:
a) battery b) base cover 3. Remove the screw that secures the optical drive to the computer.
4. Pry and slide out the optical drive to...
Owners Manual - Page 23
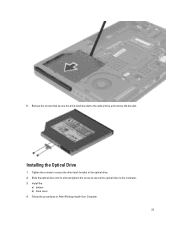
5. Remove the screws that secure the drive-latch bracket to the optical drive and remove the bracket.
Installing the Optical Drive
1. Tighten the screws to secure the drive-latch bracket to the optical drive. 2. Slide the optical drive into its slot and tighten the screw to secure the optical drive to the computer. 3. Install the:
a) battery b) base cover 4. Follow the procedures in After Working ...
Owners Manual - Page 24
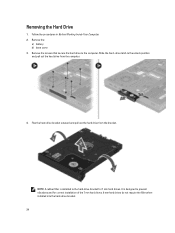
... drive from the computer.
4. Flex the hard-drive bracket outward and pull out the hard drive from the bracket.
NOTE: A rubber filler is installed to the hard-drive bracket for 7 mm hard drives. It is designed to prevent vibrations and for correct installation of the 7 mm hard drives. 9 mm hard drives do not require the filler when installed into the hard-drive...
Owners Manual - Page 68
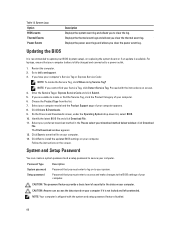
.... Displays the power event logs and allows you clear the power event log.
Updating the BIOS
It is recommended to update your BIOS (system setup), on replacing the system board or if an update is available. For laptops, ensure that your computer battery is fully charged and connected to a power outlet.
1. Restart the computer. 2. Go to dell.com/support. 3. If you have your computer's Service Tag...