Gigabyte GA-5YASV-RH driver and firmware
Drivers and firmware downloads for this Gigabyte item


Related Gigabyte GA-5YASV-RH Manual Pages
Download the free PDF manual for Gigabyte GA-5YASV-RH and other Gigabyte manuals at ManualOwl.com
Manual - Page 2

...2-2: Install Memory Modules 12 2-3: Connect ribbon cables, cabinet wires, and power supply 14
2-3-1 : I/O Back Panel Introduction 14
2-4: Connectors Introduction 16 2-5: Jumper Setting 24 2-6: Block Diagram 33 Chapter 3 BIOS Setup 34 Main ...36
Advanced Processor Options 39
Advanced 41
Memory Configuration ...42 PCI Configuration ...43 I/O Device Configuration 45 Advanced Chipset Control...
Manual - Page 4
English
GA-5YASV-RH Motherboard
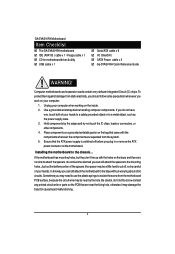
Item Checklist
The GA-5YASV-RH motherboard IDE (ATA133 ) cable x 1 / Floppy cable x 1 CD for motherboard driver & utility USB cable x 1
Serial ATA cable x 6 I/O Shield Kit SATA Power cable x 3 Ga-5YASV-RH Quick Reference Guide
WARNING!
Computer motherboards and expansion cards contain very delicate Integrated Circuit (IC) chips. To protect them against damage ...
Manual - Page 5

...; ICH9R with Software RAID 0,1,10, 5 (Windows Only) Optional LSI SW RAID 0/1/10 Supports 6 SATA 3.0 Gb/s connectors XGI Volari Z9s 32MB DDR2 1 ATA 133 connector 1 Floppyport supports 360K, 720K,1.2M, 1.44M and 2.88M bytes. 2 PS/2 connectors 1 Parallel port supports Normal/EPP/ECP mode 2 Serial port (COM, 1 by cable) 6 x USB 2.0 (4 by cable) 1 VGA connector 2 x LAN RJ45 6 x SATA 3.0Gb/s connectors...
Manual - Page 6

...
GA-5YASV-RH Motherboard Hardware Monitor
On-Board LAN
BIOS Special Features Additional Features
Enhanced features with CPU Vcore, 1.2V reference, VCC3 (3.3V) , VBAT3V, +5VSB, CPU Temperature, and System Temperature Values viewing CPU/Power/System Fan Revolution Detect CPU shutdown when overheat System Voltage Detect Intel® 82566DM & 82573LGbE controllers Supports dual Gigabit LAN ports...
Manual - Page 10
English
GA-5YASV-RH Motherboard
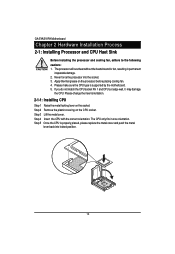
Chapter 2 Hardware Installation Process
2-1: Installing Processor and CPU Haet Sink
Before installing the processor and cooling fan, adhere to the following cautions: 1. The processor will overheat without the heatsink and/or fan, resulting in permanent
irreparable damage. 2. Never force the processor into the socket. 3. Apply thermal grease on the processor before...
Manual - Page 11

2-1-2: Installing Cooling Fan
Hardware Installation Process
Step 1 Attach the heat sink clip to the processor socket. Step 2 Place the cooling fan on the heat sink. Step 3 Secure the cooing fan with screws. Step 4 Connect processor fan can cable to the processor fanconnector
11
Manual - Page 12
...
GA-5YASV-RH Motherboard
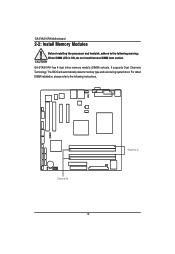
2-2: Install Memory Modules
Before installing the processor and heatsink, adhere to the following warning: When DIMM LED is ON, do not install/remove DIMM from socket.
GA-5YASV-RH has 4 dual inline memory module (DIMM) sokcets. It supports Dual Channels Technology. The BIOS will automatically detects memory type and size during system boot. For detail DIMM installation...
Manual - Page 13
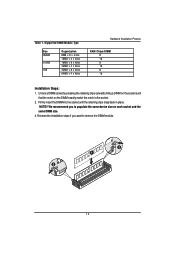
Table 1. Supported DIMM Module Type
Size 256MB
512MB
1GB
Organization 8MB x 8 x 4 bks 16MB x 4 x 4bks 16MB x 8 x 4bks 32MB x 4 x 4bks 32MB x 8 x 4bks 64MB x 4 x 4bks
Hardware Installation Process
RAM Chips/DIMM 8 16 8 16 8 16
Installation Steps: 1. ... you to populate the same device size on each socket and the same DIMM size. 4. Reverse the installation steps if you want to remove the DIMM module....
Manual - Page 15

... Connector To install a PS/2 port keyboard and mouse, plug the mouse to the upper port (green) and the keyboard to the lower port (purple).
/ / Parallel Port / Serial Port / VGA Port
This connector supports 1 standard COM port and 1 Parallel port. Device like printer can be connected to Parallel port ; mouse and modem etc can be connected to Serial port.
/ LAN Ports / USB Ports
Before you connect...
Manual - Page 21

...Introduction 15 ) UF1 (CPU fan cable connector)
Please note, a proper installation of the CPU cooler is essential to prevent the CPU from running under abnormal condition or damaged by overheating.The CPU fan connector supports Max. current up to 1A .
Pin No.
Definition
1
GND
1
2
12V
3
Sense
4
Control
16/ 17/18 ) SYS_FAN/ERONT_FAN/REAR_FAN (System fan cable connectors)
These connector...
Manual - Page 23

English
GA-5YASV-RH Motherboard 17 ) Battery If you want to erase CMOS... 1.Turn OFF the computer and unplug the power cord. 2.Remove the battery, wait for 30 second. 3.Re-install the battery. 4.Plug the power cord and turn ON the computer.
CAUTION Danger of explosion if battery is incorrectly replaced. Replace only with the same or equivalent type recommended...
Manual - Page 35

... highlighted item. To exit the Help Window press . z Main This setup page includes all the items in standard compatible BIOS. z Advanced This setup page includes all the items of AMI special enhanced features. (ex: Auto detect fan and temperature status, automatically configure hard disk parameters.) z Security Change, set, or disable password. It allows you to limit access...
Manual - Page 37
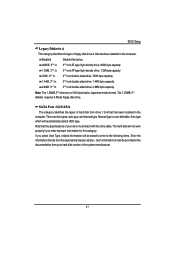
.../2 reference a 1024 byte/sector Japanese media format. The 1.25MB,31/2 diskette requires 3-Mode floppy-disk drive.
SATA Port 1/2/3/4/5/6 The category identifies the types of hard disk from drive 1 to 6 that has been installed in the computer. There are two types: auto type, and manual type. Manual type is user-definable; Auto type which will automatically detect HDD type. Note that...
Manual - Page 38

GA-5YASV-RH Motherboard
TYPE 1-39: Predefined types. Users: Set parameters by User. Auto: Set parameters automatically. (Default Vaules) CD-ROM: Use for ATAPI CD-ROM drives or double click [Auto] to set all HDD parameters automatically. ATAPI Removable: Removable disk drive is installed here.
Multi-Sector Transfers This field displays the information of Multi-Sector Transfer Mode. Disabled: The ...
Manual - Page 42

GA-5YASV-RH Motherboard
Memory Configuration
Figure 2-1: Memory Configuration
Installed Memory/Available to OS/Used by devices/ DIMM Group 1,2,3,4 Status
These category is display-only which is determined by POST (Power On Self Test) of the BIOS.
Memory Reset Yes
No
Select 'Yes', system will clear the memory error status. Save the changes and restart system. After rebooting system, the Memory ...
Manual - Page 48

GA-5YASV-RH Motherboard
Serial ATA Enabled Enables on-board serial ATA function. (Default setting) Disabled Disables on-board serial ATA function.
` Native Mode Operation
This option allows user to set the native mode for Serial ATA function.
Auto
Auto detected. (Default setting)
Serial ATA Set Native mode to Serial ATA.
` SATA RAID Enable Enabled Enabled SATA RAID function. Disabled Disable...
Manual - Page 49

Advanced Chipset Control
BIOS Setup
Figure 2-4: Advanced Chipset Control
Enable Multimedia Timer
Enabled
Enable Multimedia Timer support.
Disabled
Disable this function. (Default setting)
Wake On LAN / PME
This option allow user to determine the action of the system when a LAN/PME wake up event
occurs.
Enabled
Enable Wake On LAN/PME. (Default setting)
Disabled
Disable this function....
Manual - Page 50

GA-5YASV-RH Motherboard
Wake On Ring
This option allow user to determine the action of the system power is off and the modem is ringing.
Enabled
Enable Wake On Ring. (Default setting)
Disabled
Disable this function.
Note: This item must enabled if you're running under Windows operating system.
Wake On RTC Alarm
When "RTC Alarm Resume" item...
Manual - Page 54

GA-5YASV-RH Motherboard
Set Supervisor Password You can install and change this options for the setup menus. Type the password up to 6 characters in lengh and press . The password typed now will clear any previously entered password from the CMOS memory. You will be asked to confirm the entered password. Type the password again and press . You may also press to abort the selection...
Manual - Page 67

... array. Entering the RAID BIOS Setup 1. After rebooting your computer, wait until you see the RAID software prompting you to press Ctrl + I. The RAID prompt appears as part of the system POST and boot process prior to loading the OS. You have a few seconds to press Ctrl + I before the window disappears.
Intel(R) Matrix Storage Manager option ROM V5.0.0.1011 ICH7R wRAID5...