Gigabyte GA-78LMT-S2P driver and firmware
Drivers and firmware downloads for this Gigabyte item

Related Gigabyte GA-78LMT-S2P Manual Pages
Download the free PDF manual for Gigabyte GA-78LMT-S2P and other Gigabyte manuals at ManualOwl.com
Manual - Page 3
..., carefully read the User's Manual. For product-related information, check on our website at: http://www.gigabyte.com
Identifying Your Motherboard Revision The revision number on your motherboard looks like this: "REV: X.X." For example, "REV: 1.0" means the revision of the motherboard is 1.0. Check your motherboard revision before updating motherboard BIOS, drivers, or when looking for...
Manual - Page 4
... Contents
GA-78LMT-USB3/GA-78LMT-S2P Motherboard Layout 5 GA-78LMT-USB3/GA-78LMT-S2P Motherboard Block Diagram 6
Chapter 1 Hardware Installation 7 1-1 Installation Precautions 7 1-2 Product Specifications 8 1-3 Installing the CPU and CPU Cooler 10 1-4 Installing the Memory 11 1-5 Installing an Expansion Card 11 1-6 Back Panel Connectors 12 1-7 Internal Connectors 13
Chapter 2 BIOS Setup...
Manual - Page 5
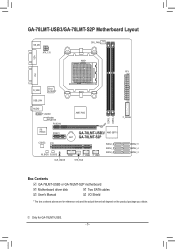
...USB_LAN
DDR3_1 DDR3_2
AUDIO
F_AUDIO Realtek RTL8111E PCIEX16
AMD 760G
iTE IT8720
PCIEX1
GA-78LMT-USB3/ AMD SB710 BAT GA-78LMT-S2P
CODEC PCI
M_BIOS B_BIOS
COM
F_USB2 F_USB1
CLR_CMOS
SYS_FAN
SATA2_2 SATA2_1 SATA2_0
F_PANEL
SATA2_5 SATA2_4 SATA2_3
Box Contents
GA-78LMT-USB3 or GA-78LMT-S2P motherboard
Motherboard driver disk
Two SATA cables
User's Manual
I/O Shield
* The box...
Manual - Page 8
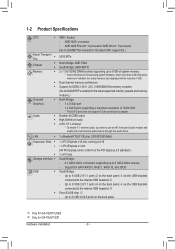
... devices - Support for SATA RAID 0, RAID 1, RAID 10, and JBOD South Bridge: - Up to 6 USB 2.0/1.1 ports (2 on the back panel, 4 via the USB brackets
connected to the internal USB headers) j - Up to 8 USB 2.0/1.1 ports (4 on the back panel, 4 via the USB brackets
connected to the internal USB headers) k Etron EJ168 chip: j - Up to 2 USB 3.0/2.0 ports on the back panel
j Only for GA-78LMT-USB3...
Manual - Page 9
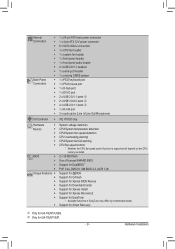
...138;Š Support for Q-Flash
ŠŠ Support for Xpress BIOS Rescue
ŠŠ Support for Download Center
ŠŠ Support for Xpress Install
ŠŠ Support for Xpress Recovery2
ŠŠ Support for EasyTune
* Available functions in EasyTune may differ by motherboard model.
ŠŠ Support for Smart Recovery
j Only for GA-78LMT-USB3. k Only for GA-78LMT-S2P...
Manual - Page 10
... information without prior notice.
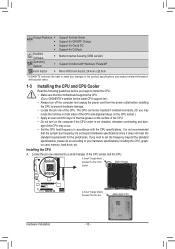
1-3 Installing the CPU and CPU Cooler
Read the following guidelines before you begin to install the CPU: • Make sure that the motherboard supports the CPU.
(Go to GIGABYTE's website for the latest CPU support list.) • Always turn off the computer and unplug the power cord from the power outlet before installing
the CPU to prevent hardware damage...
Manual - Page 12
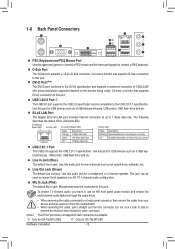
... remove the cable from your device and then remove it from the motherboard.
•• When removing the cable, pull it straight out from the connector. Do not rock it side to side to prevent an electrical short inside the cable connector.
(Note) The DVI-D port does not support D-Sub connection by adapter.
j Only for GA-78LMT-USB3. k Only for GA-78LMT-S2P.
Hardware Installation
- 12...
Manual - Page 20
...Load Optimized Defaults" section in this chapter or introductions of the battery/ clearing CMOS jumper in Chapter 1 for how to clear the CMOS values.)
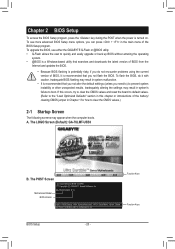
2-1 Startup Screen
The following screens may appear when the computer boots. A. The LOGO Screen (Default): GA-78LMT-USB3
B. The POST Screen
Motherboard Model BIOS Version
Award Modular BIOS v6.00PG Copyright (C) 1984-2011, Award Software, Inc.
GA...
Manual - Page 22
... controller from the system memory. (Default) UMA Frame Buffer Size Frame buffer size is the total amount of system memory allocated solely for the onboard graphics controller. MS-DOS, for example, will use only this memory for display. Options are: Auto (default), 128MB, 256MB, 512MB.
(Note) This item is present only when you install a CPU that supports this feature.
BIOS Setup...
Manual - Page 26
... the POST for faster system startup.
•• Auto Lets the BIOS automatically detect SATA devices during the POST. (Default) •• Manual Allows you to manually enter the specifications of the hard drive when the hard
drive access mode is set to CHS. Access Mode Sets the hard drive access mode. Options are: Auto (default), CHS, LBA, Large. IDE...
Manual - Page 27
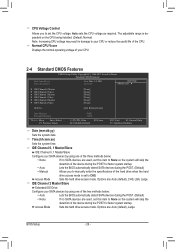
... Errors," "No Errors," "All, But Keyboard". (Default) Memory These fields are read-only and are determined by the BIOS POST.
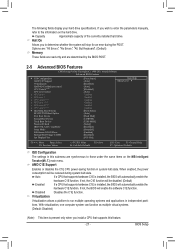
2-5 Advanced BIOS Features
CMOS Setup Utility-Copyright (C) 1984-2011 Award Software Advanced BIOS Features
} IGX Configuration AMD C1E Support Virtualization AMD K8 Cool&Quiet control CPU Unlock (Note) CPU core Control
x CPU core 0 x CPU core 1 x CPU core 2 (Note) x CPU...
Manual - Page 28
... lets the BIOS automatically configure this setting depending on the hard drive you install. (Default: Auto) First/Second/Third Boot Device Specifies the boot order from the available devices. Use the up or down arrow key to select a device and press to accept. Options are: LS120, Hard Disk, CDROM, ZIP, USB-FDD, USB-ZIP, USBCDROM, USB-HDD, Legacy LAN, Disabled. Password Check Specifies...
Manual - Page 29
... Sets the PCI Express graphics card on the PCIEX16 slot as the first display.
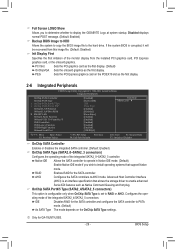
2-6 Integrated Peripherals
CMOS Setup Utility-Copyright (C) 1984-2011 Award Software Integrated Peripherals
OnChip SATA Controller OnChip SATA Type x OnChip SATA Port4/5 Type x OnChip SATA Port as ESP Onboard LAN Function Onboard LAN Boot ROM } SMART LAN Onboard Audio Function Onboard USB 3.0 Controller j USB...
Manual - Page 30
... wish to install a 3rd party add-in network card instead of using the onboard LAN, set this item to Disabled. Onboard LAN Boot ROM Allows you to decide whether to activate the boot ROM integrated with the onboard LAN chip. (Default: Disabled)
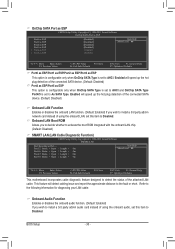
SMART LAN (LAN Cable Diagnostic Function)
CMOS Setup Utility-Copyright (C) 1984-2011 Award Software SMART LAN
Start detecting at Port..... Part1-2 Status...
Manual - Page 31
... to detect USB storage devices, including USB flash drives and USB hard drives during the POST. (Default: Enabled) Onboard Serial Port
Enables or disables the first serial port and specifies its base I/O address and corresponding interrupt. Options are: Auto, 3F8/IRQ4 (default), 2F8/IRQ3, 3E8/IRQ4, 2E8/IRQ3, Disabled.
j Only for GA-78LMT-USB3.
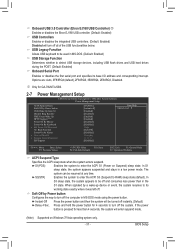
2-7 Power Management Setup
CMOS Setup Utility...
Manual - Page 32
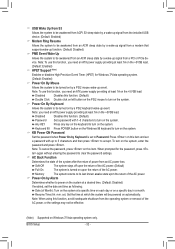
... on a specific day in a month. Resume Time (hh: mm: ss): Set the time at which the system will be powered on automatically. Note: When using this function, avoid inadequate shutdown from the operating system or removal of the AC power, or the settings may not be effective.
(Note) Supported on Windows 7/Vista operating system only.
BIOS Setup
- 32 -
Manual - Page 34
... 4-pin CPU fan.
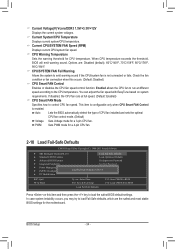
2-10 Load Fail-Safe Defaults
CMOS Setup Utility-Copyright (C) 1984-2011 Award Software
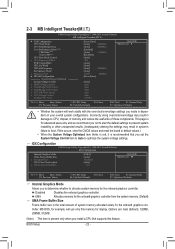
MB Intelligent Tweaker(M.I.T.)
Load Fail-Safe Defaults
Standard CMOS Features
Load Optimized Defaults
Advanced BIOS Features
Set Supervisor Password
Integrated Peripherals
Set User Password
Power Management Setup PnP/PCI...
Manual - Page 35
... updating the BIOS or after clearing the CMOS values.
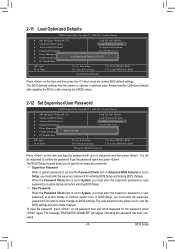
2-12 Set Supervisor/User Password
CMOS Setup Utility-Copyright (C) 1984-2011 Award Software
MB Intelligent Tweaker(M.I.T.) Standard CMOS Features Advanced BIOS Features Integrated Peripherals Power Management Setup PnP/PCI Configurations Enter Password: PC Health Status
Load...
Manual - Page 37
.../XP setup disk. • Motherboard driver disk.
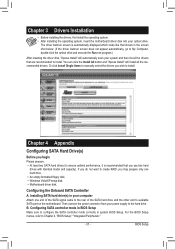
Configuring the Onboard SATA Controller
A. Installing SATA hard drive(s) in your computer Attach one end of the SATA signal cable to the rear of the SATA hard drive and the other end to available SATA port on the motherboard. Then connect the power connector from your power supply to the hard drive. B. Configuring SATA controller mode in BIOS Setup...
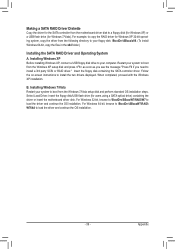
Manual - Page 39
... x64 folder.)
Installing the SATA RAID Driver and Operating System A. Installing Windows XP
Before installing Windows XP, connect a USB floppy disk drive to your computer. Restart your system to boot from the Windows XP setup disk and press as soon as you see the message "Press F6 if you need to install a 3rd party SCSI or RAID driver." Insert the floppy disk containing the SATA controller driver...