Gigabyte GA-945GMF-DS2 driver and firmware
Drivers and firmware downloads for this Gigabyte item

Related Gigabyte GA-945GMF-DS2 Manual Pages
Download the free PDF manual for Gigabyte GA-945GMF-DS2 and other Gigabyte manuals at ManualOwl.com
Manual - Page 6
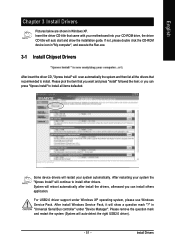
Chapter 3 Install Drivers 51 3-1 Install Chipset Drivers 51 3-2 SoftwareApplications 52 3-3 Driver CD Information 52 3-4 Hardware Information 53 3-5 Contact Us ...53
Chapter 4 Appendix 55 4-1 Unique Software Utilities 55
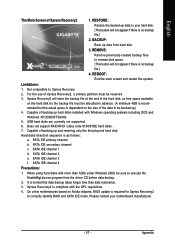
4-1-1 EasyTune 5 Introduction 55 4-1-2 Xpress Recovery2 Introduction 56 4-1-3 Flash BIOS Method Introduction 58 4-1-4 2- / 4- / 6- / 8- Channel Audio Function ...
Manual - Page 13

... amount. For example, 4 GB of memory size will instead be shown as 3.xx GB memory during system startup.
(Note 2) To use a DDRII 667 memory module on the motherboard, you must install a 1066/800 MHz FSB processor.
(Note 3) EasyTune functions may vary depending on different motherboards.
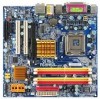
Only for GA-945GMF-DS2.
"*"
Only the GA-945GM-DS2/GA-945GMF-DS2 adopts All-Solid Capacitor design.
- 13...
Manual - Page 18
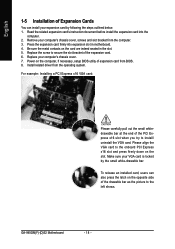
... motherboard. 4. Be sure the metal contacts on the card are indeed seated in the slot. 5. Replace the screw to secure the slot bracket of the expansion card. 6. Replace your computer's chassis cover. 7. Power on the computer, if necessary, setup BIOS utility of expansion card from BIOS. 8. Install related driver from the operating system.
For example: Installing a PCI Express x16 VGA card:
Please...
Manual - Page 19
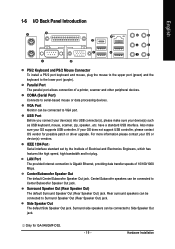
... not support USB controller, please contact OS vendor for possible patch or driver upgrade. For more information please contact your OS or device(s) vendors.
IEEE 1394 Port Serial interface standard set by the Institute of Electrical and Electronics Engineers, which has features like high speed, high bandwidth and hot plug.
LAN Port The provided Internet connection is Gigabit Ethernet, providing...
Manual - Page 23
... refer to the instructions located on the IDE device). Before attaching the IDE cable, please take note of the foolproof groove in the IDE connector.
40
39
2
1
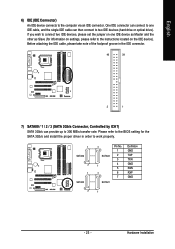
7) SATAII0 / 1 / 2 / 3 (SATA 3Gb/s Connector, Controlled by ICH7) SATA 3Gb/s can provide up to 300 MB/s transfer rate. Please refer to the BIOS setting for the SATA 3Gb/s and install the proper driver in order...
Manual - Page 26
...
9
Line Out (L)
10
FSENSE2
10
NC
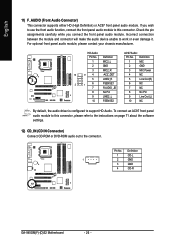
By default, the audio driver is configured to support HD Audio. To connect an AC97 front panel audio module to this connector, please refer to the instructions on page 71 about the software settings.
12) CD_IN (CD IN Connector) Connect CD-ROM or DVD-ROM audio out to the connector.
Pin No. Definition
1
CD-L
1
2
GND...
Manual - Page 31
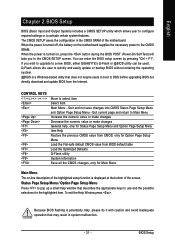
... during the BIOS POST (Power-On Self Test) will take you to the CMOS SETUP screen. You can enter the BIOS setup screen by pressing "Ctrl + F1". If you wish to upgrade to a new BIOS, either GIGABYTE's Q-Flash or @BIOS utility can be used. Q-Flash allows the user to quickly and easily update or backup BIOS without entering the operating system. @BIOS is a Windows-based...
Manual - Page 34
...
IDE devices setup. You can use one of three methods:
• Auto
Allows BIOS to automatically detect IDE/SATA devices during POST. (Default
value)
• None
Select this if no IDE/SATA devices are used and the system will skip the
automatic detection step and allow for faster system start up.
• Manual User can manually input the correct settings...
Manual - Page 36
...
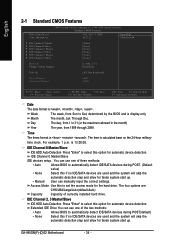
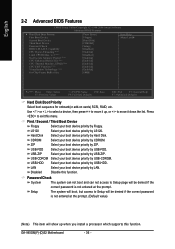
2-2 Advanced BIOS Features
CMOS Setup Utility-Copyright (C) 1984-2006 Award Software Advanced BIOS Features
` Hard Disk Boot Priority First Boot Device
Second Boot Device Third Boot Device Password Check HDD S.M.A.R.T. Capability CPU Hyper-Threading (Note) Limit CPUID Max. to 3 (Note)
No-Execute Memory Protect (Note) CPU Enhanced Halt (C1E) (Note) CPU Thermal Monitor 2(TM2) (Note) CPU EIST...
Manual - Page 51
...continue to install other drivers. System will reboot automatically after install the drivers, afterward you can install others application.
For USB2.0 driver support under Windows XP operating system, please use Windows Service Pack. After install Windows Service Pack, it will show a question mark "?" in "Universal Serial Bus controller" under "Device Manager". Please remove the question mark and...
Manual - Page 52
English
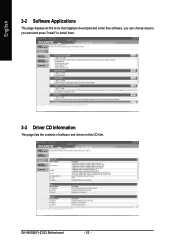
3-2 Software Applications
This page displays all the tools that Gigabyte developed and some free software, you can choose anyone you want and press "install" to install them.
3-3 Driver CD Information
This page lists the contents of software and drivers in this CD-title.
GA-945GM(F)-(D)S2 Motherboard
- 52 -
Manual - Page 56
... bytes of system memory 3. VESA-supported VGA cards
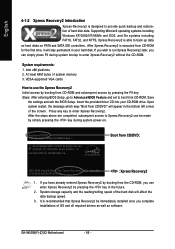
How to use the Xpress Recovery2 Initial access by booting from CD-ROM and subsequent access by pressing the F9 key: Steps: After entering BIOS Setup, go to Advanced BIOS Feature and set to boot from CD-ROM. Save
the settings and exit the BIOS Setup. Insert the provided driver CD into your CD-ROM drive. Upon system...
Manual - Page 57
... under Windows 2000, be sure to execute the
EnableBigLba.exe program from the driver CD before data backup.
2. It is normal that data backup takes longer time than data restoration.
3. Xpress Recovery2 is compliant with the GPL regulations.
4. On a few motherboards based on Nvidia chipsets, BIOS update is required for Xpress Recovery2
to correctly identify RAID and SATA...
Manual - Page 58
...Main Processor : Intel Pentium(R) 4 1.6GHz (133x12) Memory Testing : 131072K OK
Memory Frequency 266 MHz in Single Channel Primary Master : FUJITSU MPE3170AT ED-03-08 Primary Slave : None Secondary Master : CREATIVEDVD-RM DVD1242E BC101 Secondary Slave : None
Press DEL to enter SETUP / Dual BIOS / Q-Flash / F9 For
Xpress Recovery 08/07/2003-i875P-6A79BG03C-00
GA-945GM(F)-(D)S2 Motherboard
- 58...
Manual - Page 62
.... Therefore, we highly recommend reloading the BIOS defaults after BIOS has been upgraded.
CMOS Setup Utility-Copyright (C) 1984-2004 Award Software
Standard CMOS Features
Select Language
Advanced BIOS Features
Load Fail-Safe Defaults
Integrated Peripherals
Load Optimized Defaults
Power Management Setup PnP/PCI Configurations
Set Supervisor Password Load Optimized Defaults (SYe/tNU)?seYr...
Manual - Page 65

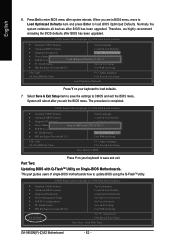
... a DOS startup disk, we recommend that you use the new @BIOS utility. @BIOS allows users to update their BIOS under Windows. Just select the desired @BIOS server to download the latest version of BIOS.
Fig 1. Installing the @BIOS utility
Fig 2. Installation Complete and Run @BIOS
Click Start/ Programs/ Gigabyte/ BIOS/ @BIOS
Select @BIOS item than click Install
Fig 3. The @BIOS Utility
Fig...
Manual - Page 67

....
Stereo Speakers Connection and Settings: We recommend that you use the speaker with amplifier to acquire the best sound effect if the stereo output is applied.
STEP 1 : After installation of the audio driver, you should find an Audio Manager icon in your system tray (you can also find the icon in Control Panel). Doubleclick the icon...
Manual - Page 68
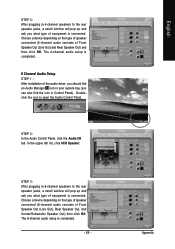
...2-channel audio setup is completed.
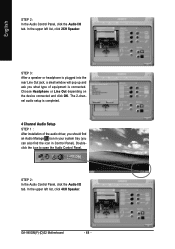
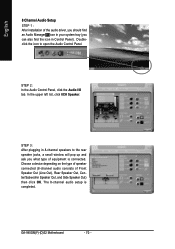
4 Channel Audio Setup STEP 1 : After installation of the audio driver, you should find an Audio Manager icon in your system tray (you can also find the icon in Control Panel). Doubleclick the icon to open the Audio Control Panel.
STEP 2: In the Audio Control Panel, click the Audio I/O tab. In the upper left list, click 4CH Speaker.
GA-945GM(F)-(D)S2 Motherboard...
Manual - Page 69
... a device depending on the type of speaker connected (4-channel audio consists of Front Speaker Out (Line Out) and Rear Speaker Out) and then click OK. The 4-channel audio setup is completed.
6 Channel Audio Setup STEP 1 : After installation of the audio driver, you should find an Audio Manager icon in your system tray (you can also find the icon in Control Panel...
Manual - Page 70
..., a small window will pop up and ask you what type of equipment is connected. Choose a device depending on the type of speaker connected (8-channel audio consists of Front Speaker Out (Line Out), Rear Speaker Out, Center/Subwoofer Speaker Out, and Side Speaker Out) then click OK. The 8-channel audio setup is completed.
GA-945GM(F)-(D)S2 Motherboard
- 70 -