Gigabyte GA-H55-USB3 driver and firmware
Drivers and firmware downloads for this Gigabyte item

Related Gigabyte GA-H55-USB3 Manual Pages
Download the free PDF manual for Gigabyte GA-H55-USB3 and other Gigabyte manuals at ManualOwl.com
Manual - Page 3
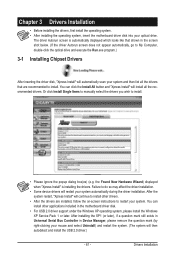
... the following types of documentations:
For quick set-up of the product, read the Quick Installation Guide included with the product. For detailed product information, carefully read the User's Manual. For instructions on how to use GIGABYTE's unique features, read or download the information on/from the Support&Downloads\Motherboard\Technology Guide page on our website.
For product-related...
Manual - Page 5
...BIOS with the Q-Flash Utility 68 4-2-2 Updating the BIOS with the @BIOS Utility 71 4-3 EasyTune 6...72 4-4 Dynamic Energy Saver™ 2 73 4-5 Q-Share...75 4-6 Smart 6™ ...76 4-7 Auto Green...79
Chapter 5 Appendix...81 5-1 Configuring SATA Hard Drive(s 81
5-1-1 Configuring GIGABYTE SATA2 SATA Controller 81 5-1-2 Making a SATA RAID/AHCI Driver Diskette 88 5-1-3 Installing the SATA RAID...
Manual - Page 12
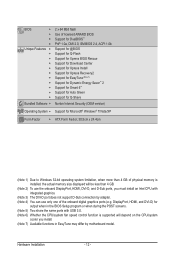
... the actual memory size displayed will be less than 4 GB.
(Note 2) To use the onboard DisplayPort, HDMI, DVI-D, and D-Sub ports, you must install an Intel CPU with integrated graphics.
(Note 3) The DVI-D port does not support D-Sub connection by adapter. (Note 4) You can use only one of the onboard digital graphics ports (e.g. DisplayPort, HDMI, and DVI-D) for
output when in the BIOS Setup program...
Manual - Page 33
... of the BIOS Setup program.
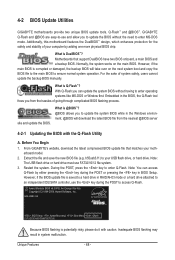
To upgrade the BIOS, use either the GIGABYTE Q-Flash or @BIOS utility. • Q-Flash allows the user to quickly and easily upgrade or back up BIOS without entering the operating
system. • @BIOS is a Windows-based utility that searches and downloads the latest version of BIOS from the
Internet and updates the BIOS. For instructions on using the Q-Flash and @BIOS...
Manual - Page 49
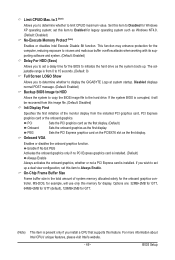
... to copy the BIOS image file to the hard drive. If the system BIOS is corrupted, it will be recovered from this image file. (Default: Disabled) Init Display First
Specifies the first initiation of the monitor display from the installed PCI graphics card, PCI Express graphics card or the onboard graphics.
PCI Sets the PCI graphics card as the first display. (Default) Onboard Sets the onboard...
Manual - Page 50
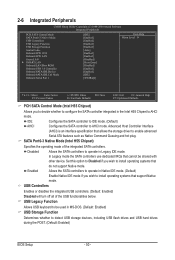
...the storage driver to enable advanced Serial ATA features such as Native Command Queuing and hot plug. SATA Port0-3 Native Mode (Intel H55 Chipset)
Specifies the operating mode of the integrated SATA controllers. Disabled Allows the SATA controllers to operate in Legacy IDE mode.
In Legacy mode the SATA controllers use dedicated IRQs that cannot be shared with other device. Set...
Manual - Page 51
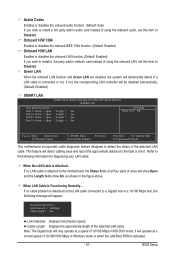
... add-in network card instead of using the onboard LAN, set this item to Disabled. Green LAN
When the onboard LAN function and Green LAN are enabled, the system will dynamically detect if a LAN cable is connected or not. If not, the corresponding LAN controller will be disabled automatically. (Default: Disabled)
SMART LAN
CMOS Setup Utility-Copyright (C) 1984-2009 Award Software SMART LAN
Start...
Manual - Page 61
... drivers are installed, follow the on-screen instructions to restart your system. You can install other applications included in the motherboard driver disk.
• For USB 2.0 driver support under the Windows XP operating system, please install the Windows XP Service Pack 1 or later. After installing the SP1 (or later), if a question mark still exists in Universal Serial Bus Controller in Device...
Manual - Page 62
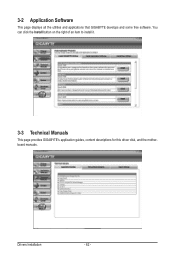
3-2 Application Software
This page displays all the utilities and applications that GIGABYTE develops and some free software. You can click the Install button on the right of an item to install it.
3-3 Technical Manuals
This page provides GIGABYTE's application guides, content descriptions for this driver disk, and the motherboard manuals.
Drivers Installation
- 62 -
Manual - Page 64

... Download Center
To update the BIOS, drivers, or applications, click the Download Center button to link to the GIGABYTE website. The latest version of the BIOS, drivers, or applications will be displayed.
3-7 New Utilities
This page provides a quick link to GIGABYTE's lately developed utilities for users to install. You can click the Install button on the right of an item to install it.
Drivers...
Manual - Page 65
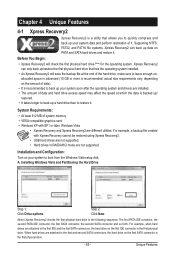
... 512 MB of system memory • VESA compatible graphics card • Windows XP with SP1 or later, Windows Vista
• Xpress Recovery and Xpress Recovery2 are different utilities. For example, a backup file created with Xpress Recovery cannot be restored using Xpress Recovery2.
• USB hard drives are not supported. • Hard drives in RAID/AHCI mode are not supported.
Installation and...
Manual - Page 68
... or pressing the key in BIOS Setup. However, if the BIOS update file is saved to a hard drive in RAID/AHCI mode or a hard drive attached to an independent IDE/SATA controller, use the key during the POST to access Q-Flash.
Award Modular BIOS v6.00PG, An Energy Star Ally Copyright (C) 1984-2009, Award Software, Inc.
H55-USB3 E4 . . . .
: BIOS Setup : XpressRecovery2 : Boot Menu : Qflash 01...
Manual - Page 71

... flashing.
B. Using @BIOS
1.
Update the BIOS Using the Internet Update Function:
Click Update BIOS from GIGABYTE Server, select the @BIOS server site closest to your location and
then download the BIOS file that matches your motherboard model. Follow the on-screen instructions to
complete.
If the BIOS update file for your motherboard is not present on the @BIOS server site, please
manually...
Manual - Page 72
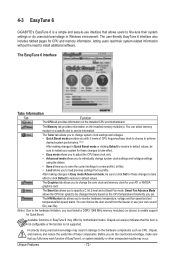
... system settings or do overclock/overvoltage in Windows environment. The user-friendly EasyTune 6 interface also includes tabbed pages for CPU and memory information, letting users read their system-related information without the need to install additional software.
The EasyTune 6 Interface
Tabs Information
Tab
Function
The CPU tab provides information on the installed CPU and motherboard...
Manual - Page 75
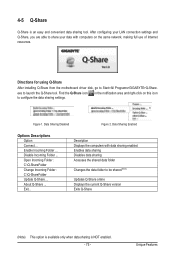
... easy and convenient data sharing tool. After configuring your LAN connection settings and Q-Share, you are able to share your data with computers on the same network, making full use of Internet resources.
Directions for using Q-Share
After installing Q-Share from the motherboard driver disk, go to Start>All Programs>GIGABYTE>Q-Share.
exe to launch the Q-Share tool. Find the...
Manual - Page 81
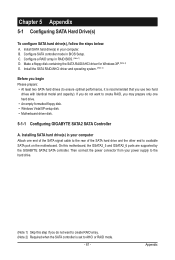
...; Motherboard driver disk.
5-1-1 Configuring GIGABYTE SATA2 SATA Controller
A. Installing SATA hard drive(s) in your computer Attach one end of the SATA signal cable to the rear of the SATA hard drive and the other end to available SATA port on the motherboard. On this motherboard, the GSATA2_5 and GSATA2_6 ports are supported by the GIGABYTE SATA2 SATA controller. Then connect the power connector...
Manual - Page 87
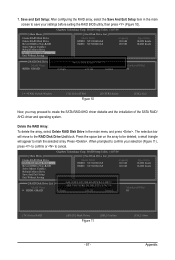
...the Save And Exit Setup item in the main screen to save your settings before exiting the RAID BIOS utility, then press (Figure 10).
[ Main Menu ]
Create RAID Disk Drive Delete RAID Disk Drive Revert HDD to Non-RAID Solve Mirror Conflict Rebuild Mirror Drive Save And Exit Setup Exit Without Saving
Gigabyte Technology Corp. RAID Setup Utility v1.07.06
[ Hard Disk Drive List ]
Model Name HDD0...
Manual - Page 88
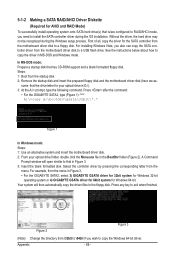
... setup process. First of all, copy the driver for the SATA controller from the motherboard driver disk to a floppy disk. For installing Windows Vista, you also can copy the SATA controller driver from the motherboard driver disk to a USB flash drive. See the instructions below about how to copy the driver in MS-DOS and Windows mode.
In MS-DOS mode: Prepare a startup disk that has CD-ROM support...
Manual - Page 89
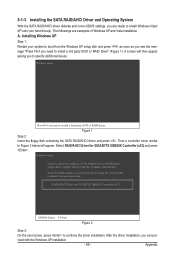
... need to install a third party SCSI or RAID driver.
Figure 1 Step 2: Insert the floppy disk containing the SATA RAID/AHCI driver and press . Then a controller menu similar to Figure 2 below will appear. Select RAID/AHCI Driver for GIGABYTE GBB36X Controller (x32) and press .
Windows Setup
You have chosen to configure a SCSI Adapter for use with Windows, using a device support disk provided by...
Manual - Page 102
... Bus Driver for High Definition Audio and select Disable and Uninstall. Step 4: In Device Manager, right-click on the computer name and select Scan for hardware changes. When the Add New Hardware Wizard appears, click Cancel. Then install the onboard HD audio driver from the motherboard driver disk or download the audio driver from GIGABYTE's website to install. For more details, go to the Support...