Gigabyte GV-N275UD-896H driver and firmware
Drivers and firmware downloads for this Gigabyte item

Related Gigabyte GV-N275UD-896H Manual Pages
Download the free PDF manual for Gigabyte GV-N275UD-896H and other Gigabyte manuals at ManualOwl.com
Manual - Page 1
GV-N275UD-896H
NVIDIA® GeForceTM GTX 275 Graphics Accelerator
User's Manual
Rev. 101 12MM-N275U8H-101R
Copyright © 2009 GIGABYTE TECHNOLOGY CO., LTD Copyright by GIGA-BYTE TECHNOLOGY CO., LTD. ("GBT"). No part of this manual may be reproduced or transmitted in any form without the expressed, written permission of GBT. Trademarks Third-party brands and...
Manual - Page 3
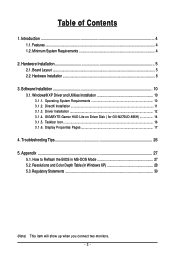
... Hardware Installation 5 2.1. Board Layout ...5 2.2. Hardware Installation ...8
3. Software Installation 10 3.1. Windows® XP Driver and Utilities Installation 10
3.1.1. Operating System Requirements 10 3.1.2. DirectX Installation ...11 3.1.3. Driver Installation ...12 3.1.4. GIGABYTE Gamer HUD Lite on Driver Disk ( for GV-N275UD-896H 14 3.1.5. Taskbar Icon ...16 3.1.6. Display Properties...
Manual - Page 4
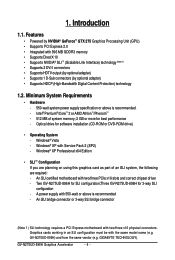
...XP with Service Pack 2 (SP2) - Windows® XP Professional x64 Edition
• SLI TM Configuration If you are planning on using this graphics card as part of an SLI system, the following are required: - An SLI certified motherboard with two/three PCIe x16 slots and correct chipset driver - Two GV-N275UD-896H for SLI configuration;Three GV-N275UD-896H for 3-way SLI configuration - A power supply...
Manual - Page 5
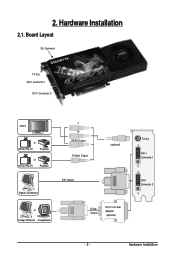
... Installation
2.1. Board Layout
SLI Connector
TV-Out DVI-I Connector 1
DVI-I Connector 2
HDTV
or
NTSC / PAL TV
Projector
or
NTSC / PAL TV
Projector
Digital LCD Monitor
Y Pr Pb/AV Output S-Video Output
DVI Output
(optional)
or Analog LCD Monitor Analog Monitor
D-Sub Output
DVI-I to D-Sub Adapter (optional)
TV-Out
DVI-I Connector 1
DVI-I Connector 2
- 5 -
Hardware Installation
Manual - Page 7
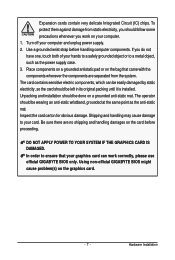
... to your card. Be sure there are no shipping and handling damages on the card before proceeding.
DO NOT APPLY POWER TO YOUR SYSTEM IF THE GRAPHICS CARD IS DAMAGED. In order to ensure that your graphics card can work correctly, please use official GIGABYTE BIOS only. Using non-official GIGABYTE BIOS might cause problem(s) on the graphics card.
- 7 -
Hardware Installation
Manual - Page 8
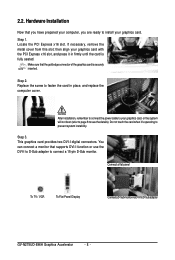
... the card when it's operating to prevent system instability.
Step 3. This graphics card provides two DVI-I digital connectors. You can connect a monitor that supports DVI-I function or use the DVI-I to D-Sub adapter to connect a 15-pin D-Sub monitor.
Connect a flat panel
To TV / VCR
To Flat Panel Display
Connect a D-Sub monitor via DVI-I to D-Sub adapter
GV-N275UD-896H Graphics Accelerator...
Manual - Page 9
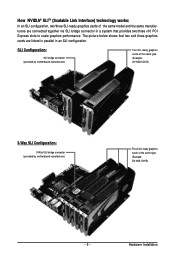
... are linked in parallel in an SLI configuration.
SLI Configuration:
SLI bridge connector (provided by motherboard manufacturer)
Two SLI-ready graphics cards of the same type. (Example: GV-N28-1GH-B)
3-Way SLI Configuration:
3-Way SLI bridge connector (provided by motherboard manufacturer)
Three SLI-ready graphics cards of the same type. (Example: GV-N28-1GH-B)
- 9 -
Hardware Installation
Manual - Page 10
3. Software Installation
In this manual, we assume that your CD-ROM drive letter to be Drive D: The installation of drivers is very simple. When you insert the driver CD into your CD-ROM drive, you can see the autorun window (if it does not show up, run "D:\setup.exe"). Then you can follow the instructions to setup your graphics card driver. (Please follow the subsection "3.1.3 Driver Installation...
Manual - Page 11
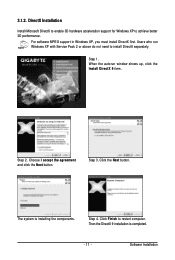
... DirectX to enable 3D hardware acceleration support for Windows XP to achieve better 3D performance.
For software MPEG support in Windows XP, you must install DirectX first. Users who run Windows XP with Service Pack 2 or above do not need to install DirectX separately.
Step 1. When the autorun window shows up, click the Install DirectX 9 item.
Step 2. Choose I accept the agreement...
Manual - Page 12
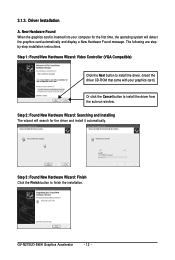
... to install the driver. (Insert the driver CD-ROM that came with your graphics card.)
Or click the Cancel button to install the driver from the autorun window. Step 2: Found New Hardware Wizard: Searching and Installing The wizard will search for the driver and install it automatically.
Step 3: Found New Hardware Wizard: Finish Click the Finish button to finish the installation.
GV-N275UD-896H...
Manual - Page 13
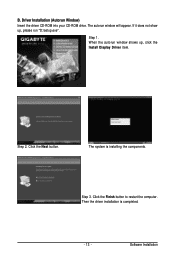
...CD-ROM into your CD-ROM drive. The autorun window will appear. If it does not show up, please run "D:\setup.exe".
Step 1. When the autorun window shows up, click the Install Display Driver item.
Step 2. Click the Next button.
The system is installing the components.
Step 3. Click the Finish button to restart the computer. Then the driver installation is completed.
- 13 -
Software Installation
Manual - Page 14
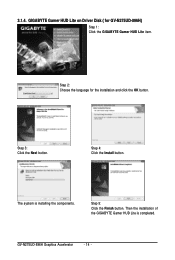
... Lite on Driver Disk ( for GV-N275UD-896H)
Step 1: Click the GIGABYTE Gamer HUD Lite item.
Step 2: Choose the language for the installation and click the OK button.
Step 3: Click the Next button.
Step 4: Click the Install button.
The system is installing the components.
Step 5: Click the Finish button. Then the installation of the GIGABYTE Gamer HUD Lite is completed.
GV-N275UD-896H Graphics...
Manual - Page 15
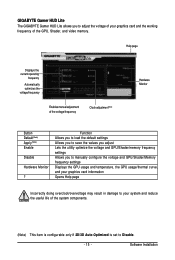
... your graphics card and the working frequency of the GPU, Shader, and video memory.
Help page
Displays the current operating
frequency
Automatically optimizes the voltage/frequency
Enables manual adjustment of the voltage/frequency
Clock adjustment(Note)
Hardware Monitor
Button Default(Note) Apply(Note) Enable
Disable
Hardware Monitor
?
Function Allows you to load the default settings Allows...
Manual - Page 16
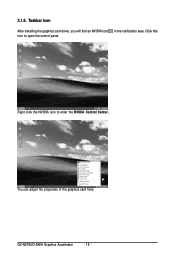
3.1.5. Taskbar Icon
After installing the graphics card driver, you will find an NVIDIA icon in the notification area. Click this icon to open the control panel.
Right click the NVIDIA icon to enter the NVIDIA Control Center.
You can adjust the properties of the graphics card here.
GV-N275UD-896H Graphics Accelerator
- 16 -
Manual - Page 17

... Pages
To access Display Properties pages, right-click on desktop and then select Properties. The Display Properties dialog box shows the information of display adapter, color, the range of display area, and the refresh rate.
Settings (Resolutions and Color Quality for Windows)
You may adjust the screen resolution and color quality settings in this dialog box.
You can move the slider...
Manual - Page 19
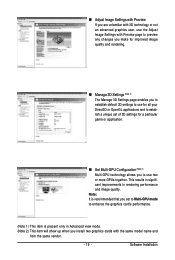
... performance and image quality.
Note: It is recommended that you set to Multi-GPU mode to enhance the graphics card's performance.
(Note 1) This item is present only in Advanced view mode. (Note 2) This item will show up when you install two graphics cards with the same model name and
from the same vendor.
- 19 -
Software Installation
Manual - Page 21
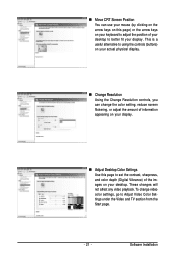
... information appearing on your display.
„ Adjust Desktop Color Settings Use this page to set the contrast, sharpness, and color depth (Digital Vibrance) of the images on your desktop. These changes will not affect any video playback. To change video color settings, go to Adjust Video Color Settings under the Video and TV section from the Start page.
- 21 -
Software Installation
Manual - Page 23
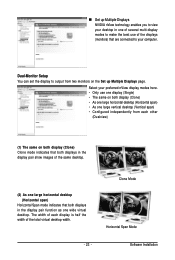
... technology enables you to view your desktop in one of several multi-display modes to make the best use of the displays (monitors) that are connected to your computer.
Dual-Monitor Setup You can set the display to output from two monitors on the Set up Multiple Displays page.
Select your preferred nView display modes here. • Only use one...
Manual - Page 25
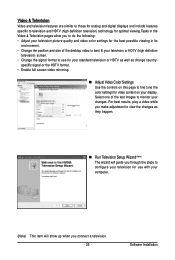
... Color Settings Use the controls on this page to fine tune the color settings for video content on your display. Select one of the test images to monitor your changes. For best results, play a video while you make adjustment to view the changes as they happen.
„ Run Television Setup Wizard (Note) The wizard will guide you...
Manual - Page 26
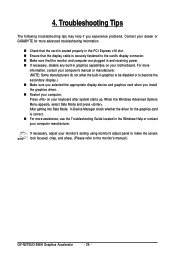
... Mode, in Device Manager check whether the driver for the graphics card is correct. „ For more assistance, use the Troubleshooting Guide located in the Windows Help or contact your computer manufacturer.
If necessary, adjust your monitor's setting using monitor's adjust panel to make the screen look focused, crisp, and sharp. (Please refer to the monitor's manual.)
GV-N275UD-896H Graphics...