Gigabyte GV-R545HM-512I driver and firmware
Drivers and firmware downloads for this Gigabyte item

Related Gigabyte GV-R545HM-512I Manual Pages
Download the free PDF manual for Gigabyte GV-R545HM-512I and other Gigabyte manuals at ManualOwl.com
Manual - Page 1
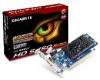
GV-R545HM-1GI/ GV-R545HM-512I/ GV-R545SC-1GI/ GV-R545OC-512I
ATI RadeonTM HD 5450 Graphics Accelerator
User's Manual
Rev. 102 12MM-R545S-102R
Copyright © 2010 GIGABYTE TECHNOLOGY CO., LTD Copyright by GIGA-BYTE TECHNOLOGY CO., LTD. ("GBT"). No part of this manual may be reproduced or transmitted in any form without the expressed, written permission of GBT. Trademarks Third...
Manual - Page 4

...Features ...5 1.2. Minimum System Requirements 5
2. Hardware Installation 6 2.1. Board Layout ...6 2.2. Hardware Installation ...11
3. Software Installation 12 3.1. Driver and Utility Installation 12
3.1.1. Driver Installation ...12 3.2. Taskbar Icon ...14 3.3. Display Properties Pages 16
4. Troubleshooting Tips 29 5. Appendix ...30
5.1. Resolutions and Color Depth Tables 30 5.2. Regulatory...
Manual - Page 5
... GV-R545HM-512I(*Note1)only) • Supports DirectX 11 • Supports CrossFireXTM • Supports 1 Dual-Link DVI-I connector1 • Supports 1 D-Sub connector • Supports 1 HDMI connector
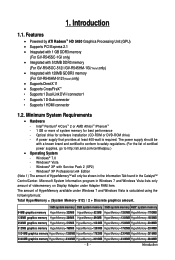
1.2. Minimum System Requirements
• Hardware - Intel® Pentium® 4/CoreTM 2 or AMD AthlonTM /PhenomTM - 1 GB or more of system memory for best performance - Optical drive for software...
Manual - Page 6
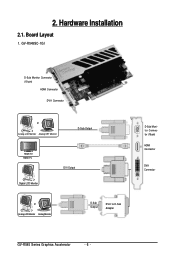
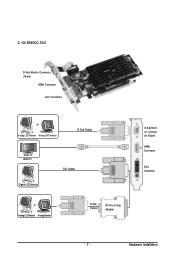
2. Hardware Installation
2.1. Board Layout
1. GV-R545SC-1GI
D-Sub Monitor Connector (15-pin)
HDMI Connector
DVI-I Connector
or Analog LCD Monitor Analog CRT Monitor
D-Sub Output
HDMI TV HDMI TV
Digital LCD Monitor
DVI Output
or Analog LCD Monitor Analog Monitor
D-Sub Output
DVI-I to D-Sub Adapter
D-Sub Monitor Connector (15-pin)
HDMI Connector
DVI-I Connector
GV-R545 Series Graphics ...
Manual - Page 7
2. GV-R545OC-512I
D-Sub Monitor Connector (15-pin)
HDMI Connector
DVI-I Connector
or Analog LCD Monitor Analog CRT Monitor
D-Sub Output
HDMI TV HDMI TV
Digital LCD Monitor
DVI Output
or Analog LCD Monitor Analog Monitor
D-Sub Output
DVI-I to D-Sub Adapter
D-Sub Monitor Connector (15-pin)
HDMI Connector
DVI-I Connector
- 7 -
Hardware Installation
Manual - Page 9
4. GV-R545HM-512I
D-Sub Monitor Connector (15-pin)
HDMI Connector DVI-I Connector
or Analog LCD Monitor Analog CRT Monitor
D-Sub Output
HDMI TV HDMI TV
Digital LCD Monitor
DVI Output
or Analog LCD Monitor Analog Monitor
D-Sub Output
DVI-I to D-Sub Adapter
D-Sub Monitor Connector (15-pin)
HDMI Connector
DVI-I Connector
- 9 -
Hardware Installation
Manual - Page 10
... HD 5450 series support HDMI output which can handle both audio and video signals. However, audio output from the onboard audio controller or the external sound card will be disabled when HDMI output is activated. If no need for HDMI output function, set the onboard audio controller or the external sound card to be the default Sound Playback device to obtain audio output from your...
Manual - Page 11
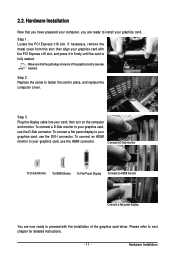
... place, and replace the computer cover.
Step 3. Plug the display cable into your card; then turn on the computer and monitor. To connect a D-Sub monitor to your graphics card, use the D-Sub connector. To connect a flat panel display to your graphics card, use the DVI-I connector. To connect an HDMI monitor to your graphics card, use the HDMI connector.
Connect a D-Sub monitor...
Manual - Page 12
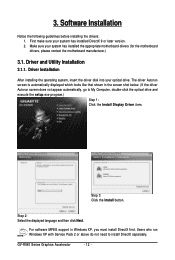
...My Computer, double-click the optical drive and execute the setup.exe program.)
Step 1: Click the Install Display Driver item.
Step 3: Click the Install button.
Step 2: Select the displayed language and then click Next.
For software MPEG support in Windows XP, you must install DirectX first. Users who run Windows XP with Service Pack 2 or above do not need to install DirectX separately.
GV-R545...
Manual - Page 13
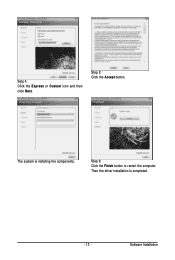
Setp 4: Click the Express or Custom icon and then click Next.
Step 5: Click the Accept button.
The system is installing the components.
Step 6: Click the Finish button to restart the computer. Then the driver installation is completed.
- 13 -
Software Installation
Manual - Page 14
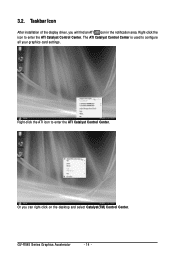
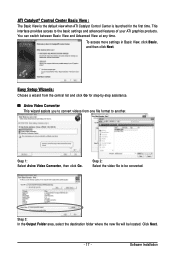
3.2. Taskbar Icon
After installation of the display driver, you will find an ATI icon in the notification area. Right-click the icon to enter the ATI Catalyst Control Center. The ATI Catalyst Control Center is used to configure all your graphics card settings.
Right-click the ATI icon to enter the ATI Catalyst Control Center.
Or you can right...
Manual - Page 15
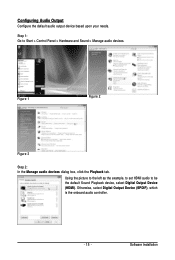
... and Sound > Manage audio devices.
Figure 1
Figure 2
Figure 3
Step 2: In the Manage audio devices dialog box, click the Playback tab.
Using the picture to the left as the example, to set HDMI audio to be the default Sound Playback device, select Digital Output Device (HDMI). Otherwise, select Digital Output Device (SPDIF), which is the onboard audio controller.
- 15 -
Software Installation
Manual - Page 16
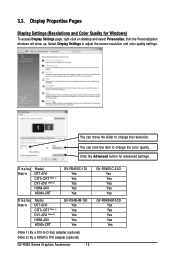
...settings.
Display Matrix
Model CRT+DVI CRT+CRT (Note 1) DVI +DVI (Note 2) HDMI+DVI HDMI+CRT
GV-R545SC-1GI Yes Yes Yes Yes Yes
GV-R545OC-512I Yes Yes Yes Yes Yes
Display Matrix
Model CRT+DVI CRT+CRT (Note 1) DVI +DVI (Note 2) HDMI+DVI HDMI+CRT
GV-R545HM-1GI Yes Yes Yes Yes Yes
GV-R545HM-512I Yes Yes Yes Yes Yes
(Note 1) By a DVI-to-D-Sub adapter.(optional) (Note 2) By a HDMI to DVI adapter...
Manual - Page 17
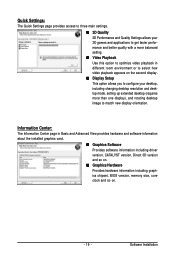
...Control Center is launched for the first time. This interface provides access to the basic settings and advanced features of your ATI graphics products. You can switch between Basic View and Advanced View at any time.
To access more settings in Basic View, click Basic, and then click Next.
Easy Setup... destination folder where the new file will be located. Click Next.
- 17 -
Software Installation
Manual - Page 19
... desktop resolution and desktop mode, setting up extended desktop (requires more than one display), and rotating desktop image to match new display orientation.
Information Center:
The Information Center page in Basic and Advanced View provides hardware and software information about the installed graphics card.
„ Graphics Software Provides software information including driver version...
Manual - Page 21
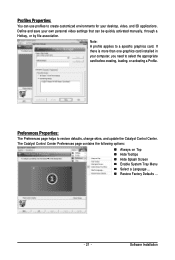
... environments for your desktop, video, and 3D applications. Define and save your own personal video settings that can be quickly activated manually, through a Hotkey, or by file association.
Note: A profile applies to a specific graphics card. If there is more than one graphics card installed in your computer, you need to select the appropriate card before creating, loading, or activating...
Manual - Page 23
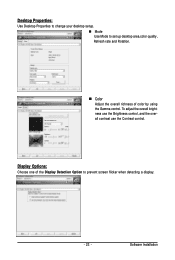
... to set up desktop area,color quality, Refresh rate and Rotation.
„ Color Adjust the overall richness of color by using the Gamma control. To adjust the overall brightness use the Brightness control, and the overall contrast use the Contrast control.
Display Options:
Choose one of the Display Detection Option to prevent screen flicker when detecting a display.
- 23 -
Software Installation
Manual - Page 25
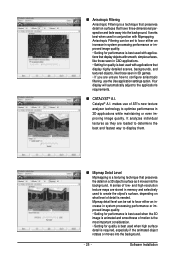
...or even improving image quality. It analyzes individual
textures as they are loaded to determine the
best and fastest way to display them.
„ Mipmap Detail Level
Mipmapping is a texturing technique that... and high-resolution texture maps are stored in memory and selectively used to create the object's surface, depending on what level of detail is needed. Mipmap detail level can be set to favor ...
Manual - Page 27
... support.
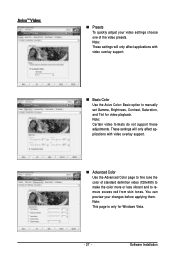
„ Advanced Color Use the Advanced Color page to fine tune the color of standard definition video (720x480) to make the color more or less vibrant and to remove excess red from skin tones. You can preview your changes before applying them. Note: This page is only for Windows Vista.
- 27 -
Software Installation
Manual - Page 29
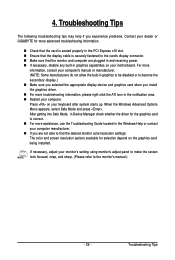
...receiving power. „ If necessary, disable any built-in graphics capabilities on your motherboard. For more
information, consult your computer's manual or manufacturer. (NOTE: Some manufacturers do not allow the built-in graphics to be disabled or to become the secondary display.) „ Make sure you selected the appropriate display device and graphics card when you install the graphics driver...