Gigabyte R120-T31 driver and firmware

Related Gigabyte R120-T31 Manual Pages
Download the free PDF manual for Gigabyte R120-T31 and other Gigabyte manuals at ManualOwl.com
Manual - Page 1
... TECHNOLOGY CO., LTD.
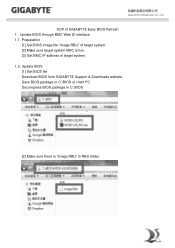
SOP of GIGABYTE Easy BIOS Refresh 1. Update BIOS through BMC Web UI interface 1.1. Preparation
[1] Get BIOS image file "image.RBU" of target system. [2] Make sure target system BMC is live. [3] Get BMC IP address of target system. 1.2. Update BIOS [1] Get BIOS file Download BIOS from GIGABYTE Support & Downloads website. Save BIOS package in C:\BIOS of client PC. Decompress...
Manual - Page 2
GIGA -BYTE TECHNOLOGY CO., LTD.
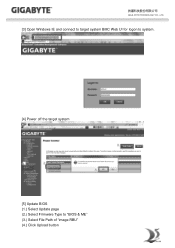
[3] Open Windows IE and connect to target system BMC Web UI for logon to system.
[4] Power off the target system
[5] Update BIOS (1.) Select Update page (2.) Select Firmware Type to "BIOS & ME" (3.) Select File Path of "image.RBU" (4.) Click Upload button
Manual - Page 3
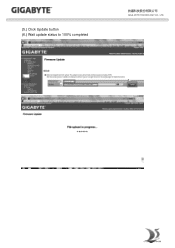
(5.) Click Update button (6.) Wait update status to 100% completed
GIGA -BYTE TECHNOLOGY CO., LTD.
Manual - Page 6
... CO., LTD.
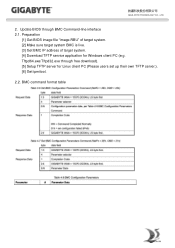
2. Update BIOS through BMC Command-line interface 2.1. Preparation
[1] Get BIOS image file "image.RBU" of target system. [2] Make sure target system BMC is live. [3] Get BMC IP address of target system. [4] Download TFTP service application for Windows client PC (e.g. Tftpd64.exe/Tftpd32.exe through free download). [5] Setup TFTP server for Linux client PC (Please users set up their...
Manual - Page 8
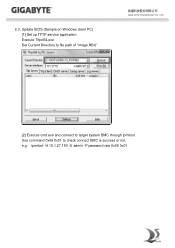
2.3. Update BIOS (Sample on Windows client PC) [1] Set up TFTP service application Execute Tftpd64.exe Set Current Directory to file path of "image.RBU"
GIGA -BYTE TECHNOLOGY CO., LTD.
[2] Execute cmd.exe and connect to target system BMC through ipmitool. Use command 0x06 0x01 to check connect BMC is success or not. e.g. ipmitool -H 10.1.27.150 -U admin -P password raw 0x06 0x01
Manual - Page 10
... CO., LTD.
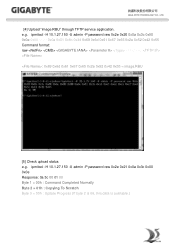
[4] Upload "image.RBU" through TFTP service application. e.g. ipmitool -H 10.1.27.150 -U admin -P password raw 0x2e 0x20 0x0a 0x3c 0x00 0x0e 0x00 0x00 0x0a 0x01... -H 10.1.27.150 -U admin -P password raw 0x2e 0x21 0x0a 0x3c 0x00 0x0e Response: 0a 3c 00 01 00 Byte 1 = 00h : Command Completed Normally Byte 2 = 01h : Copying To Scratch Byte 3 = 00h : Update Progress (If byte 2 is 06, this...
Manual - Page 11
GIGA -BYTE TECHNOLOGY CO., LTD.
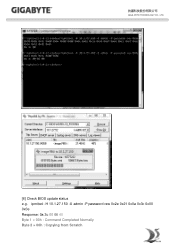
[6] Check BIOS update status e.g. ipmitool -H 10.1.27.150 -U admin -P password raw 0x2e 0x21 0x0a 0x3c 0x00 0x0e Response: 0a 3c 00 06 40 Byte 1 = 00h : Command Completed Normally Byte 2 = 06h : Copying from Scratch
Manual - Page 12
GIGA -BYTE TECHNOLOGY CO., LTD.
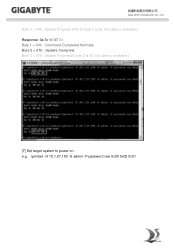
Byte 3 = 40h : Update Progress 64% (If byte 2 is 06, this data is available.) Response: 0a 3c 00 07 00 Byte 1 = 00h : Command Completed Normally Byte 2 = 07h : Update Complete Byte 3 = 00h : Update Progress(If byte 2 is 06, this data is available.)
[7] Set target system to power on. e.g. ipmitool -H 10.1.27.150 -U admin -P password raw 0x00 0x02 0x01
Manual - Page 2

... Management Console Overview 8 Enter Gigabyte Management Console 9 Properties ...9 Configuration ...10
Network ...10 Network Security ...11 Security ...12
Users ...13 Services ...14 IPMI ...15 Time Setting ...17 Language ...18 Sessions ...19 LDAP ...20 Updates ...21 Utilities ...22 Server Information ...23 LEDs ...23 Sensor Monitor...24 Power Control ...25 Power Consumption ...26 System Event...
Manual - Page 6

... configuration requirements:
Supported Browsers: Internet Explorer 8~12 Google chrome Version 29.0.1547.66m Firefox 2.0
JAVA Recommended Version 8 Update 25 or later version (file size: ~ 623KB)
Install Java Tool
Please follow the instruction to install Java in Windows operating system. 1. Go to http://www.java.com 2. Click Download on the middle of the...
Manual - Page 8

Using the Web UI
The BMC firmware features an embedded web server, enabling users to connect to the BMC using an Internet browser (Microsoft® Internet Explorer™). The web server shall support 4 concurrent connections Web-based GUI is supported on the following browsers: Microsoft Windows: • Internet Explorer 8 ~ 12 • Mozilla® Firefox® 2.0 or later Linux...
Manual - Page 12

Network Security
You can configure the network security settings on this screen. Check the IP Blocking Enabled box and input the desire value of IP Blocking Fail Count, IP Blocking Fail Window, and IP Blocking Penalty Time. After you finish the configuration, click Apply Change to save the settings.
11
Manual - Page 21

LDAP
LDAP screen allows download user list of LDAP server then create Gigabyte Management Console user account from this list directly. Check the box below to enable LDAP authentication and enter the required information to access the LDAP server. Click Apply Changes to save your changes.
20
Manual - Page 22

Updates
The firmware can be updated remotely. To update firmware, follow the instruction below: 1. Select Update Type. 2. Select the file on your local system by using Browse. Click Upload to update to the new version of firmware.
21
Manual - Page 23
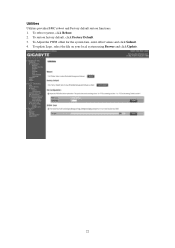
Utilities
Utilities provides BMC reboot and Factory default restore functions. 1. To reboot system, click Reboot. 2. To restore factory default, click Factory Default. 3. To Adjust the PWM offset for the system fans, enter offset values and click Submit. 4. To update Logo, select the file on your local system using Browse and click Update.
22
Manual - Page 25
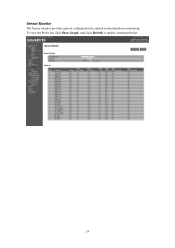
Sensor Monitor
The Sensor monitor provides general configuration for related system hardware monitoring. To view the Probe list, click Show Graph. And click Refresh to update current probe list.
24
Manual - Page 7
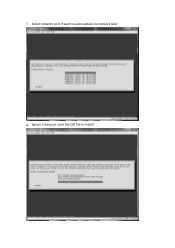
f. Select network port if want to auto update via network later g. Ignore it because used the ISO file to install
Manual - Page 10

4. Install OS with software RAID, please select Manual a. Select a HDD for boot device
Manual - Page 22

t. Select which software need to install
Manual - Page 7
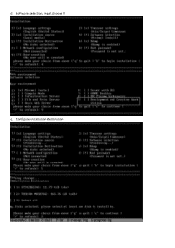
d. Software selection, must choose 9 e. Configure installation destination