MSI H61M driver and firmware


Related MSI H61M Manual Pages
Download the free PDF manual for MSI H61M and other MSI manuals at ManualOwl.com
User Guide - Page 2
... contents. Our products are under continual improvement and we reserve the right to make changes without notice.
Trademarks
All trademarks in this manual are properties of their respective owners.
■ MSI® is registered trademark of Micro-Star Int'l Co.,Ltd. ■ NVIDIA® is registered trademark of NVIDIA Corporation. ■ ATI...
User Guide - Page 3
... with your system and no solution can be obtained from the user's manual, please contact your place of purchase or local distributor. Alternatively, please try the following help resources for further guidance.
Visit the MSI website for technical guide, BIOS updates, driver updates, and other information: http://www.msi.com/service/download
Contact our technical staff at: http://support.msi.com
User Guide - Page 4
... with the limits for a class B digital device, pursuant to part 15 of the FCC rules. These limits are designed to provide reasonable protection against harmful interference in a residential installation. This equipment generates, uses and can radiate radio frequency energy and, if not installed and used in accordance with the instruction manual, may cause harmful interference to...
User Guide - Page 14
...
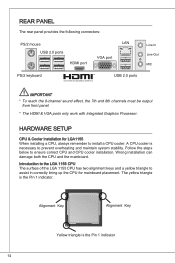
LAN
USB 2.0 ports HDMI port
VGA port
PS/2 keyboard
USB 2.0 ports
Line-In Line-Out MIC
Important * To reach the 8-channel sound effect, the 7th and 8th channels must be output
from front panel.
* The HDMI & VGA ports only work with Integrated Graphics Processor.
HARDWARE SETUP
CPU & Cooler Installation for LGA1155 When installing a CPU, always remember to install a CPU cooler. A CPU cooler...
User Guide - Page 15
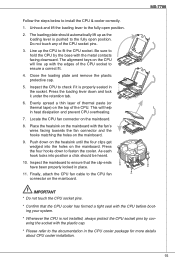
... properly locked in place.
. Finally, attach the CPU fan cable to the CPU fan connector on the mainboard.
Important * Do not touch the CPU socket pins.
* Confirm that the CPU cooler has formed a tight seal with the CPU before booting your system.
* Whenever the CPU is not installed, always protect the CPU socket pins by covering the socket with...
User Guide - Page 16
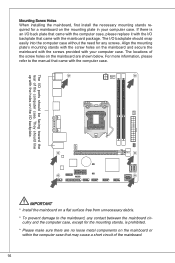
... the mainboard and secure the mainboard with the screws provided with your computer case. The locations of the screw holes on the mainboard are shown below. For more information, please refer to the manual that came with the computer case.
Important * Install the mainboard on a flat surface free from unnecessary debris. * To prevent damage...
User Guide - Page 17
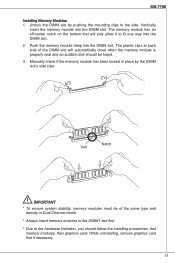
... memory module is properly seat and an audible click should be heard. 3. Manually check if the memory module...memory modules must be of the same type and
density in Dual-Channel mode. * Always insert memory modules in the DIMM1 slot first. * Due to the hardware limitation, you should follow the installing procedures: first
memory modules, then graphics card. While uninstalling, remove graphics card...
User Guide - Page 23
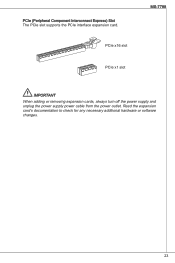
... Component Interconnect Express) Slot The PCIe slot supports the PCIe interface expansion card.
PCIe x16 slot
PCIe x1 slot
MS-7788
Important
When adding or removing expansion cards, always turn off the power supply and unplug the power supply power cable from the power outlet. Read the expansion card's documentation to check for any necessary additional hardware or software changes.
23
User Guide - Page 24
BIOS Setup
Power on the computer and the system will start POST (Power On Self Test) process. When the message below appears on the screen, press key to enter Setup.
Press DEL to enter Setup Menu If the message disappears before you respond and you still wish to enter Setup, restart the system by turning it OFF and On...
User Guide - Page 26
EIST The Enhanced Intel SpeedStep technology allows you to set the performance level of the microprocessor whether the computer is running on battery or AC power. This field will appear after you installed the CPU which supports speedstep technology.
Intel Turbo Boost This item will appear when you install a CPU with Intel Turbo Boost technology. This item is used...
User Guide - Page 27
...
tRP This setting controls the number of cycles for Row Address Strobe (RAS) to be allowed to precharge. If insufficient time is allowed for the RAS to accumulate its charge before DRAM refresh, refreshing may be incomplete and DRAM may fail to retain data. This item applies only when synchronous DRAM is installed in...
User Guide - Page 30
... and exit setup. Save Changes and Reboot Use this item to save changes and reset the system. Save Changes Use this item to save changes. Discard Changes Use this item to abandon all changes. Restore Defaults Use this item to load the optimized default values set by the BIOS vendor. == Boot Override == The installed storage devices will...
User Guide - Page 47
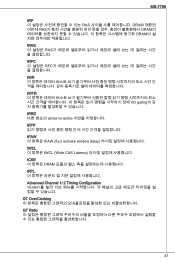
MS-7788
tRP RAS DRAM RAS DRAM DRAM
tRAS RAS
tRFC RFC
tWR
tWTR I/O gating
tRRD active-to-active
tRTP
tFAW tFAW (four activate window delay
tWCL tWCL (Write CAS Latency
tCKE DRAM
tRTL
Advanced Channel 1/ 2 Timing Configuration
User Guide - Page 127
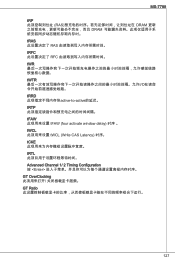
MS-7788
tRP RAS DRAM DRAM tRAS RAS tRFC RFC tWR tWTR I/O tRRD active-to-active tRTP tFAW tFAW (four activate window delay tWCL tWCL (Write CAS Latency) 时序。 tCKE tRTL Advanced Channel 1/ 2 Timing Configuration 按
User Guide - Page 147
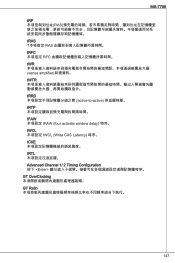
MS-7788
tRP RAS tRAS T RAS tRFC RFC tWR sense amplifier tWTR tRRD active-to-active tRTP tFAW tFAW (four activate window delay) 時序。 tWCL tWCL (Write CAS Latency) 時序。 tCKE tRTL Advanced Channel 1/ 2 Timing Configuration 按下
User Guide - Page 171
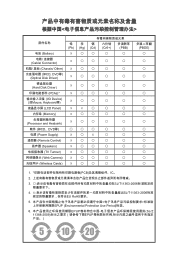
...28304; (Power Supply)
☓
〇
☓
〇
〇
遥控器 (Remote Control)
☓
〇
〇
〇
〇
扬声器 (Speakers)
☓
〇
〇
〇
〇
TV Tunner)
☓
〇
〇
〇
〇
Web Camera) ☓
〇
〇
〇
〇
Wireless Cards) ☓...