MSI Midas driver and firmware

Related MSI Midas Manual Pages
Download the free PDF manual for MSI Midas and other MSI manuals at ManualOwl.com
User Guide - Page 2

... for a class B digital device, pursuant to part 15 of the FCC rules. These limits are designed to provide reasonable protection against harmful interference when the equipment is operated in a commercial environment. This equipment generates, uses and can radiate radio frequency energy and, if not installed and used in accordance with the instruction manual, may cause...
User Guide - Page 3
...® and Athlon® and Duron® are registered trademarks of AMD Corporation. PS/2 and OS®/2 are registered trademarks of International Business Machines Corporation. Windows® 95/98/2000/NT/XP are registered trademarks of Microsoft Corporation. Netware® is a registered trademark of Novell, Inc. Award® is a registered trademark...
User Guide - Page 5

...2-3 2.3 Memory 2-3 Memory Speed/CPU FSB Support Matrix 2-3 DDRPopulation Rules 2-4 DDR Module Combination 2-4 Installing DDRModules 2-5 2.4 Power Supply 2-6 ATX 20-Pin Power Connector: ATX1 2-6 ATX 12V Power Connector: JPW1 2-6 2.5 Front Panel 2-7 Audio Ports 2-7 USBPorts 2-7 2.6 Rear Panel 2-8 Mouse/Keyboard Connectors 2-8 Audio Ports 2-9 VGA Port 2-9 RJ-45 LAN Jack 2-10 USB Ports...
User Guide - Page 6
... SystemAssembly 3-1 3.1 Overview 3-2 Installation Tools 3-2 Screws 3-2 Checking the Items 3-3 3.2 Installation Procedures 3-4 1. Removing Cover, Drive Cage 3-4 2. Installing HDD 3-5 3. Installing FDD and Optical Drive 3-6 4. Installing Memory Modules 3-8 5. Installing CPU 3-9 6. Installing CPU Cooler 3-10 7. Restoring Chassis Cover 3-11 Chapter 4. BIOS Setup 4-1 EnteringSetup 4-2
vi
User Guide - Page 9

... power management - Integrated USB2.0 controller, 8237 supporting 8 ports
Main Memory † Two 184-pin DDR DIMM slots † Supports maximum memory size up to 2GB for single channel mode
(For the updated supporting memory modules, please visit http://www. msi.com.tw/program/products/mainboard/mbd/pro_mbd_trp_list. php.)
Slots † Three PCI 2.2 32-bit PCI bus slots (support 3.3v/5v PCI bus...
User Guide - Page 16

2 Introducing Mainboard This chapter tells you basics of the CPU, memory modules, and expansion cards, as well as how to setup the jumpers on the mainboard. Also, it provides the instructions on connecting the peripheal devices, such as the mouse, keyboard, etc.
While doing the installation, be careful in holding the components and follow the installation procedures.
User Guide - Page 18

... DDR SDRAM DIMM (Double In-Line Memory Module) and supports the memory size up to 2 GB.
You can install PC2700/DDR333 or PC2100/DDR266 modules into the DDR DIMM slots. (For the updated supporting memory modules, please visit http://www.msi.com.tw/program/products/mainboard/mbd/ pro_mbd_trp_list.php.)
Memory Speed/CPU FSB Support Matrix
Memory FSB
FSB200 FSB266 FSB333
DDR266
OK...
User Guide - Page 19

... DIMM module on the slots. Each DIMM slot
supports up to a maximum size of 1GB. Users can install either single- or double-sided modules to meet their own needs.
DDR Module Combination Install at least one DIMM module into the slots. Memory mod-
ules can be installed into the slots in any order. You can...
User Guide - Page 20
Introducing Mainboard
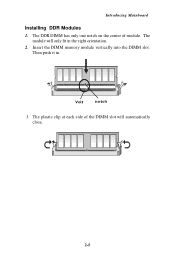
Installing DDR Modules 1. The DDR DIMM has only one notch on the center of module. The
module will only fit in the right orientation. 2. Insert the DIMM memory module vertically into the DIMM slot.
Then push it in.
Volt
notch
3. The plastic clip at each side of the DIMM slot will automatically close.
2-5
User Guide - Page 35

... any necessary hardware or software settings for the expansion card, such as jumpers, switches or BIOS configuration.
PCI Slots
PCI Interrupt Request Routing The IRQ, abbreviation of interrupt request line and pronounced I-R-Q, are hardware lines over which devices can send interrupt signals to the microprocessor. The PCI IRQ pins are typically connected to the PCI bus INT A# ~ INT D# pins as...
User Guide - Page 36

System Assembly
3 System Assembly
This chapter provides you with the installation procedures of Midas barebone. It is useful for you to read the information of mainboard setup before assembling the whole system.
3-1
User Guide - Page 37
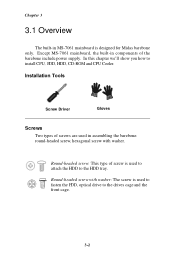
...mainboard is designed for Midas barebone only. Except MS-7061 mainboard, the built-in components of the barebone include power supply. In this chapter we'll show you how to install CPU, FDD, HDD, CD-ROM and CPU Cooler.
Installation Tools
Screw Driver
Gloves
Screws
Two ....
Round-headed screw with washer: The screw is used to fasten the FDD, optical drive to the drives cage and the front cage.
3-2
User Guide - Page 39
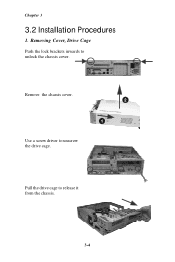
Chapter 3
3.2 Installation Procedures
1. Removing Cover, Drive Cage Push the lock brackets inwards to unlock the chassis cover.
Remove the chassis cover.
Use a screw driver to unscrew the drive cage.
Pull the drive cage to release it from the chassis.
3-4
User Guide - Page 40

2. Installing HDD Press the HDD lever to the left to release the HDD cage.
Pull the HDD tray forwards to remove it from the drive cage.
Put the HDD in the HDD tray and use 4 screws to fix it on both sides.
Put the HDD tray back to secure it on the drive cage.
System Assembly
3-5
User Guide - Page 41

Chapter 3
3. Installing FDD and Optical Drive Press the FDD tray lever to release the FDD lock and push the FDD inwards to fix it.
Use 2 screws to secure the FDD in the FDD tray.
Insert the optical drive into the drive cage.
Use 2 screws to secure the optical drive in the tray.
3-6
User Guide - Page 43

Chapter 3
4. Installing Memory Modules Locate the DIMM slots.
Insert the DIMM vertically into the slot. Note: The DIMM has only one notch on the center of module. It will only fit in the right direction.
3-8
User Guide - Page 44

5. Installing CPU
Locate the CPU socket. Pull the lever away from the socket and raise it up to 90-degree angle.
System Assembly
Put the CPU onto the socket. Note: Make sure the pins are completely embedded into the socket. The CPU can only fit in the correct direction.
Close the lever to complete the installaton.
3-9
User Guide - Page 45

Chapter 3
6. Installing CPU Cooler Place the CPU cooler onto the CPU socket. Be sure to align the notch to the CPU socket.
Close the inside lever with a tack screwdriver or hands.
Press the outside lever to secure the CPU cooler.
Connect the power cord of the CPU cooler.
3-10
User Guide - Page 48

...Select First Boot Device
FloppInycrease the num: 1esritcFvlaolpupeyor make changes
IDE-D0 ecrease the nu:mIeBrMic-DvaTluLeAo-r30m7a0k3e8 changes CDROLoMad Fail-Safe D:eAfaTuAltsPI CD-ROM DRIVE 40X M
[Up...the highlighted setup function is displayed at the bottom of the screen.
MSI Reminds You...
The items under each BIOS category described in this chapter are under continuous update for better ...
User Guide - Page 59

... ROM of the Onboard LAN Chip. Settings: [Enabled], [Disabled]. OnChip USB Controller Select [All Enabled] if your system contains a Universal Serial Bus (USB) controller and you have USB peripherals. Settings: [All Enabled], [Disabled].
OnChip USB 2.0 Controller Set to [Enabled] if you need to use any USB 2.0 device in the operating system that does not support or have any USB 2.0 driver installed...