MSI ProBox23 driver and firmware

Related MSI ProBox23 Manual Pages
Download the free PDF manual for MSI ProBox23 and other MSI manuals at ManualOwl.com
User Guide - Page 2
Getting Started
How to Use this Service Manual
This Service Manual is targeted for MSI-authorized dealer or service center. It provides in-depth illustration of assembling the system. Each topic may be related with each other; hence you are highly recommended to read this guide from cover to cover first.
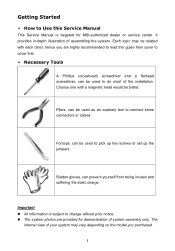
Necessary Tools
A Phillips (crosshead) screwdriver...
User Guide - Page 3

... adapter before performing any installation procedures on
the system. Do not perform any maintenance with wet hands. Prevent foreign substances, such as water, other liquids or chemicals, from
entering the system while performing installation procedures on the system. Use a grounded wrist strap before handling system components such as CPU,
Memory, HDD, mini PCI-E card...
User Guide - Page 4
System Assembly
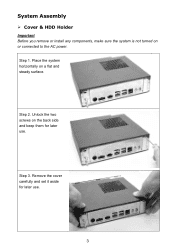
Cover & HDD Holder
Important Before you remove or install any components, make sure the system is not turned on or connected to the AC power. Step 1. Place the system horizontally on a flat and steady surface.
Step 2. Unlock the two screws on the back side and keep them for later use.
Step 3. Remove the cover carefully and set it aside for later use.
3
User Guide - Page 5
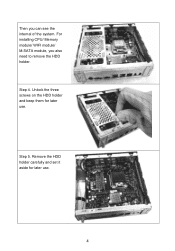
Then you can see the internal of the system. For installing CPU/ Memory module/ WIFI module/ M-SATA module, you also need to remove the HDD holder.
Step 4. Unlock the three screws on the HDD holder and keep them for later use.
Step 5. Remove the HDD holder carefully and set it aside for later use.
4
User Guide - Page 6
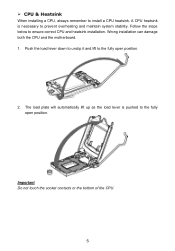
...; CPU & Heatsink
When installing a CPU, always remember to install a CPU heatsink. A CPU heatsink is necessary to prevent overheating and maintain system stability. Follow the steps below to ensure correct CPU and heatsink installation. Wrong installation can damage both the CPU and the motherboard. 1. Push the load lever down to unclip it and lift to the fully open position.
2. The load plate...
User Guide - Page 9
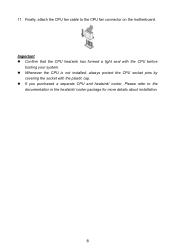
..., attach the CPU fan cable to the CPU fan connector on the motherboard.
Important Confirm that the CPU heatsink has formed a tight seal with the CPU before
booting your system. Whenever the CPU is not installed, always protect the CPU socket pins by
covering the socket with the plastic cap. If you purchased a separate CPU and heatsink...
User Guide - Page 10
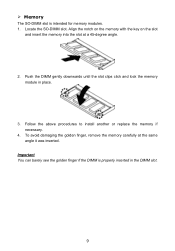
... angle.
2. Push the DIMM gently downwards until the slot clips click and lock the memory module in place.
3. Follow the above procedures to install another or replace the memory if necessary.
4. To avoid damaging the golden finger, remove the memory carefully at the same angle it was inserted.
Important You can barely see the...
User Guide - Page 13
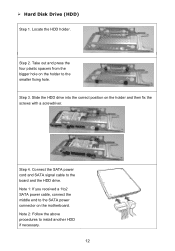
... the HDD drive into the correct position on the holder and then fix the screws with a screwdriver.
Step 4. Connect the SATA power cord and SATA signal cable to the board and the HDD drive. Note 1: If you received a 1to2 SATA power cable, connect the middle end to the SATA power connector on the motherboard. Note 2: Follow the above procedures to install another HDD if...